(function() {
document.addEventListener('DOMContentLoaded', function() {
var componentMetadata = JSON.parse('\x7b\x22componentName\x22\x3a\x22ActionToolbar_c91d3ca3-260f-49e5-a185-3914efed63d4\x22,\x22deferOptions\x22\x3a\x7b\x22deferComponent\x22\x3afalse,\x22deferType\x22\x3a\x22None\x22,\x22deferId\x22\x3a\x22re1e0e65d3e4f4c49a7a28e50c48e7562\x22,\x22deferredContainerId\x22\x3a\x22\x2fmain\x2fdockingActionToolbar\x22,\x22deferredContainerView\x22\x3anull\x7d,\x22viewName\x22\x3a\x22ActionToolbar\x22\x7d');
var configuration = {"contentId":"9c833f69-648d-4327-bb5b-f887789085ba","toolbarSettings":{"id":"c91d3ca3-260f-49e5-a185-3914efed63d4","registrationUrl":"/GMI/CoreSites/TBSP/Home/register/reg-fp","regAction":"FAVORITE","eSourceCode":11275,"namePassedToEvents":"RDPToolbarSTICKY","buttons":[{"addFavoriteErrorMessage":"Sorry, something went wrong. Please save again.","removeFavoriteErrorMessage":"Error occurred while removing from favorites","registrationUrl":"/GMI/CoreSites/TBSP/Home/register/reg-fp","regAction":"FAVORITE","eSourceCode":11275,"isCurrentUserAnonymous":false,"isFavoriteItem":false,"id":"718b4e01-b2be-40cf-8f0c-bca3b01db0ed","allowedForAnonymousUsers":false,"type":"Favorite","displayName":"Save","namePassedToEvents":"Favorite","cssClassName":"atButtonFavorite","privacyOptOutMessage":"\u003cdiv class=\u0027privacyMessage\u0027\u003e\n\u003ch3\u003eThis feature is not available with your current cookie settings.\u003c/h3\u003e\n\u003cp\u003eYou can \u003ca href=\u0027#\u0027 data-show-preference-center=\u00271\u0027\u003eupdate your privacy settings\u003c/a\u003e to enable this content. Please enable “Functional Cookies” to use this feature.\u003c/p\u003e\n\u003c/div\u003e","showPrivacyOptOutMessage":false},{"nestedButtons":[{"layoutParameter":"p%3d1","id":"219a704d-bb63-40af-8f0d-f8389062f7e9","allowedForAnonymousUsers":true,"type":"Print","displayName":"Print Recipe","namePassedToEvents":"Print","cssClassName":"atButtonPrint","privacyOptOutMessage":"\u003cdiv class=\u0027privacyMessage\u0027\u003e\n\u003ch3\u003eThis feature is not available with your current cookie settings.\u003c/h3\u003e\n\u003cp\u003eYou can \u003ca href=\u0027#\u0027 data-show-preference-center=\u00271\u0027\u003eupdate your privacy settings\u003c/a\u003e to enable this content. Please enable “Functional Cookies” to use this feature.\u003c/p\u003e\n\u003c/div\u003e","showPrivacyOptOutMessage":false},{"providerName":"pinterest","providerNamePassedToEvents":"Pinterest","shareUrlFormat":"//pinterest.com/pin/create/link/?url={0}","id":"585d4198-c691-4eae-bb63-66cc1927e44a","allowedForAnonymousUsers":true,"type":"Social","displayName":"Save To Pinterest","namePassedToEvents":"Pinterest","cssClassName":"atButtonPinterest","privacyOptOutMessage":"\u003cdiv class=\u0027privacyMessage\u0027\u003e\n\u003ch3\u003eThis feature is not available with your current cookie settings.\u003c/h3\u003e\n\u003cp\u003eYou can \u003ca href=\u0027#\u0027 data-show-preference-center=\u00271\u0027\u003eupdate your privacy settings\u003c/a\u003e to enable this content. Please enable “Functional Cookies” to use this feature.\u003c/p\u003e\n\u003c/div\u003e","showPrivacyOptOutMessage":false},{"templateId":"95752b5c-7e75-4367-bca7-fdd3abb0ebcb","dialogHeading":"Email Recipe","emailCode":"TBSP_ContentEmail","dialogSettings":{"cancelButtonText":"Cancel","copyToSenderLabel":"Send a Copy to Myself","emailAddressesLabel":"* Email Address(es)","emailInstructionText":"Separate email addresses with commas","fromText":"From:","privacyPolicyText":"\u003cp\u003e\u0026copy;2024 General Mills, Inc. All Rights Reserved. This information will only be used to send an email to your friend(s) and will not be saved. Please read our \u003ca rel=\u0022noopener noreferrer\u0022 rel=\u0022noopener noreferrer\u0022 href=\u0022http://www.generalmills.com/company/privacy-policies/privacy-policy-us\u0022 target=\u0022_blank\u0022 shape=\u0022rect\u0022\u003ePrivacy Policy\u003c/a\u003e.\u003c/p\u003e","requiredFieldText":"* Required","sendButtonText":"Send","senderEmailAddressLabel":"* Your Email Address","senderFirstNameLabel":"* Your First Name","sendToText":"Send To:"},"id":"fad236f8-3084-4a50-bc7d-283bc5511677","allowedForAnonymousUsers":true,"type":"Email","displayName":"Share via Email","namePassedToEvents":"Email","cssClassName":"atButtonEmail","privacyOptOutMessage":"\u003cdiv class=\u0027privacyMessage\u0027\u003e\n\u003ch3\u003eThis feature is not available with your current cookie settings.\u003c/h3\u003e\n\u003cp\u003eYou can \u003ca href=\u0027#\u0027 data-show-preference-center=\u00271\u0027\u003eupdate your privacy settings\u003c/a\u003e to enable this content. Please enable “Functional Cookies” to use this feature.\u003c/p\u003e\n\u003c/div\u003e","showPrivacyOptOutMessage":false},{"providerName":"facebook","providerNamePassedToEvents":"Facebook","shareUrlFormat":"//facebook.com/sharer/sharer.php?u={0}","id":"fc7a5260-abb4-42be-958a-d172ba87442b","allowedForAnonymousUsers":true,"type":"Social","displayName":"Share on Facebook","namePassedToEvents":"Facebook","cssClassName":"atButtonFacebook","privacyOptOutMessage":"\u003cdiv class=\u0027privacyMessage\u0027\u003e\n\u003ch3\u003eThis feature is not available with your current cookie settings.\u003c/h3\u003e\n\u003cp\u003eYou can \u003ca href=\u0027#\u0027 data-show-preference-center=\u00271\u0027\u003eupdate your privacy settings\u003c/a\u003e to enable this content. Please enable “Functional Cookies” to use this feature.\u003c/p\u003e\n\u003c/div\u003e","showPrivacyOptOutMessage":false},{"successMessage":"Copied.","errorMessage":"Press Ctrl+C and Enter to copy to clipboard","successMessageDuration":3000,"errorMessageDuration":10000,"id":"263303a9-5fe6-480d-910a-608f153d379a","allowedForAnonymousUsers":true,"type":"CopyLink","displayName":"Copy Link","namePassedToEvents":"Copy","cssClassName":"atButtonCopyLink","privacyOptOutMessage":"\u003cdiv class=\u0027privacyMessage\u0027\u003e\n\u003ch3\u003eThis feature is not available with your current cookie settings.\u003c/h3\u003e\n\u003cp\u003eYou can \u003ca href=\u0027#\u0027 data-show-preference-center=\u00271\u0027\u003eupdate your privacy settings\u003c/a\u003e to enable this content. Please enable “Functional Cookies” to use this feature.\u003c/p\u003e\n\u003c/div\u003e","showPrivacyOptOutMessage":false}],"id":"46a2d62f-b80c-49bf-969f-5d28640dc94a","allowedForAnonymousUsers":true,"type":"Reveal","displayName":"Share","namePassedToEvents":"Share","cssClassName":"atButtonReveal","privacyOptOutMessage":"\u003cdiv class=\u0027privacyMessage\u0027\u003e\n\u003ch3\u003eThis feature is not available with your current cookie settings.\u003c/h3\u003e\n\u003cp\u003eYou can \u003ca href=\u0027#\u0027 data-show-preference-center=\u00271\u0027\u003eupdate your privacy settings\u003c/a\u003e to enable this content. Please enable “Functional Cookies” to use this feature.\u003c/p\u003e\n\u003c/div\u003e","showPrivacyOptOutMessage":false},{"errorMessage":"","id":"0a1bab6c-f930-4359-b8b4-a72470a4d8ee","allowedForAnonymousUsers":true,"type":"WakeLock","displayName":"Keep Screen On","namePassedToEvents":"Wakelock","cssClassName":"","privacyOptOutMessage":"\u003cdiv class=\u0027privacyMessage\u0027\u003e\n\u003ch3\u003eThis feature is not available with your current cookie settings.\u003c/h3\u003e\n\u003cp\u003eYou can \u003ca href=\u0027#\u0027 data-show-preference-center=\u00271\u0027\u003eupdate your privacy settings\u003c/a\u003e to enable this content. Please enable “Functional Cookies” to use this feature.\u003c/p\u003e\n\u003c/div\u003e","showPrivacyOptOutMessage":false}],"isSticky":true},"userSettings":{"isCurrentUserAnonymous":true,"isFavoriteItem":false},"pageAttributes":{"url":"https%3a%2f%2fwww.tablespoon.com%2frecipes%2famazing-apple-cake%2f9c833f69-648d-4327-bb5b-f887789085ba","contentId":"9c833f69-648d-4327-bb5b-f887789085ba"},"recaptchaPublicKey":"6LfW_icUAAAAAL_CG700pddUxLNYIxgRJe3vOg2Z"};
var moduleName = 'actionToolbar';
var isVueModule = true;
GeneralMills.PandoSites.RegisterControlInstance(moduleName, configuration, componentMetadata, isVueModule)
});
})();
(function() {
document.addEventListener('DOMContentLoaded', function() {
var componentMetadata = JSON.parse('\x7b\x22componentName\x22\x3a\x22ActionToolbar_c91d3ca3-260f-49e5-a185-3914efed63d4\x22,\x22deferOptions\x22\x3a\x7b\x22deferComponent\x22\x3afalse,\x22deferType\x22\x3a\x22None\x22,\x22deferId\x22\x3a\x22rc41e418574cf44bda04654e401a9f657\x22,\x22deferredContainerId\x22\x3a\x22\x2fmain\x2fdockingActionToolbarMobile\x22,\x22deferredContainerView\x22\x3anull\x7d,\x22viewName\x22\x3a\x22ActionToolbar\x22\x7d');
var configuration = {"contentId":"9c833f69-648d-4327-bb5b-f887789085ba","toolbarSettings":{"id":"c91d3ca3-260f-49e5-a185-3914efed63d4","registrationUrl":"/GMI/CoreSites/TBSP/Home/register/reg-fp","regAction":"FAVORITE","eSourceCode":11275,"namePassedToEvents":"RDPToolbarSTICKY","buttons":[{"addFavoriteErrorMessage":"Sorry, something went wrong. Please save again.","removeFavoriteErrorMessage":"Error occurred while removing from favorites","registrationUrl":"/GMI/CoreSites/TBSP/Home/register/reg-fp","regAction":"FAVORITE","eSourceCode":11275,"isCurrentUserAnonymous":false,"isFavoriteItem":false,"id":"718b4e01-b2be-40cf-8f0c-bca3b01db0ed","allowedForAnonymousUsers":false,"type":"Favorite","displayName":"Save","namePassedToEvents":"Favorite","cssClassName":"atButtonFavorite","privacyOptOutMessage":"\u003cdiv class=\u0027privacyMessage\u0027\u003e\n\u003ch3\u003eThis feature is not available with your current cookie settings.\u003c/h3\u003e\n\u003cp\u003eYou can \u003ca href=\u0027#\u0027 data-show-preference-center=\u00271\u0027\u003eupdate your privacy settings\u003c/a\u003e to enable this content. Please enable “Functional Cookies” to use this feature.\u003c/p\u003e\n\u003c/div\u003e","showPrivacyOptOutMessage":false},{"nestedButtons":[{"layoutParameter":"p%3d1","id":"219a704d-bb63-40af-8f0d-f8389062f7e9","allowedForAnonymousUsers":true,"type":"Print","displayName":"Print Recipe","namePassedToEvents":"Print","cssClassName":"atButtonPrint","privacyOptOutMessage":"\u003cdiv class=\u0027privacyMessage\u0027\u003e\n\u003ch3\u003eThis feature is not available with your current cookie settings.\u003c/h3\u003e\n\u003cp\u003eYou can \u003ca href=\u0027#\u0027 data-show-preference-center=\u00271\u0027\u003eupdate your privacy settings\u003c/a\u003e to enable this content. Please enable “Functional Cookies” to use this feature.\u003c/p\u003e\n\u003c/div\u003e","showPrivacyOptOutMessage":false},{"providerName":"pinterest","providerNamePassedToEvents":"Pinterest","shareUrlFormat":"//pinterest.com/pin/create/link/?url={0}","id":"585d4198-c691-4eae-bb63-66cc1927e44a","allowedForAnonymousUsers":true,"type":"Social","displayName":"Save To Pinterest","namePassedToEvents":"Pinterest","cssClassName":"atButtonPinterest","privacyOptOutMessage":"\u003cdiv class=\u0027privacyMessage\u0027\u003e\n\u003ch3\u003eThis feature is not available with your current cookie settings.\u003c/h3\u003e\n\u003cp\u003eYou can \u003ca href=\u0027#\u0027 data-show-preference-center=\u00271\u0027\u003eupdate your privacy settings\u003c/a\u003e to enable this content. Please enable “Functional Cookies” to use this feature.\u003c/p\u003e\n\u003c/div\u003e","showPrivacyOptOutMessage":false},{"templateId":"95752b5c-7e75-4367-bca7-fdd3abb0ebcb","dialogHeading":"Email Recipe","emailCode":"TBSP_ContentEmail","dialogSettings":{"cancelButtonText":"Cancel","copyToSenderLabel":"Send a Copy to Myself","emailAddressesLabel":"* Email Address(es)","emailInstructionText":"Separate email addresses with commas","fromText":"From:","privacyPolicyText":"\u003cp\u003e\u0026copy;2024 General Mills, Inc. All Rights Reserved. This information will only be used to send an email to your friend(s) and will not be saved. Please read our \u003ca rel=\u0022noopener noreferrer\u0022 rel=\u0022noopener noreferrer\u0022 href=\u0022http://www.generalmills.com/company/privacy-policies/privacy-policy-us\u0022 target=\u0022_blank\u0022 shape=\u0022rect\u0022\u003ePrivacy Policy\u003c/a\u003e.\u003c/p\u003e","requiredFieldText":"* Required","sendButtonText":"Send","senderEmailAddressLabel":"* Your Email Address","senderFirstNameLabel":"* Your First Name","sendToText":"Send To:"},"id":"fad236f8-3084-4a50-bc7d-283bc5511677","allowedForAnonymousUsers":true,"type":"Email","displayName":"Share via Email","namePassedToEvents":"Email","cssClassName":"atButtonEmail","privacyOptOutMessage":"\u003cdiv class=\u0027privacyMessage\u0027\u003e\n\u003ch3\u003eThis feature is not available with your current cookie settings.\u003c/h3\u003e\n\u003cp\u003eYou can \u003ca href=\u0027#\u0027 data-show-preference-center=\u00271\u0027\u003eupdate your privacy settings\u003c/a\u003e to enable this content. Please enable “Functional Cookies” to use this feature.\u003c/p\u003e\n\u003c/div\u003e","showPrivacyOptOutMessage":false},{"providerName":"facebook","providerNamePassedToEvents":"Facebook","shareUrlFormat":"//facebook.com/sharer/sharer.php?u={0}","id":"fc7a5260-abb4-42be-958a-d172ba87442b","allowedForAnonymousUsers":true,"type":"Social","displayName":"Share on Facebook","namePassedToEvents":"Facebook","cssClassName":"atButtonFacebook","privacyOptOutMessage":"\u003cdiv class=\u0027privacyMessage\u0027\u003e\n\u003ch3\u003eThis feature is not available with your current cookie settings.\u003c/h3\u003e\n\u003cp\u003eYou can \u003ca href=\u0027#\u0027 data-show-preference-center=\u00271\u0027\u003eupdate your privacy settings\u003c/a\u003e to enable this content. Please enable “Functional Cookies” to use this feature.\u003c/p\u003e\n\u003c/div\u003e","showPrivacyOptOutMessage":false},{"successMessage":"Copied.","errorMessage":"Press Ctrl+C and Enter to copy to clipboard","successMessageDuration":3000,"errorMessageDuration":10000,"id":"263303a9-5fe6-480d-910a-608f153d379a","allowedForAnonymousUsers":true,"type":"CopyLink","displayName":"Copy Link","namePassedToEvents":"Copy","cssClassName":"atButtonCopyLink","privacyOptOutMessage":"\u003cdiv class=\u0027privacyMessage\u0027\u003e\n\u003ch3\u003eThis feature is not available with your current cookie settings.\u003c/h3\u003e\n\u003cp\u003eYou can \u003ca href=\u0027#\u0027 data-show-preference-center=\u00271\u0027\u003eupdate your privacy settings\u003c/a\u003e to enable this content. Please enable “Functional Cookies” to use this feature.\u003c/p\u003e\n\u003c/div\u003e","showPrivacyOptOutMessage":false}],"id":"46a2d62f-b80c-49bf-969f-5d28640dc94a","allowedForAnonymousUsers":true,"type":"Reveal","displayName":"Share","namePassedToEvents":"Share","cssClassName":"atButtonReveal","privacyOptOutMessage":"\u003cdiv class=\u0027privacyMessage\u0027\u003e\n\u003ch3\u003eThis feature is not available with your current cookie settings.\u003c/h3\u003e\n\u003cp\u003eYou can \u003ca href=\u0027#\u0027 data-show-preference-center=\u00271\u0027\u003eupdate your privacy settings\u003c/a\u003e to enable this content. Please enable “Functional Cookies” to use this feature.\u003c/p\u003e\n\u003c/div\u003e","showPrivacyOptOutMessage":false},{"errorMessage":"","id":"0a1bab6c-f930-4359-b8b4-a72470a4d8ee","allowedForAnonymousUsers":true,"type":"WakeLock","displayName":"Keep Screen On","namePassedToEvents":"Wakelock","cssClassName":"","privacyOptOutMessage":"\u003cdiv class=\u0027privacyMessage\u0027\u003e\n\u003ch3\u003eThis feature is not available with your current cookie settings.\u003c/h3\u003e\n\u003cp\u003eYou can \u003ca href=\u0027#\u0027 data-show-preference-center=\u00271\u0027\u003eupdate your privacy settings\u003c/a\u003e to enable this content. Please enable “Functional Cookies” to use this feature.\u003c/p\u003e\n\u003c/div\u003e","showPrivacyOptOutMessage":false}],"isSticky":true},"userSettings":{"isCurrentUserAnonymous":true,"isFavoriteItem":false},"pageAttributes":{"url":"https%3a%2f%2fwww.tablespoon.com%2frecipes%2famazing-apple-cake%2f9c833f69-648d-4327-bb5b-f887789085ba","contentId":"9c833f69-648d-4327-bb5b-f887789085ba"},"recaptchaPublicKey":"6LfW_icUAAAAAL_CG700pddUxLNYIxgRJe3vOg2Z"};
var moduleName = 'actionToolbar';
var isVueModule = true;
GeneralMills.PandoSites.RegisterControlInstance(moduleName, configuration, componentMetadata, isVueModule)
});
})();
Ingredients
For the Apple Pound Cake
-
1
box (16 oz) Betty Crocker™ Pound Cake Mix
-
1/4
cup butter, softened
-
2
eggs
-
2/3
cup water or milk
-
2
cups diced Granny Smith Apples, from two apples
-
1
teaspoon cinnamon
For the Cinnamon Frosting
-
1 1/2
tubs (12 oz) Betty Crocker™ Whipped Fluffy White Frosting
-
3/4
teaspoon cinnamon
-
Green food coloring
For the Chocolate Popcorn Tree
-
1 1/2
tablespoons butter
-
3 1/2
cups miniature marshmallows
-
1/3
cup chocolate chips
-
2
cups chocolate crispy rice cereal
-
6
ounces melted and tempered milk chocolate or melted light cocoa confectionery coating (candy melts)
-
5
cups popped popcorn
-
10
ounces melted green confectionery coating (candy melts)
-
50
small sour cherry candies
For the Picket Fence
-
10
ounces white modeling chocolate
(function() {
document.addEventListener('DOMContentLoaded', function() {
var componentMetadata = JSON.parse('\x7b\x22componentName\x22\x3a\x22RecipeIngredients_a2352866-1a21-4a5d-9dd4-1744f7700fb5\x22,\x22deferOptions\x22\x3a\x7b\x22deferComponent\x22\x3afalse,\x22deferType\x22\x3a\x22None\x22,\x22deferId\x22\x3a\x22r811c32ede75c41a78f3da9d0506aaa53\x22,\x22deferredContainerId\x22\x3a\x22\x2fmain\x2frdpIngredients\x22,\x22deferredContainerView\x22\x3anull\x7d,\x22viewName\x22\x3a\x22RecipeIngredients\x22\x7d');
var configuration = {};
var moduleName = 'recipeIngredients';
var isVueModule = false;
GeneralMills.PandoSites.RegisterControlInstance(moduleName, configuration, componentMetadata, isVueModule)
});
})();
Steps
-
1
Apple Pound Cake: Prepare pound cake mix according to package instructions. Toss apple pieces with 1 teaspoon cinnamon. Fold apples into cake batter. Pour batter into a nonstick, tin foil-lined 9x13-inch baking pan. Bake at 350°F for 32-36 minutes, until a toothpick inserted in the center of the cake comes out clean. Cool cake completely. Remove cake from pan and peel off tin foil. Set cake on a cake board.
-
2
Cinnamon Frosting: Pour Betty Crocker Whipped White Frosting into a mixing bowl. Add 3/4 teaspoon cinnamon and green food coloring. Stir until well blended. Spread a very thin layer of green frosting over cake. Pour remaining frosting into a pastry bag fitted with a grass tip. Pipe grass over top of cake, leaving an open space for the apple tree.
-
3
Cereal Tree Trunk: 1) Make the cereal treat mixture. Combine butter, marshmallows, and chocolate chips in a large bowl. Heat in the microwave on high for 30-second increments, stirring after each, until melted. Stir in cereal. 2) Working on a silicone mat, sculpt a tree trunk with a few low branches out of the cereal treat mixture. Brush melted and tempered milk chocolate or melted light cocoa confectionery coating over the tree trunk. Make smaller branches, brush them with chocolate, allow them to dry, and add them to the tree trunk using chocolate as glue. Then allow that to dry and add one more layer of chocolate over top of the branch. 3) Once you've added all the branches, add one more coat of chocolate then refrigerate it for 15-20 minutes until the chocolate sets hard.
-
4
Popcorn Leaves: Place popcorn in a large mixing bowl. Reserve 1 tablespoon of the green confectionery coating for later, then pour the rest over top of the popcorn and fold until well coated. Add pieces of the green colored popcorn to the tree, placing them between branches first, then start stacking the pieces on top of each other until you have a full tree. Refrigerate for 15 minutes.
-
5
Apples: Attach some of the sour cherry candies to the popcorn tree using the reserved green confectionery coating as edible glue. Reserve the remaining candies to sprinkle on the cake under the tree.
-
6
Picket Fence: Knead white modeling chocolate and roll out on a silicone mat until 1/8-inch thick. Cut four 1/2-inch wide by 12-inch long strips and four 1/2-inch wide by 9-inch long strips. Cut 38 strips that are 1/2-inch wide by 2-inch long. Cut one end of each piece into a point. Set two 12-inch long strips about 3/4 inches apart. Use water to attach the small 2-inch fence pieces along those two strips about an inch apart. Repeat creating one more 12-inch long panel. Then do the same using the 9-inch strips, creating a total of 4 picket fence panels to go around the cake.
-
7
Before serving, place the tree on top of the cake. Pipe green grass around the tree. Press the picket fence around the base of the cake, cutting off any excess fence. Sprinkle some sour cherry candies on the grass under the tree.
(function() {
document.addEventListener('DOMContentLoaded', function() {
var componentMetadata = JSON.parse('\x7b\x22componentName\x22\x3a\x22RecipeSteps_a2352866-1a21-4a5d-9dd4-1744f7700fb5\x22,\x22deferOptions\x22\x3a\x7b\x22deferComponent\x22\x3atrue,\x22deferType\x22\x3a\x22OnDemand\x22,\x22deferId\x22\x3a\x22r737e1c624ed847f39dd05a16f1c0bc66\x22,\x22deferredContainerId\x22\x3a\x22\x2fmain\x2frdpSteps\x22,\x22deferredContainerView\x22\x3a\x22RecipeDetail\x22\x7d,\x22viewName\x22\x3a\x22RecipeSteps\x22\x7d');
var configuration = {"initAreImagesHidden":false,"hideImagesEventName":"HideStepShots","showImagesEventName":"ShowStepShots","hideImagesButtonText":"Hide Images","showImagesButtonText":"Show Images","hideImagesClass":"rdpHideStepImages"};
var moduleName = 'recipeStepShots';
var isVueModule = true;
GeneralMills.PandoSites.RegisterControlInstance(moduleName, configuration, componentMetadata, isVueModule)
});
})();
Nutrition Information
No nutrition information available for this recipe
(function() {
document.addEventListener('DOMContentLoaded', function() {
var componentMetadata = JSON.parse('\x7b\x22componentName\x22\x3a\x22RecipeNutritionNonPrint_a2352866-1a21-4a5d-9dd4-1744f7700fb5\x22,\x22deferOptions\x22\x3a\x7b\x22deferComponent\x22\x3atrue,\x22deferType\x22\x3a\x22Simple\x22,\x22deferId\x22\x3a\x22rd25d8a9d6ff64cef917bb8e6cb3d53b6\x22,\x22deferredContainerId\x22\x3a\x22\x2fmain\x2frdpNutrition\x22,\x22deferredContainerView\x22\x3a\x22RecipeDetail\x22\x7d,\x22viewName\x22\x3a\x22RecipeNutritionNonPrint\x22\x7d');
var configuration = {"initIsExpanded":false,"expandEventName":"NutritionExpand","collapseEventName":"NutritionCollapse"};
var moduleName = 'recipeNutrition';
var isVueModule = true;
GeneralMills.PandoSites.RegisterControlInstance(moduleName, configuration, componentMetadata, isVueModule)
});
})();
More About This Recipe
-
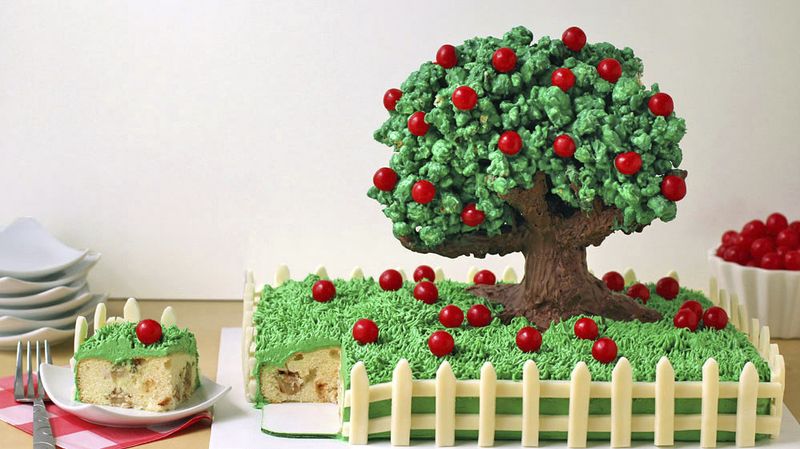
Slice into this adorable cake for a taste of sweet apples and cinnamon.
Autumn is the perfect time to enjoy an apple dessert, and this cake sure won’t disappoint. Cinnamon-coated crisp and tart Granny Smith Apples are baked into a Betty Crocker Pound Cake and then topped with a light cinnamon frosting.
The cake is wonderful all on its own, but to put it over the top, I decorated it to look like a grass-covered yard and planted a cute tree on top that’s made from chocolate cereal treats, white chocolate coated popcorn, and sour candy apples. The white picket fence is made out of white modeling chocolate, which means this entire dessert is edible! So once your friends and family are done oohing and ahhing over the tree, they'll love eating this sweet fall-inspired treat.
First, to really carry the theme through the cake, I added cinnamon apples to a Betty Crocker Pound Cake Mix.
The apples added a lovely fresh fall flavor to the pound cake and helped to keep it moist.
To make the apple flavor really pop, I added a touch of cinnamon to some Betty Crocker Whipped White Frosting, which I then tinted green and spread onto the cake. I could have skipped this step, but the top of my cake was rather bumpy. I could have leveled it, but decided instead to fill in the grooves with frosting.
To make the frosting look like grass, I added a grass decorating tip to a pastry bag, filled it with frosting, and then piped frosting grass all over the top of the cake, leaving room to add my apple tree later. Then I froze my cake for a few hours. I knew the pound cake would be nice and sturdy, but I wanted to make sure the cake was solid enough to hold up my tree without having to add lots of support. Plus, I find that a frozen cake, once thawed, is more moist and tender.
Now for the really fun part of this project: I began my making a batch of cereal treats using chocolate rice crisp cereal. I added some chocolate chips to make a more sturdy mixture.
Working on a silicone mat to keep the tree from sticking, I started to sculpt my tree trunk. One thing to note here: You need to make pretty long roots on your trunk in order to keep the tree from toppling over. Mine did at first; in the final pictures you'll see I had to add longer roots. Learn from my mistake and add them now! Add 6 or more roots. You can always cover some of them up with frosting grass if you don't want them all to show, but they will help to keep your tree upright.
As I worked I painted milk chocolate over the cereal treats. If you use milk chocolate, you need to temper it; otherwise I'd suggest using light cocoa confectionery coating (candy melts) as listed in the ingredients. It's important to allow the chocolate to harden before you start adding a lot of branches. It's also a good idea to add about 3 layers to the trunk to make sure it's really solid.
To add branches, I first shaped them out of cereal treats, then painted them with chocolate and allowed them to dry. Then I attached them to the tree using more chocolate, allowed that to dry, and then painted another coat of chocolate over the branch.
You won’t actually see many of these branches, but you need lots of them to hold up the popcorn leaves. It's important that the tree is really solid and the chocolate has completely hardened before you add the leaves.
Once my chocolate tree was ready I wrapped the base of the trunk in plastic wrap. Then I whipped up a batch of green-colored white chocolate popcorn.
Making the candy coated popcorn is so easy; just fold melted green confectionery coating into popped popcorn until it's nicely coated.
Working quickly, I added popcorn to the tree, placing a few pieces in between the branches then piling more on top once those pieces were secure. This is a messy job! I washed my hands several times while creating my tree.
If the popcorn starts to harden as you're working, you can put the bowl in the microwave and heat it for 10-15 seconds. You want to get all the popcorn on the tree, then refrigerate it until the candy-coated popcorn hardens.
Once my tree was ready, I used the rest of the green candy coating as edible glue to attach the sour cherry candies (AKA the apples) to the tree.
Right after I took this picture, the tree fell over and I realized it needed larger roots! I added the roots, but worried the tree wouldn't stand up well, so I pushed three skewers into the tree in a crisscross pattern and cut off any excess on the bottom. I let it sit overnight to make sure it would stand up, and it did. So, as I said, just start with a sturdy root structure and your tree should stand strong!
To finish off the cake, I created a picket fence out of white modeling chocolate. I rolled it out on a silicone mat then cut out all the pieces.
Then I attached the fence ...
(function() {
document.addEventListener('DOMContentLoaded', function() {
var componentMetadata = JSON.parse('\x7b\x22componentName\x22\x3a\x22RecipeTipCategory_a2352866-1a21-4a5d-9dd4-1744f7700fb5\x22,\x22deferOptions\x22\x3a\x7b\x22deferComponent\x22\x3atrue,\x22deferType\x22\x3a\x22Simple\x22,\x22deferId\x22\x3a\x22rc2c5c742233a4e5890c9b3695c465eaa\x22,\x22deferredContainerId\x22\x3a\x22\x2fmain\x2frdpStories\x22,\x22deferredContainerView\x22\x3a\x22RecipeDetail\x22\x7d,\x22viewName\x22\x3a\x22RecipeTipCategory\x22\x7d');
var configuration = {"expandEventName":"MoreAboutRecipeExpand","collapseEventName":"MoreAboutRecipeCollapse"};
var moduleName = 'recipeTipCategory';
var isVueModule = true;
GeneralMills.PandoSites.RegisterControlInstance(moduleName, configuration, componentMetadata, isVueModule)
});
})();
© 2024 ®/TM General Mills All Rights Reserved
(function() {
document.addEventListener('DOMContentLoaded', function() {
var componentMetadata = JSON.parse('\x7b\x22componentName\x22\x3a\x22DoubleClick_5f8292a2-3e9c-4318-94df-7fbdffc17662\x22,\x22deferOptions\x22\x3a\x7b\x22deferComponent\x22\x3atrue,\x22deferType\x22\x3a\x22OnDemand\x22,\x22deferId\x22\x3a\x22r8e2dd7d738c14369ae756193ad8f26d9\x22,\x22deferredContainerId\x22\x3a\x22\x2fmain\x2frdpFeatureAd\x22,\x22deferredContainerView\x22\x3a\x22DoubleClick\x22\x7d,\x22viewName\x22\x3a\x22DoubleClick\x22\x7d');
var configuration = {"adId":"OMP/tablespoon/recipes/300x250_AutoRefresh_top","minPageWidth":"1000","maxPageWidth":"9999","defaultMinPageWidth":"1000","defaultMaxPageWidth":"9999","size":"[300, 250]","refreshWhenViewed":true,"adContainerId":"c2d49338-d99f-4652-993a-ce11977e3cd5","doubleClickAdContainerId":"c9d96d8b-9d33-4932-9247-bd12aed00164","adCaptionText":"Advertisement","networkCode":"/15704463/","relevantMetadata":["Dessert","Cereal","Apple","Chocolate"],"privacyOptOut":false,"adProvider":"Legacy","sovrnCssClass":"","responsive":false,"contentType":"Recipe","itemId":"9c833f69-648d-4327-bb5b-f887789085ba","continuesBelowText":"Recipe Continues Below"};
var moduleName = 'doubleClick';
var isVueModule = true;
GeneralMills.PandoSites.RegisterControlInstance(moduleName, configuration, componentMetadata, isVueModule)
});
})();
(function() {
document.addEventListener('DOMContentLoaded', function() {
var componentMetadata = JSON.parse('\x7b\x22componentName\x22\x3a\x22DoubleClick_c259ff4d-47bb-4fe7-add7-de2effa54403\x22,\x22deferOptions\x22\x3a\x7b\x22deferComponent\x22\x3atrue,\x22deferType\x22\x3a\x22OnDemand\x22,\x22deferId\x22\x3a\x22rc5984e02c4594a27b8e16dc7aee7ee93\x22,\x22deferredContainerId\x22\x3a\x22\x2fmain\x2frdpFeatureAd\x22,\x22deferredContainerView\x22\x3a\x22DoubleClick\x22\x7d,\x22viewName\x22\x3a\x22DoubleClick\x22\x7d');
var configuration = {"adId":"OMP/tablespoon/recipes/728x90_top","minPageWidth":"768","maxPageWidth":"999","defaultMinPageWidth":"1000","defaultMaxPageWidth":"9999","size":"[728, 90]","refreshWhenViewed":false,"adContainerId":"301aa865-5c18-42d2-9c48-457964a9975b","doubleClickAdContainerId":"6ac50dd2-06ed-4ead-a4f9-f756d40516a5","adCaptionText":"Advertisement","networkCode":"/15704463/","relevantMetadata":["Dessert","Cereal","Apple","Chocolate"],"privacyOptOut":false,"adProvider":"Legacy","sovrnCssClass":"","responsive":false,"contentType":"Recipe","itemId":"9c833f69-648d-4327-bb5b-f887789085ba","continuesBelowText":"Recipe Continues Below"};
var moduleName = 'doubleClick';
var isVueModule = true;
GeneralMills.PandoSites.RegisterControlInstance(moduleName, configuration, componentMetadata, isVueModule)
});
})();
(function() {
document.addEventListener('DOMContentLoaded', function() {
var componentMetadata = JSON.parse('\x7b\x22componentName\x22\x3a\x22DoubleClick_6c874281-d7ee-4246-91de-0f51cce6949e\x22,\x22deferOptions\x22\x3a\x7b\x22deferComponent\x22\x3atrue,\x22deferType\x22\x3a\x22OnDemand\x22,\x22deferId\x22\x3a\x22r905e5cf917144fcd83c544e946e52f6b\x22,\x22deferredContainerId\x22\x3a\x22\x2fmain\x2frdpFeatureAd\x22,\x22deferredContainerView\x22\x3a\x22DoubleClick\x22\x7d,\x22viewName\x22\x3a\x22DoubleClick\x22\x7d');
var configuration = {"adId":"OMP/m_tablespoon/recipes/300x250_top","minPageWidth":"299","maxPageWidth":"767","defaultMinPageWidth":"1000","defaultMaxPageWidth":"9999","size":"[[300,250], [300,600]]","refreshWhenViewed":false,"adContainerId":"3302cf6f-04ff-4449-addd-d2bed646d72b","doubleClickAdContainerId":"919fbb5f-40b1-4286-a9b2-e6ae464ae88a","adCaptionText":"Advertisement","networkCode":"/15704463/","relevantMetadata":["Dessert","Cereal","Apple","Chocolate"],"privacyOptOut":false,"adProvider":"Legacy","sovrnCssClass":"","responsive":false,"contentType":"Recipe","itemId":"9c833f69-648d-4327-bb5b-f887789085ba","continuesBelowText":"Recipe Continues Below"};
var moduleName = 'doubleClick';
var isVueModule = true;
GeneralMills.PandoSites.RegisterControlInstance(moduleName, configuration, componentMetadata, isVueModule)
});
})();
(function() {
document.addEventListener('DOMContentLoaded', function() {
var componentMetadata = JSON.parse('\x7b\x22componentName\x22\x3a\x22RelatedContent_51c5b479-ce04-468f-b3cd-042a1083ee73\x22,\x22deferOptions\x22\x3a\x7b\x22deferComponent\x22\x3atrue,\x22deferType\x22\x3a\x22OnDemand\x22,\x22deferId\x22\x3a\x22rc914cb1125e245908a0163f1025b7297\x22,\x22deferredContainerId\x22\x3a\x22\x2fmain\x2frdpRelatedContent1\x22,\x22deferredContainerView\x22\x3a\x22RecipeDetail\x22\x7d,\x22viewName\x22\x3a\x22RelatedContent\x22\x7d');
var configuration = {"dataSourceId":"51c5b479-ce04-468f-b3cd-042a1083ee73","isCurrentUserAnonymous":true,"relatedContentList":{"contentId":"9c833f69-648d-4327-bb5b-f887789085ba","listSettings":{"pageSize":6,"startPage":1,"listType":1,"title":"Try These Next","useModalRegistration":false,"regAction":"","esrcCode":0,"favoriteButtonLabelFormat":"Add {0} to favorites","contentTypes":[],"showImages":true,"showRatings":false,"allowFavoriting":true,"cssClassName":""},"items":[{"contentId":"b99e20b0-9d6a-490e-860c-d785963c0a74","contentType":"Recipe","title":"Apple Gingerbread Dump Cake","isFavorite":false,"linkUrl":"/recipes/apple-gingerbread-dump-cake/b99e20b0-9d6a-490e-860c-d785963c0a74","numberOfRatings":"0","averageRating":"0","averageRatingStars":"0","smallImageUrl":"//mojo.generalmills.com/api/public/content/fR6Mr_FN2kCAMRqWREHSpQ_gmi_hi_res_jpeg.jpeg?v=f2e33945\u0026t=205ad118875f48b5b556c2955695e2f6","mediumImageUrl":"//mojo.generalmills.com/api/public/content/fR6Mr_FN2kCAMRqWREHSpQ_gmi_hi_res_jpeg.jpeg?v=f2e33945\u0026t=9df44d78ea5c47f98018cc1578c6de79"},{"contentId":"b54b228d-4930-43ac-aa68-ba9d6b9184bb","contentType":"Recipe","title":"S’mores Cake Rolls","isFavorite":false,"linkUrl":"/recipes/smores-cake-rolls/b54b228d-4930-43ac-aa68-ba9d6b9184bb","numberOfRatings":"0","averageRating":"0","averageRatingStars":"0","smallImageUrl":"//mojo.generalmills.com/api/public/content/oY3dymmahU6MiLLRgxd3EQ_gmi_hi_res_jpeg.jpeg?v=0112d2e9\u0026t=205ad118875f48b5b556c2955695e2f6","mediumImageUrl":"//mojo.generalmills.com/api/public/content/oY3dymmahU6MiLLRgxd3EQ_gmi_hi_res_jpeg.jpeg?v=0112d2e9\u0026t=9df44d78ea5c47f98018cc1578c6de79"},{"contentId":"b02399c3-0ae6-4aee-9929-e7bddfe444c5","contentType":"Recipe","title":"Caramel Apple Dump Cake with Spiced Whipped Cream","isFavorite":false,"linkUrl":"/recipes/caramel-apple-dump-cake-with-spiced-whipped-cream/b02399c3-0ae6-4aee-9929-e7bddfe444c5","numberOfRatings":"0","averageRating":"0","averageRatingStars":"0","smallImageUrl":"//mojo.generalmills.com/api/public/content/JGP9q1fKOk24gX7z-G5Y7Q_gmi_hi_res_jpeg.jpeg?v=04f9198a\u0026t=205ad118875f48b5b556c2955695e2f6","mediumImageUrl":"//mojo.generalmills.com/api/public/content/JGP9q1fKOk24gX7z-G5Y7Q_gmi_hi_res_jpeg.jpeg?v=04f9198a\u0026t=9df44d78ea5c47f98018cc1578c6de79"},{"contentId":"2650dbe6-a365-42e8-93cf-94cf5bea0aa4","contentType":"Recipe","title":"Apple Roll Cake with Caramel Frosting","isFavorite":false,"linkUrl":"/recipes/apple-roll-cake-with-caramel-frosting/2650dbe6-a365-42e8-93cf-94cf5bea0aa4","numberOfRatings":"0","averageRating":"0","averageRatingStars":"0","smallImageUrl":"//mojo.generalmills.com/api/public/content/xtCUtRTMUECVFxjFxLP7dg_gmi_hi_res_jpeg.jpeg?v=83cde468\u0026t=205ad118875f48b5b556c2955695e2f6","mediumImageUrl":"//mojo.generalmills.com/api/public/content/xtCUtRTMUECVFxjFxLP7dg_gmi_hi_res_jpeg.jpeg?v=83cde468\u0026t=9df44d78ea5c47f98018cc1578c6de79"},{"contentId":"bb1ea24d-4339-4caf-886a-bd0aa9902c26","contentType":"Recipe","title":"Caramel Apple Sheet Cake ","isFavorite":false,"linkUrl":"/recipes/caramel-apple-sheet-cake/bb1ea24d-4339-4caf-886a-bd0aa9902c26","numberOfRatings":"0","averageRating":"0","averageRatingStars":"0","smallImageUrl":"//mojo.generalmills.com/api/public/content/uZuN4D5IH0ipHvUWqtS6Qw_gmi_hi_res_jpeg.jpeg?v=fdcea53b\u0026t=205ad118875f48b5b556c2955695e2f6","mediumImageUrl":"//mojo.generalmills.com/api/public/content/uZuN4D5IH0ipHvUWqtS6Qw_gmi_hi_res_jpeg.jpeg?v=fdcea53b\u0026t=9df44d78ea5c47f98018cc1578c6de79"},{"contentId":"14cd99a8-3759-4484-bccf-c1efb6b8e48d","contentType":"Recipe","title":"Earth Cake with Rock Candy Core","isFavorite":false,"linkUrl":"/recipes/earth-cake-with-rock-candy-core/14cd99a8-3759-4484-bccf-c1efb6b8e48d","numberOfRatings":"0","averageRating":"0","averageRatingStars":"0","smallImageUrl":"//mojo.generalmills.com/api/public/content/hQvPkWXwDUW6nsJsJMf-2A_gmi_hi_res_jpeg.jpeg?v=e5eabd5d\u0026t=205ad118875f48b5b556c2955695e2f6","mediumImageUrl":"//mojo.generalmills.com/api/public/content/hQvPkWXwDUW6nsJsJMf-2A_gmi_hi_res_jpeg.jpeg?v=e5eabd5d\u0026t=9df44d78ea5c47f98018cc1578c6de79"}],"availableItems":[{"contentId":"b99e20b0-9d6a-490e-860c-d785963c0a74","contentType":"Recipe","title":"Apple Gingerbread Dump Cake","isFavorite":false,"linkUrl":"/recipes/apple-gingerbread-dump-cake/b99e20b0-9d6a-490e-860c-d785963c0a74","numberOfRatings":"0","averageRating":"0","averageRatingStars":"0","smallImageUrl":"//mojo.generalmills.com/api/public/content/fR6Mr_FN2kCAMRqWREHSpQ_gmi_hi_res_jpeg.jpeg?v=f2e33945\u0026t=205ad118875f48b5b556c2955695e2f6","mediumImageUrl":"//mojo.generalmills.com/api/public/content/fR6Mr_FN2kCAMRqWREHSpQ_gmi_hi_res_jpeg.jpeg?v=f2e33945\u0026t=9df44d78ea5c47f98018cc1578c6de79"},{"contentId":"b54b228d-4930-43ac-aa68-ba9d6b9184bb","contentType":"Recipe","title":"S’mores Cake Rolls","isFavorite":false,"linkUrl":"/recipes/smores-cake-rolls/b54b228d-4930-43ac-aa68-ba9d6b9184bb","numberOfRatings":"0","averageRating":"0","averageRatingStars":"0","smallImageUrl":"//mojo.generalmills.com/api/public/content/oY3dymmahU6MiLLRgxd3EQ_gmi_hi_res_jpeg.jpeg?v=0112d2e9\u0026t=205ad118875f48b5b556c2955695e2f6","mediumImageUrl":"//mojo.generalmills.com/api/public/content/oY3dymmahU6MiLLRgxd3EQ_gmi_hi_res_jpeg.jpeg?v=0112d2e9\u0026t=9df44d78ea5c47f98018cc1578c6de79"},{"contentId":"b02399c3-0ae6-4aee-9929-e7bddfe444c5","contentType":"Recipe","title":"Caramel Apple Dump Cake with Spiced Whipped Cream","isFavorite":false,"linkUrl":"/recipes/caramel-apple-dump-cake-with-spiced-whipped-cream/b02399c3-0ae6-4aee-9929-e7bddfe444c5","numberOfRatings":"0","averageRating":"0","averageRatingStars":"0","smallImageUrl":"//mojo.generalmills.com/api/public/content/JGP9q1fKOk24gX7z-G5Y7Q_gmi_hi_res_jpeg.jpeg?v=04f9198a\u0026t=205ad118875f48b5b556c2955695e2f6","mediumImageUrl":"//mojo.generalmills.com/api/public/content/JGP9q1fKOk24gX7z-G5Y7Q_gmi_hi_res_jpeg.jpeg?v=04f9198a\u0026t=9df44d78ea5c47f98018cc1578c6de79"},{"contentId":"2650dbe6-a365-42e8-93cf-94cf5bea0aa4","contentType":"Recipe","title":"Apple Roll Cake with Caramel Frosting","isFavorite":false,"linkUrl":"/recipes/apple-roll-cake-with-caramel-frosting/2650dbe6-a365-42e8-93cf-94cf5bea0aa4","numberOfRatings":"0","averageRating":"0","averageRatingStars":"0","smallImageUrl":"//mojo.generalmills.com/api/public/content/xtCUtRTMUECVFxjFxLP7dg_gmi_hi_res_jpeg.jpeg?v=83cde468\u0026t=205ad118875f48b5b556c2955695e2f6","mediumImageUrl":"//mojo.generalmills.com/api/public/content/xtCUtRTMUECVFxjFxLP7dg_gmi_hi_res_jpeg.jpeg?v=83cde468\u0026t=9df44d78ea5c47f98018cc1578c6de79"},{"contentId":"bb1ea24d-4339-4caf-886a-bd0aa9902c26","contentType":"Recipe","title":"Caramel Apple Sheet Cake ","isFavorite":false,"linkUrl":"/recipes/caramel-apple-sheet-cake/bb1ea24d-4339-4caf-886a-bd0aa9902c26","numberOfRatings":"0","averageRating":"0","averageRatingStars":"0","smallImageUrl":"//mojo.generalmills.com/api/public/content/uZuN4D5IH0ipHvUWqtS6Qw_gmi_hi_res_jpeg.jpeg?v=fdcea53b\u0026t=205ad118875f48b5b556c2955695e2f6","mediumImageUrl":"//mojo.generalmills.com/api/public/content/uZuN4D5IH0ipHvUWqtS6Qw_gmi_hi_res_jpeg.jpeg?v=fdcea53b\u0026t=9df44d78ea5c47f98018cc1578c6de79"},{"contentId":"14cd99a8-3759-4484-bccf-c1efb6b8e48d","contentType":"Recipe","title":"Earth Cake with Rock Candy Core","isFavorite":false,"linkUrl":"/recipes/earth-cake-with-rock-candy-core/14cd99a8-3759-4484-bccf-c1efb6b8e48d","numberOfRatings":"0","averageRating":"0","averageRatingStars":"0","smallImageUrl":"//mojo.generalmills.com/api/public/content/hQvPkWXwDUW6nsJsJMf-2A_gmi_hi_res_jpeg.jpeg?v=e5eabd5d\u0026t=205ad118875f48b5b556c2955695e2f6","mediumImageUrl":"//mojo.generalmills.com/api/public/content/hQvPkWXwDUW6nsJsJMf-2A_gmi_hi_res_jpeg.jpeg?v=e5eabd5d\u0026t=9df44d78ea5c47f98018cc1578c6de79"}]}};
var moduleName = 'relatedContent';
var isVueModule = true;
GeneralMills.PandoSites.RegisterControlInstance(moduleName, configuration, componentMetadata, isVueModule)
});
})();
(function() {
document.addEventListener('DOMContentLoaded', function() {
var componentMetadata = JSON.parse('\x7b\x22componentName\x22\x3a\x22RelatedContent_3189d52e-4fdf-44af-ba27-f9502579ef43\x22,\x22deferOptions\x22\x3a\x7b\x22deferComponent\x22\x3atrue,\x22deferType\x22\x3a\x22OnDemand\x22,\x22deferId\x22\x3a\x22r676022d4532540d5adfddd8adc32dcb1\x22,\x22deferredContainerId\x22\x3a\x22\x2fmain\x2frdpRelatedContent1\x22,\x22deferredContainerView\x22\x3a\x22RecipeDetail\x22\x7d,\x22viewName\x22\x3a\x22RelatedContent\x22\x7d');
var configuration = {"dataSourceId":"3189d52e-4fdf-44af-ba27-f9502579ef43","isCurrentUserAnonymous":true,"relatedContentList":{"contentId":"9c833f69-648d-4327-bb5b-f887789085ba","listSettings":{"pageSize":3,"startPage":1,"listType":1,"title":"Explore Categories","useModalRegistration":false,"regAction":"","esrcCode":0,"favoriteButtonLabelFormat":"Add {0} to favorites","contentTypes":["Category"],"showImages":false,"showRatings":false,"allowFavoriting":false,"cssClassName":"relatedContentWithoutImages"},"items":[{"contentId":"f86f1441-e7c3-4ef2-ad3f-ed438d8644e6","contentType":"Category","title":"Desserts","isFavorite":false,"linkUrl":"/desserts","numberOfRatings":"0","averageRating":"0","averageRatingStars":"0","smallImageUrl":"","mediumImageUrl":""},{"contentId":"52a8596f-ab24-4b88-98d9-b6a40daa0b9e","contentType":"Category","title":"Apple Cider Recipes, Dishes and Ideas from Tablespoon","isFavorite":false,"linkUrl":"/courses/drinks/apple-cider","numberOfRatings":"0","averageRating":"0","averageRatingStars":"0","smallImageUrl":"","mediumImageUrl":""},{"contentId":"32e81f7d-1693-42b3-89f3-645314f3f01d","contentType":"Category","title":"Hot Chocolate Recipes, Dishes and Ideas from Tablespoon","isFavorite":false,"linkUrl":"/courses/drinks/hot-chocolate","numberOfRatings":"0","averageRating":"0","averageRatingStars":"0","smallImageUrl":"","mediumImageUrl":""}],"availableItems":[{"contentId":"f86f1441-e7c3-4ef2-ad3f-ed438d8644e6","contentType":"Category","title":"Desserts","isFavorite":false,"linkUrl":"/desserts","numberOfRatings":"0","averageRating":"0","averageRatingStars":"0","smallImageUrl":"","mediumImageUrl":""},{"contentId":"52a8596f-ab24-4b88-98d9-b6a40daa0b9e","contentType":"Category","title":"Apple Cider Recipes, Dishes and Ideas from Tablespoon","isFavorite":false,"linkUrl":"/courses/drinks/apple-cider","numberOfRatings":"0","averageRating":"0","averageRatingStars":"0","smallImageUrl":"","mediumImageUrl":""},{"contentId":"32e81f7d-1693-42b3-89f3-645314f3f01d","contentType":"Category","title":"Hot Chocolate Recipes, Dishes and Ideas from Tablespoon","isFavorite":false,"linkUrl":"/courses/drinks/hot-chocolate","numberOfRatings":"0","averageRating":"0","averageRatingStars":"0","smallImageUrl":"","mediumImageUrl":""}]}};
var moduleName = 'relatedContent';
var isVueModule = true;
GeneralMills.PandoSites.RegisterControlInstance(moduleName, configuration, componentMetadata, isVueModule)
});
})();
(function() {
document.addEventListener('DOMContentLoaded', function() {
var componentMetadata = JSON.parse('\x7b\x22componentName\x22\x3a\x22DoubleClick_745c15b5-a9ad-4519-81b8-8ce6135efb93\x22,\x22deferOptions\x22\x3a\x7b\x22deferComponent\x22\x3atrue,\x22deferType\x22\x3a\x22OnDemand\x22,\x22deferId\x22\x3a\x22r375406f66983452f8a1138dd273d69dc\x22,\x22deferredContainerId\x22\x3a\x22\x2fmain\x2frdpSecondaryAd\x22,\x22deferredContainerView\x22\x3a\x22DoubleClick\x22\x7d,\x22viewName\x22\x3a\x22DoubleClick\x22\x7d');
var configuration = {"adId":"OMP/tablespoon/recipes/300x250_bottom","minPageWidth":"1000","maxPageWidth":"9999","defaultMinPageWidth":"1000","defaultMaxPageWidth":"9999","size":"[[300,600],[300,250]]","refreshWhenViewed":false,"adContainerId":"f246714f-1dd0-46cf-9164-21a6fffe7fd5","doubleClickAdContainerId":"184421b5-b84b-4dcc-ac97-1bf7527fd566","adCaptionText":"Advertisement","networkCode":"/15704463/","relevantMetadata":["Dessert","Cereal","Apple","Chocolate"],"privacyOptOut":false,"adProvider":"Legacy","sovrnCssClass":"","responsive":false,"contentType":"Recipe","itemId":"9c833f69-648d-4327-bb5b-f887789085ba","continuesBelowText":"Recipe Continues Below"};
var moduleName = 'doubleClick';
var isVueModule = true;
GeneralMills.PandoSites.RegisterControlInstance(moduleName, configuration, componentMetadata, isVueModule)
});
})();
(function() {
document.addEventListener('DOMContentLoaded', function() {
var componentMetadata = JSON.parse('\x7b\x22componentName\x22\x3a\x22DoubleClick_adef0bec-8719-4457-8387-12e0f80eec2b\x22,\x22deferOptions\x22\x3a\x7b\x22deferComponent\x22\x3atrue,\x22deferType\x22\x3a\x22OnDemand\x22,\x22deferId\x22\x3a\x22refc85ab04a5e4db7ba8c24296c234238\x22,\x22deferredContainerId\x22\x3a\x22\x2fmain\x2frdpSecondaryAd\x22,\x22deferredContainerView\x22\x3a\x22DoubleClick\x22\x7d,\x22viewName\x22\x3a\x22DoubleClick\x22\x7d');
var configuration = {"adId":"OMP/tablespoon/recipes/728x90_bottom","minPageWidth":"768","maxPageWidth":"999","defaultMinPageWidth":"1000","defaultMaxPageWidth":"9999","size":"[728, 90]","refreshWhenViewed":false,"adContainerId":"b9ec26d9-60a5-41c7-9c15-a0a5f5f11fac","doubleClickAdContainerId":"bc7a7483-8895-4a6e-a7d4-b0134798129c","adCaptionText":"Advertisement","networkCode":"/15704463/","relevantMetadata":["Dessert","Cereal","Apple","Chocolate"],"privacyOptOut":false,"adProvider":"Legacy","sovrnCssClass":"","responsive":false,"contentType":"Recipe","itemId":"9c833f69-648d-4327-bb5b-f887789085ba","continuesBelowText":"Recipe Continues Below"};
var moduleName = 'doubleClick';
var isVueModule = true;
GeneralMills.PandoSites.RegisterControlInstance(moduleName, configuration, componentMetadata, isVueModule)
});
})();
(function() {
document.addEventListener('DOMContentLoaded', function() {
var componentMetadata = JSON.parse('\x7b\x22componentName\x22\x3a\x22DoubleClick_80e5634b-4b8b-4ab6-9d42-f87399323043\x22,\x22deferOptions\x22\x3a\x7b\x22deferComponent\x22\x3atrue,\x22deferType\x22\x3a\x22OnDemand\x22,\x22deferId\x22\x3a\x22r7ac513d2b4264da7ae25348dd7b29791\x22,\x22deferredContainerId\x22\x3a\x22\x2fmain\x2frdpSecondaryAd\x22,\x22deferredContainerView\x22\x3a\x22DoubleClick\x22\x7d,\x22viewName\x22\x3a\x22DoubleClick\x22\x7d');
var configuration = {"adId":"OMP/m_tablespoon/recipes/300x250_bottom","minPageWidth":"299","maxPageWidth":"767","defaultMinPageWidth":"1000","defaultMaxPageWidth":"9999","size":"[[300,250], [300,600]]","refreshWhenViewed":false,"adContainerId":"6eaf9e3a-c094-4261-a621-9554197b7e1c","doubleClickAdContainerId":"095c431b-f39d-492e-88d8-333bc60a42c1","adCaptionText":"Advertisement","networkCode":"/15704463/","relevantMetadata":["Dessert","Cereal","Apple","Chocolate"],"privacyOptOut":false,"adProvider":"Legacy","sovrnCssClass":"","responsive":false,"contentType":"Recipe","itemId":"9c833f69-648d-4327-bb5b-f887789085ba","continuesBelowText":"Recipe Continues Below"};
var moduleName = 'doubleClick';
var isVueModule = true;
GeneralMills.PandoSites.RegisterControlInstance(moduleName, configuration, componentMetadata, isVueModule)
});
})();
(function() {
document.addEventListener('DOMContentLoaded', function() {
var componentMetadata = JSON.parse('\x7b\x22componentName\x22\x3a\x22DoubleClick_34589d2e-66d8-4e9a-9c4f-fb0e3ab39458\x22,\x22deferOptions\x22\x3a\x7b\x22deferComponent\x22\x3atrue,\x22deferType\x22\x3a\x22OnDemand\x22,\x22deferId\x22\x3a\x22rcd912f7a694543c18337cbac3b3a217d\x22,\x22deferredContainerId\x22\x3a\x22\x2fmain\x2frdpTernaryAd\x22,\x22deferredContainerView\x22\x3a\x22DoubleClick\x22\x7d,\x22viewName\x22\x3a\x22DoubleClick\x22\x7d');
var configuration = {"adId":"OMP/tablespoon/recipes/300x250_bottom2","minPageWidth":"1000","maxPageWidth":"9999","defaultMinPageWidth":"1000","defaultMaxPageWidth":"9999","size":"[[300,600],[300,250]]","refreshWhenViewed":false,"adContainerId":"261445b6-3d94-4366-b3c9-cc425e720b60","doubleClickAdContainerId":"59eff6db-a879-470b-902b-8018a7d2ecee","adCaptionText":"Advertisement","networkCode":"/15704463/","relevantMetadata":["Dessert","Cereal","Apple","Chocolate"],"privacyOptOut":false,"adProvider":"Legacy","sovrnCssClass":"","responsive":false,"contentType":"Recipe","itemId":"9c833f69-648d-4327-bb5b-f887789085ba","continuesBelowText":"Recipe Continues Below"};
var moduleName = 'doubleClick';
var isVueModule = true;
GeneralMills.PandoSites.RegisterControlInstance(moduleName, configuration, componentMetadata, isVueModule)
});
})();