(function() {
document.addEventListener('DOMContentLoaded', function() {
var componentMetadata = JSON.parse('\x7b\x22componentName\x22\x3a\x22ActionToolbar_c91d3ca3-260f-49e5-a185-3914efed63d4\x22,\x22deferOptions\x22\x3a\x7b\x22deferComponent\x22\x3afalse,\x22deferType\x22\x3a\x22None\x22,\x22deferId\x22\x3a\x22r62717ee7c9b945d7bd069b6d01449a40\x22,\x22deferredContainerId\x22\x3a\x22\x2fmain\x2fdockingActionToolbar\x22,\x22deferredContainerView\x22\x3anull\x7d,\x22viewName\x22\x3a\x22ActionToolbar\x22\x7d');
var configuration = {"contentId":"9c1bc613-b17f-456e-918d-5f68e8bb876f","toolbarSettings":{"id":"c91d3ca3-260f-49e5-a185-3914efed63d4","registrationUrl":"/GMI/CoreSites/TBSP/Home/register/reg-fp","regAction":"FAVORITE","eSourceCode":11275,"namePassedToEvents":"RDPToolbarSTICKY","buttons":[{"addFavoriteErrorMessage":"Sorry, something went wrong. Please save again.","removeFavoriteErrorMessage":"Error occurred while removing from favorites","registrationUrl":"/GMI/CoreSites/TBSP/Home/register/reg-fp","regAction":"FAVORITE","eSourceCode":11275,"isCurrentUserAnonymous":false,"isFavoriteItem":false,"id":"718b4e01-b2be-40cf-8f0c-bca3b01db0ed","allowedForAnonymousUsers":false,"type":"Favorite","displayName":"Save","namePassedToEvents":"Favorite","cssClassName":"atButtonFavorite","privacyOptOutMessage":"\u003cdiv class=\u0027privacyMessage\u0027\u003e\n\u003ch3\u003eThis feature is not available with your current cookie settings.\u003c/h3\u003e\n\u003cp\u003eYou can \u003ca href=\u0027#\u0027 data-show-preference-center=\u00271\u0027\u003eupdate your privacy settings\u003c/a\u003e to enable this content. Please enable “Functional Cookies” to use this feature.\u003c/p\u003e\n\u003c/div\u003e","showPrivacyOptOutMessage":false},{"nestedButtons":[{"layoutParameter":"p%3d1","id":"219a704d-bb63-40af-8f0d-f8389062f7e9","allowedForAnonymousUsers":true,"type":"Print","displayName":"Print Recipe","namePassedToEvents":"Print","cssClassName":"atButtonPrint","privacyOptOutMessage":"\u003cdiv class=\u0027privacyMessage\u0027\u003e\n\u003ch3\u003eThis feature is not available with your current cookie settings.\u003c/h3\u003e\n\u003cp\u003eYou can \u003ca href=\u0027#\u0027 data-show-preference-center=\u00271\u0027\u003eupdate your privacy settings\u003c/a\u003e to enable this content. Please enable “Functional Cookies” to use this feature.\u003c/p\u003e\n\u003c/div\u003e","showPrivacyOptOutMessage":false},{"providerName":"pinterest","providerNamePassedToEvents":"Pinterest","shareUrlFormat":"//pinterest.com/pin/create/link/?url={0}","id":"585d4198-c691-4eae-bb63-66cc1927e44a","allowedForAnonymousUsers":true,"type":"Social","displayName":"Save To Pinterest","namePassedToEvents":"Pinterest","cssClassName":"atButtonPinterest","privacyOptOutMessage":"\u003cdiv class=\u0027privacyMessage\u0027\u003e\n\u003ch3\u003eThis feature is not available with your current cookie settings.\u003c/h3\u003e\n\u003cp\u003eYou can \u003ca href=\u0027#\u0027 data-show-preference-center=\u00271\u0027\u003eupdate your privacy settings\u003c/a\u003e to enable this content. Please enable “Functional Cookies” to use this feature.\u003c/p\u003e\n\u003c/div\u003e","showPrivacyOptOutMessage":false},{"templateId":"95752b5c-7e75-4367-bca7-fdd3abb0ebcb","dialogHeading":"Email Recipe","emailCode":"TBSP_ContentEmail","dialogSettings":{"cancelButtonText":"Cancel","copyToSenderLabel":"Send a Copy to Myself","emailAddressesLabel":"* Email Address(es)","emailInstructionText":"Separate email addresses with commas","fromText":"From:","privacyPolicyText":"\u003cp\u003e\u0026copy;2024 General Mills, Inc. All Rights Reserved. This information will only be used to send an email to your friend(s) and will not be saved. Please read our \u003ca rel=\u0022noopener noreferrer\u0022 rel=\u0022noopener noreferrer\u0022 href=\u0022http://www.generalmills.com/company/privacy-policies/privacy-policy-us\u0022 target=\u0022_blank\u0022 shape=\u0022rect\u0022\u003ePrivacy Policy\u003c/a\u003e.\u003c/p\u003e","requiredFieldText":"* Required","sendButtonText":"Send","senderEmailAddressLabel":"* Your Email Address","senderFirstNameLabel":"* Your First Name","sendToText":"Send To:"},"id":"fad236f8-3084-4a50-bc7d-283bc5511677","allowedForAnonymousUsers":true,"type":"Email","displayName":"Share via Email","namePassedToEvents":"Email","cssClassName":"atButtonEmail","privacyOptOutMessage":"\u003cdiv class=\u0027privacyMessage\u0027\u003e\n\u003ch3\u003eThis feature is not available with your current cookie settings.\u003c/h3\u003e\n\u003cp\u003eYou can \u003ca href=\u0027#\u0027 data-show-preference-center=\u00271\u0027\u003eupdate your privacy settings\u003c/a\u003e to enable this content. Please enable “Functional Cookies” to use this feature.\u003c/p\u003e\n\u003c/div\u003e","showPrivacyOptOutMessage":false},{"providerName":"facebook","providerNamePassedToEvents":"Facebook","shareUrlFormat":"//facebook.com/sharer/sharer.php?u={0}","id":"fc7a5260-abb4-42be-958a-d172ba87442b","allowedForAnonymousUsers":true,"type":"Social","displayName":"Share on Facebook","namePassedToEvents":"Facebook","cssClassName":"atButtonFacebook","privacyOptOutMessage":"\u003cdiv class=\u0027privacyMessage\u0027\u003e\n\u003ch3\u003eThis feature is not available with your current cookie settings.\u003c/h3\u003e\n\u003cp\u003eYou can \u003ca href=\u0027#\u0027 data-show-preference-center=\u00271\u0027\u003eupdate your privacy settings\u003c/a\u003e to enable this content. Please enable “Functional Cookies” to use this feature.\u003c/p\u003e\n\u003c/div\u003e","showPrivacyOptOutMessage":false},{"successMessage":"Copied.","errorMessage":"Press Ctrl+C and Enter to copy to clipboard","successMessageDuration":3000,"errorMessageDuration":10000,"id":"263303a9-5fe6-480d-910a-608f153d379a","allowedForAnonymousUsers":true,"type":"CopyLink","displayName":"Copy Link","namePassedToEvents":"Copy","cssClassName":"atButtonCopyLink","privacyOptOutMessage":"\u003cdiv class=\u0027privacyMessage\u0027\u003e\n\u003ch3\u003eThis feature is not available with your current cookie settings.\u003c/h3\u003e\n\u003cp\u003eYou can \u003ca href=\u0027#\u0027 data-show-preference-center=\u00271\u0027\u003eupdate your privacy settings\u003c/a\u003e to enable this content. Please enable “Functional Cookies” to use this feature.\u003c/p\u003e\n\u003c/div\u003e","showPrivacyOptOutMessage":false}],"id":"46a2d62f-b80c-49bf-969f-5d28640dc94a","allowedForAnonymousUsers":true,"type":"Reveal","displayName":"Share","namePassedToEvents":"Share","cssClassName":"atButtonReveal","privacyOptOutMessage":"\u003cdiv class=\u0027privacyMessage\u0027\u003e\n\u003ch3\u003eThis feature is not available with your current cookie settings.\u003c/h3\u003e\n\u003cp\u003eYou can \u003ca href=\u0027#\u0027 data-show-preference-center=\u00271\u0027\u003eupdate your privacy settings\u003c/a\u003e to enable this content. Please enable “Functional Cookies” to use this feature.\u003c/p\u003e\n\u003c/div\u003e","showPrivacyOptOutMessage":false},{"errorMessage":"","id":"0a1bab6c-f930-4359-b8b4-a72470a4d8ee","allowedForAnonymousUsers":true,"type":"WakeLock","displayName":"Keep Screen On","namePassedToEvents":"Wakelock","cssClassName":"","privacyOptOutMessage":"\u003cdiv class=\u0027privacyMessage\u0027\u003e\n\u003ch3\u003eThis feature is not available with your current cookie settings.\u003c/h3\u003e\n\u003cp\u003eYou can \u003ca href=\u0027#\u0027 data-show-preference-center=\u00271\u0027\u003eupdate your privacy settings\u003c/a\u003e to enable this content. Please enable “Functional Cookies” to use this feature.\u003c/p\u003e\n\u003c/div\u003e","showPrivacyOptOutMessage":false}],"isSticky":true},"userSettings":{"isCurrentUserAnonymous":true,"isFavoriteItem":false},"pageAttributes":{"url":"https%3a%2f%2fwww.tablespoon.com%2frecipes%2fpizza-planes%2f9c1bc613-b17f-456e-918d-5f68e8bb876f","contentId":"9c1bc613-b17f-456e-918d-5f68e8bb876f"},"recaptchaPublicKey":"6LfW_icUAAAAAL_CG700pddUxLNYIxgRJe3vOg2Z"};
var moduleName = 'actionToolbar';
var isVueModule = true;
GeneralMills.PandoSites.RegisterControlInstance(moduleName, configuration, componentMetadata, isVueModule)
});
})();
(function() {
document.addEventListener('DOMContentLoaded', function() {
var componentMetadata = JSON.parse('\x7b\x22componentName\x22\x3a\x22ActionToolbar_c91d3ca3-260f-49e5-a185-3914efed63d4\x22,\x22deferOptions\x22\x3a\x7b\x22deferComponent\x22\x3afalse,\x22deferType\x22\x3a\x22None\x22,\x22deferId\x22\x3a\x22r0f008518558a436382d1f66ff7569d1b\x22,\x22deferredContainerId\x22\x3a\x22\x2fmain\x2fdockingActionToolbarMobile\x22,\x22deferredContainerView\x22\x3anull\x7d,\x22viewName\x22\x3a\x22ActionToolbar\x22\x7d');
var configuration = {"contentId":"9c1bc613-b17f-456e-918d-5f68e8bb876f","toolbarSettings":{"id":"c91d3ca3-260f-49e5-a185-3914efed63d4","registrationUrl":"/GMI/CoreSites/TBSP/Home/register/reg-fp","regAction":"FAVORITE","eSourceCode":11275,"namePassedToEvents":"RDPToolbarSTICKY","buttons":[{"addFavoriteErrorMessage":"Sorry, something went wrong. Please save again.","removeFavoriteErrorMessage":"Error occurred while removing from favorites","registrationUrl":"/GMI/CoreSites/TBSP/Home/register/reg-fp","regAction":"FAVORITE","eSourceCode":11275,"isCurrentUserAnonymous":false,"isFavoriteItem":false,"id":"718b4e01-b2be-40cf-8f0c-bca3b01db0ed","allowedForAnonymousUsers":false,"type":"Favorite","displayName":"Save","namePassedToEvents":"Favorite","cssClassName":"atButtonFavorite","privacyOptOutMessage":"\u003cdiv class=\u0027privacyMessage\u0027\u003e\n\u003ch3\u003eThis feature is not available with your current cookie settings.\u003c/h3\u003e\n\u003cp\u003eYou can \u003ca href=\u0027#\u0027 data-show-preference-center=\u00271\u0027\u003eupdate your privacy settings\u003c/a\u003e to enable this content. Please enable “Functional Cookies” to use this feature.\u003c/p\u003e\n\u003c/div\u003e","showPrivacyOptOutMessage":false},{"nestedButtons":[{"layoutParameter":"p%3d1","id":"219a704d-bb63-40af-8f0d-f8389062f7e9","allowedForAnonymousUsers":true,"type":"Print","displayName":"Print Recipe","namePassedToEvents":"Print","cssClassName":"atButtonPrint","privacyOptOutMessage":"\u003cdiv class=\u0027privacyMessage\u0027\u003e\n\u003ch3\u003eThis feature is not available with your current cookie settings.\u003c/h3\u003e\n\u003cp\u003eYou can \u003ca href=\u0027#\u0027 data-show-preference-center=\u00271\u0027\u003eupdate your privacy settings\u003c/a\u003e to enable this content. Please enable “Functional Cookies” to use this feature.\u003c/p\u003e\n\u003c/div\u003e","showPrivacyOptOutMessage":false},{"providerName":"pinterest","providerNamePassedToEvents":"Pinterest","shareUrlFormat":"//pinterest.com/pin/create/link/?url={0}","id":"585d4198-c691-4eae-bb63-66cc1927e44a","allowedForAnonymousUsers":true,"type":"Social","displayName":"Save To Pinterest","namePassedToEvents":"Pinterest","cssClassName":"atButtonPinterest","privacyOptOutMessage":"\u003cdiv class=\u0027privacyMessage\u0027\u003e\n\u003ch3\u003eThis feature is not available with your current cookie settings.\u003c/h3\u003e\n\u003cp\u003eYou can \u003ca href=\u0027#\u0027 data-show-preference-center=\u00271\u0027\u003eupdate your privacy settings\u003c/a\u003e to enable this content. Please enable “Functional Cookies” to use this feature.\u003c/p\u003e\n\u003c/div\u003e","showPrivacyOptOutMessage":false},{"templateId":"95752b5c-7e75-4367-bca7-fdd3abb0ebcb","dialogHeading":"Email Recipe","emailCode":"TBSP_ContentEmail","dialogSettings":{"cancelButtonText":"Cancel","copyToSenderLabel":"Send a Copy to Myself","emailAddressesLabel":"* Email Address(es)","emailInstructionText":"Separate email addresses with commas","fromText":"From:","privacyPolicyText":"\u003cp\u003e\u0026copy;2024 General Mills, Inc. All Rights Reserved. This information will only be used to send an email to your friend(s) and will not be saved. Please read our \u003ca rel=\u0022noopener noreferrer\u0022 rel=\u0022noopener noreferrer\u0022 href=\u0022http://www.generalmills.com/company/privacy-policies/privacy-policy-us\u0022 target=\u0022_blank\u0022 shape=\u0022rect\u0022\u003ePrivacy Policy\u003c/a\u003e.\u003c/p\u003e","requiredFieldText":"* Required","sendButtonText":"Send","senderEmailAddressLabel":"* Your Email Address","senderFirstNameLabel":"* Your First Name","sendToText":"Send To:"},"id":"fad236f8-3084-4a50-bc7d-283bc5511677","allowedForAnonymousUsers":true,"type":"Email","displayName":"Share via Email","namePassedToEvents":"Email","cssClassName":"atButtonEmail","privacyOptOutMessage":"\u003cdiv class=\u0027privacyMessage\u0027\u003e\n\u003ch3\u003eThis feature is not available with your current cookie settings.\u003c/h3\u003e\n\u003cp\u003eYou can \u003ca href=\u0027#\u0027 data-show-preference-center=\u00271\u0027\u003eupdate your privacy settings\u003c/a\u003e to enable this content. Please enable “Functional Cookies” to use this feature.\u003c/p\u003e\n\u003c/div\u003e","showPrivacyOptOutMessage":false},{"providerName":"facebook","providerNamePassedToEvents":"Facebook","shareUrlFormat":"//facebook.com/sharer/sharer.php?u={0}","id":"fc7a5260-abb4-42be-958a-d172ba87442b","allowedForAnonymousUsers":true,"type":"Social","displayName":"Share on Facebook","namePassedToEvents":"Facebook","cssClassName":"atButtonFacebook","privacyOptOutMessage":"\u003cdiv class=\u0027privacyMessage\u0027\u003e\n\u003ch3\u003eThis feature is not available with your current cookie settings.\u003c/h3\u003e\n\u003cp\u003eYou can \u003ca href=\u0027#\u0027 data-show-preference-center=\u00271\u0027\u003eupdate your privacy settings\u003c/a\u003e to enable this content. Please enable “Functional Cookies” to use this feature.\u003c/p\u003e\n\u003c/div\u003e","showPrivacyOptOutMessage":false},{"successMessage":"Copied.","errorMessage":"Press Ctrl+C and Enter to copy to clipboard","successMessageDuration":3000,"errorMessageDuration":10000,"id":"263303a9-5fe6-480d-910a-608f153d379a","allowedForAnonymousUsers":true,"type":"CopyLink","displayName":"Copy Link","namePassedToEvents":"Copy","cssClassName":"atButtonCopyLink","privacyOptOutMessage":"\u003cdiv class=\u0027privacyMessage\u0027\u003e\n\u003ch3\u003eThis feature is not available with your current cookie settings.\u003c/h3\u003e\n\u003cp\u003eYou can \u003ca href=\u0027#\u0027 data-show-preference-center=\u00271\u0027\u003eupdate your privacy settings\u003c/a\u003e to enable this content. Please enable “Functional Cookies” to use this feature.\u003c/p\u003e\n\u003c/div\u003e","showPrivacyOptOutMessage":false}],"id":"46a2d62f-b80c-49bf-969f-5d28640dc94a","allowedForAnonymousUsers":true,"type":"Reveal","displayName":"Share","namePassedToEvents":"Share","cssClassName":"atButtonReveal","privacyOptOutMessage":"\u003cdiv class=\u0027privacyMessage\u0027\u003e\n\u003ch3\u003eThis feature is not available with your current cookie settings.\u003c/h3\u003e\n\u003cp\u003eYou can \u003ca href=\u0027#\u0027 data-show-preference-center=\u00271\u0027\u003eupdate your privacy settings\u003c/a\u003e to enable this content. Please enable “Functional Cookies” to use this feature.\u003c/p\u003e\n\u003c/div\u003e","showPrivacyOptOutMessage":false},{"errorMessage":"","id":"0a1bab6c-f930-4359-b8b4-a72470a4d8ee","allowedForAnonymousUsers":true,"type":"WakeLock","displayName":"Keep Screen On","namePassedToEvents":"Wakelock","cssClassName":"","privacyOptOutMessage":"\u003cdiv class=\u0027privacyMessage\u0027\u003e\n\u003ch3\u003eThis feature is not available with your current cookie settings.\u003c/h3\u003e\n\u003cp\u003eYou can \u003ca href=\u0027#\u0027 data-show-preference-center=\u00271\u0027\u003eupdate your privacy settings\u003c/a\u003e to enable this content. Please enable “Functional Cookies” to use this feature.\u003c/p\u003e\n\u003c/div\u003e","showPrivacyOptOutMessage":false}],"isSticky":true},"userSettings":{"isCurrentUserAnonymous":true,"isFavoriteItem":false},"pageAttributes":{"url":"https%3a%2f%2fwww.tablespoon.com%2frecipes%2fpizza-planes%2f9c1bc613-b17f-456e-918d-5f68e8bb876f","contentId":"9c1bc613-b17f-456e-918d-5f68e8bb876f"},"recaptchaPublicKey":"6LfW_icUAAAAAL_CG700pddUxLNYIxgRJe3vOg2Z"};
var moduleName = 'actionToolbar';
var isVueModule = true;
GeneralMills.PandoSites.RegisterControlInstance(moduleName, configuration, componentMetadata, isVueModule)
});
})();
Ingredients
-
1
can (11 oz) refrigerated Pillsbury™ Thin Crust Pizza Crust
-
1/2
cup Muir Glen™ organic pasta sauce
-
15
large slices provolone or mozzarella cheese
-
Pepperoni, assorted pizza toppings ham, pineapple, etc.
-
Optional: food coloring markers
(function() {
document.addEventListener('DOMContentLoaded', function() {
var componentMetadata = JSON.parse('\x7b\x22componentName\x22\x3a\x22RecipeIngredients_a2352866-1a21-4a5d-9dd4-1744f7700fb5\x22,\x22deferOptions\x22\x3a\x7b\x22deferComponent\x22\x3afalse,\x22deferType\x22\x3a\x22None\x22,\x22deferId\x22\x3a\x22rb75072ea73084bcbadc52fd5afd5c4d4\x22,\x22deferredContainerId\x22\x3a\x22\x2fmain\x2frdpIngredients\x22,\x22deferredContainerView\x22\x3anull\x7d,\x22viewName\x22\x3a\x22RecipeIngredients\x22\x7d');
var configuration = {};
var moduleName = 'recipeIngredients';
var isVueModule = false;
GeneralMills.PandoSites.RegisterControlInstance(moduleName, configuration, componentMetadata, isVueModule)
});
})();
Steps
-
1
Preheat oven to 425°F (400°F if using dark pan.)
-
2
Unroll dough onto a parchment paper lined or non-stick baking pan. Bake for 7-9 minutes until golden brown. Allow to cool completely.
-
3
Meanwhile, cut cheese slices using airplane cookie cutter.
-
4
Cut pizza toppings into windows, stripes and other airplane decorations.
-
5
Cut cooled crust using airplane cutter. You should get about 15 planes out of your crusts, depending on the size of your cutter.
-
6
Spread Muir Glen™ Organic Pasta Sauce over each pizza crust. Top with a slice of airplane-shaped cheese.
-
7
Add decorations on top.
-
8
Bake for about 4 minutes, just until cheese melts.
(function() {
document.addEventListener('DOMContentLoaded', function() {
var componentMetadata = JSON.parse('\x7b\x22componentName\x22\x3a\x22RecipeSteps_a2352866-1a21-4a5d-9dd4-1744f7700fb5\x22,\x22deferOptions\x22\x3a\x7b\x22deferComponent\x22\x3atrue,\x22deferType\x22\x3a\x22OnDemand\x22,\x22deferId\x22\x3a\x22r60e920b1e4b54088b4cbc303f37f5430\x22,\x22deferredContainerId\x22\x3a\x22\x2fmain\x2frdpSteps\x22,\x22deferredContainerView\x22\x3a\x22RecipeDetail\x22\x7d,\x22viewName\x22\x3a\x22RecipeSteps\x22\x7d');
var configuration = {"initAreImagesHidden":false,"hideImagesEventName":"HideStepShots","showImagesEventName":"ShowStepShots","hideImagesButtonText":"Hide Images","showImagesButtonText":"Show Images","hideImagesClass":"rdpHideStepImages"};
var moduleName = 'recipeStepShots';
var isVueModule = true;
GeneralMills.PandoSites.RegisterControlInstance(moduleName, configuration, componentMetadata, isVueModule)
});
})();
Nutrition Information
No nutrition information available for this recipe
(function() {
document.addEventListener('DOMContentLoaded', function() {
var componentMetadata = JSON.parse('\x7b\x22componentName\x22\x3a\x22RecipeNutritionNonPrint_a2352866-1a21-4a5d-9dd4-1744f7700fb5\x22,\x22deferOptions\x22\x3a\x7b\x22deferComponent\x22\x3atrue,\x22deferType\x22\x3a\x22Simple\x22,\x22deferId\x22\x3a\x22r3a79689449994bf2bf82b61211852039\x22,\x22deferredContainerId\x22\x3a\x22\x2fmain\x2frdpNutrition\x22,\x22deferredContainerView\x22\x3a\x22RecipeDetail\x22\x7d,\x22viewName\x22\x3a\x22RecipeNutritionNonPrint\x22\x7d');
var configuration = {"initIsExpanded":false,"expandEventName":"NutritionExpand","collapseEventName":"NutritionCollapse"};
var moduleName = 'recipeNutrition';
var isVueModule = true;
GeneralMills.PandoSites.RegisterControlInstance(moduleName, configuration, componentMetadata, isVueModule)
});
})();
More About This Recipe
-
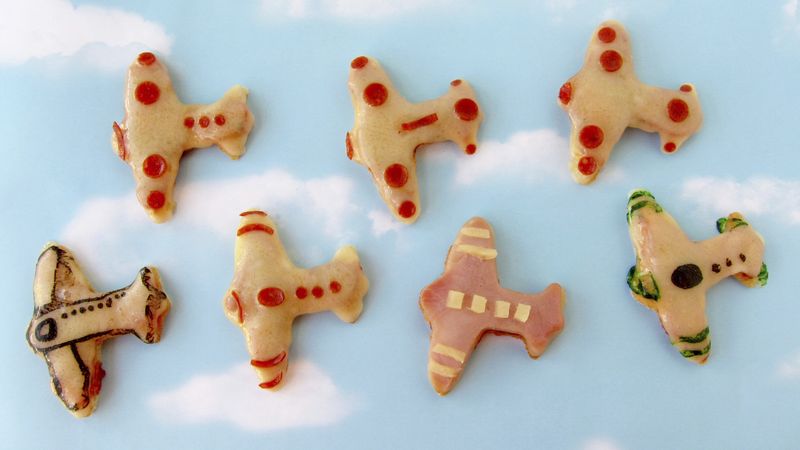
Edible airplanes touch down just in time for the new movie release, and they'll have your kids flying high!
I get to spend my days playing in the kitchen, creating edible crafts, and whenever my friend's children are visiting, they want to join me.
I love to see their eyes light up when they turn something ordinary into something really cool, like these Pizza Planes, which are so easy to make that even very young kids can help out. What better way to get kiddos to eat than to get 'em involved in the prep? It's like you're letting them play with their food!
To make these pizzas you will need to do just a small amour of prep work before you call the kids to help.
Pop open the Pillsbury™ Thin Crust Pizza Crust and lay it out on a baking sheet. I like to line my pan with parchment paper for easier removal, but a non-stick pan or cooking spray work well too.
Bake the crust for 7-9 minutes until golden brown and then allow it to cool completely.
Now grab the kids, so they can join in on the fun. Cut airplane shapes out of the pizza crust using a cookie cutter. Press down hard and wiggle the cutter around a bit to cut through the crust. Cut out about 15 airplanes.
While you are working, you can heat up a small bowl of the Muir Glen Pasta Sauce and dip all those scraps of pizza crust in it. Yum.
Now to the fun part. Use the cookie cutter to cut airplane shapes out of your cheese. Then cut shapes out of pepperoni, or any other pizza topping you like, and decorate your airplanes.
I used mini round cutters and kitchen shears to cut circles and stripes out of pepperoni. My favorite pizza is Hawaiian, so I cut an airplane out of a slice of ham, stacked it on top of my cheese slice, then added pineapple stripes and windows.
If your kids only like cheese pizza, they can use food coloring markers to decorate their pizzas.
After you're done decorating, it's time to assemble the pizzas. Spread some Muir Glen Pasta Sauce over each airplane shaped pizza crust. Then pick up the decorated slices of cheese and ham -- lay them on top of the sauce-covered crusts.
Heat pizzas in your oven just until the cheese melts, about 4 minutes. You'll notice that as the cheese melts, the decorations move a bit and the food coloring smears. It's O.K. You and the kids are just going to gobble these down anyway.
If I were making these to serve at a party, I would probably set them out unbaked on a platter until the kids were ready to eat, then ...
I'd pop them into the oven to melt the cheese and serve hot.
Team Tablespoon was super excited to find Beth’s amazing creations on her blog, Hungryhappenings.com. So, as you can imagine, we are geeked out to have her as a guest blogger. Check out the awesome noms that she made just for us!
(function() {
document.addEventListener('DOMContentLoaded', function() {
var componentMetadata = JSON.parse('\x7b\x22componentName\x22\x3a\x22RecipeTipCategory_a2352866-1a21-4a5d-9dd4-1744f7700fb5\x22,\x22deferOptions\x22\x3a\x7b\x22deferComponent\x22\x3atrue,\x22deferType\x22\x3a\x22Simple\x22,\x22deferId\x22\x3a\x22r5f129f82c93f488183cd8ccbb4370757\x22,\x22deferredContainerId\x22\x3a\x22\x2fmain\x2frdpStories\x22,\x22deferredContainerView\x22\x3a\x22RecipeDetail\x22\x7d,\x22viewName\x22\x3a\x22RecipeTipCategory\x22\x7d');
var configuration = {"expandEventName":"MoreAboutRecipeExpand","collapseEventName":"MoreAboutRecipeCollapse"};
var moduleName = 'recipeTipCategory';
var isVueModule = true;
GeneralMills.PandoSites.RegisterControlInstance(moduleName, configuration, componentMetadata, isVueModule)
});
})();
© 2024 ®/TM General Mills All Rights Reserved
(function() {
document.addEventListener('DOMContentLoaded', function() {
var componentMetadata = JSON.parse('\x7b\x22componentName\x22\x3a\x22DoubleClick_5f8292a2-3e9c-4318-94df-7fbdffc17662\x22,\x22deferOptions\x22\x3a\x7b\x22deferComponent\x22\x3atrue,\x22deferType\x22\x3a\x22OnDemand\x22,\x22deferId\x22\x3a\x22r43be588525d1456f86e2ade3d9162790\x22,\x22deferredContainerId\x22\x3a\x22\x2fmain\x2frdpFeatureAd\x22,\x22deferredContainerView\x22\x3a\x22DoubleClick\x22\x7d,\x22viewName\x22\x3a\x22DoubleClick\x22\x7d');
var configuration = {"adId":"OMP/tablespoon/recipes/300x250_AutoRefresh_top","minPageWidth":"1000","maxPageWidth":"9999","defaultMinPageWidth":"1000","defaultMaxPageWidth":"9999","size":"[300, 250]","refreshWhenViewed":true,"adContainerId":"2a5e695a-7e86-4321-849d-e026e5e50963","doubleClickAdContainerId":"46fba053-7c79-4571-a4ce-21830b54b635","adCaptionText":"Advertisement","networkCode":"/15704463/","relevantMetadata":["Appetizer","Pizza"],"privacyOptOut":false,"adProvider":"Legacy","sovrnCssClass":"","responsive":false,"contentType":"Recipe","itemId":"9c1bc613-b17f-456e-918d-5f68e8bb876f","continuesBelowText":"Recipe Continues Below"};
var moduleName = 'doubleClick';
var isVueModule = true;
GeneralMills.PandoSites.RegisterControlInstance(moduleName, configuration, componentMetadata, isVueModule)
});
})();
(function() {
document.addEventListener('DOMContentLoaded', function() {
var componentMetadata = JSON.parse('\x7b\x22componentName\x22\x3a\x22DoubleClick_c259ff4d-47bb-4fe7-add7-de2effa54403\x22,\x22deferOptions\x22\x3a\x7b\x22deferComponent\x22\x3atrue,\x22deferType\x22\x3a\x22OnDemand\x22,\x22deferId\x22\x3a\x22r4d9243dd3f3d4737b83fc7170b9b1467\x22,\x22deferredContainerId\x22\x3a\x22\x2fmain\x2frdpFeatureAd\x22,\x22deferredContainerView\x22\x3a\x22DoubleClick\x22\x7d,\x22viewName\x22\x3a\x22DoubleClick\x22\x7d');
var configuration = {"adId":"OMP/tablespoon/recipes/728x90_top","minPageWidth":"768","maxPageWidth":"999","defaultMinPageWidth":"1000","defaultMaxPageWidth":"9999","size":"[728, 90]","refreshWhenViewed":false,"adContainerId":"33ae3e4e-991a-4032-a58f-6a2f6163cf90","doubleClickAdContainerId":"fc738c11-30ff-4c50-95a1-fa0704bf8afc","adCaptionText":"Advertisement","networkCode":"/15704463/","relevantMetadata":["Appetizer","Pizza"],"privacyOptOut":false,"adProvider":"Legacy","sovrnCssClass":"","responsive":false,"contentType":"Recipe","itemId":"9c1bc613-b17f-456e-918d-5f68e8bb876f","continuesBelowText":"Recipe Continues Below"};
var moduleName = 'doubleClick';
var isVueModule = true;
GeneralMills.PandoSites.RegisterControlInstance(moduleName, configuration, componentMetadata, isVueModule)
});
})();
(function() {
document.addEventListener('DOMContentLoaded', function() {
var componentMetadata = JSON.parse('\x7b\x22componentName\x22\x3a\x22DoubleClick_6c874281-d7ee-4246-91de-0f51cce6949e\x22,\x22deferOptions\x22\x3a\x7b\x22deferComponent\x22\x3atrue,\x22deferType\x22\x3a\x22OnDemand\x22,\x22deferId\x22\x3a\x22r97c973df24214319bc1055b133b1afde\x22,\x22deferredContainerId\x22\x3a\x22\x2fmain\x2frdpFeatureAd\x22,\x22deferredContainerView\x22\x3a\x22DoubleClick\x22\x7d,\x22viewName\x22\x3a\x22DoubleClick\x22\x7d');
var configuration = {"adId":"OMP/m_tablespoon/recipes/300x250_top","minPageWidth":"299","maxPageWidth":"767","defaultMinPageWidth":"1000","defaultMaxPageWidth":"9999","size":"[[300,250], [300,600]]","refreshWhenViewed":false,"adContainerId":"cdd7b265-1ad6-4f54-b980-7046dd178c53","doubleClickAdContainerId":"e76652fc-52c1-4c9a-93a6-4b841afd4026","adCaptionText":"Advertisement","networkCode":"/15704463/","relevantMetadata":["Appetizer","Pizza"],"privacyOptOut":false,"adProvider":"Legacy","sovrnCssClass":"","responsive":false,"contentType":"Recipe","itemId":"9c1bc613-b17f-456e-918d-5f68e8bb876f","continuesBelowText":"Recipe Continues Below"};
var moduleName = 'doubleClick';
var isVueModule = true;
GeneralMills.PandoSites.RegisterControlInstance(moduleName, configuration, componentMetadata, isVueModule)
});
})();
(function() {
document.addEventListener('DOMContentLoaded', function() {
var componentMetadata = JSON.parse('\x7b\x22componentName\x22\x3a\x22RelatedContent_51c5b479-ce04-468f-b3cd-042a1083ee73\x22,\x22deferOptions\x22\x3a\x7b\x22deferComponent\x22\x3atrue,\x22deferType\x22\x3a\x22OnDemand\x22,\x22deferId\x22\x3a\x22r911b12be561a49479a0f24804159d076\x22,\x22deferredContainerId\x22\x3a\x22\x2fmain\x2frdpRelatedContent1\x22,\x22deferredContainerView\x22\x3a\x22RecipeDetail\x22\x7d,\x22viewName\x22\x3a\x22RelatedContent\x22\x7d');
var configuration = {"dataSourceId":"51c5b479-ce04-468f-b3cd-042a1083ee73","isCurrentUserAnonymous":true,"relatedContentList":{"contentId":"9c1bc613-b17f-456e-918d-5f68e8bb876f","listSettings":{"pageSize":6,"startPage":1,"listType":1,"title":"Try These Next","useModalRegistration":false,"regAction":"","esrcCode":0,"favoriteButtonLabelFormat":"Add {0} to favorites","contentTypes":[],"showImages":true,"showRatings":false,"allowFavoriting":true,"cssClassName":""},"items":[{"contentId":"6b99d141-0271-43d0-b3e2-54d369dd2a7c","contentType":"Recipe","title":"Mini Snowman Pizzas","isFavorite":false,"linkUrl":"/recipes/mini-snowman-pizzas/6b99d141-0271-43d0-b3e2-54d369dd2a7c","numberOfRatings":"0","averageRating":"0","averageRatingStars":"0","smallImageUrl":"//mojo.generalmills.com/api/public/content/LPWoxuZxhEiecnlDt-jhSQ_gmi_hi_res_jpeg.jpeg?v=1a22e69c\u0026t=205ad118875f48b5b556c2955695e2f6","mediumImageUrl":"//mojo.generalmills.com/api/public/content/LPWoxuZxhEiecnlDt-jhSQ_gmi_hi_res_jpeg.jpeg?v=1a22e69c\u0026t=9df44d78ea5c47f98018cc1578c6de79"},{"contentId":"a6925325-e710-43d6-9a28-bd1c1277c80e","contentType":"Recipe","title":"White Pizza Monkey Bread","isFavorite":false,"linkUrl":"/recipes/white-pizza-monkey-bread/a6925325-e710-43d6-9a28-bd1c1277c80e","numberOfRatings":"0","averageRating":"0","averageRatingStars":"0","smallImageUrl":"//mojo.generalmills.com/api/public/content/WnIhXznpikKOB4gL7QwkSg_gmi_hi_res_jpeg.jpeg?v=b5e64b9c\u0026t=205ad118875f48b5b556c2955695e2f6","mediumImageUrl":"//mojo.generalmills.com/api/public/content/WnIhXznpikKOB4gL7QwkSg_gmi_hi_res_jpeg.jpeg?v=b5e64b9c\u0026t=9df44d78ea5c47f98018cc1578c6de79"},{"contentId":"e12197ca-54de-46e1-8282-0d3e82addb5d","contentType":"Recipe","title":"Stuffed Pepperoni Pizza Braid","isFavorite":false,"linkUrl":"/recipes/stuffed-pepperoni-pizza-braid/e12197ca-54de-46e1-8282-0d3e82addb5d","numberOfRatings":"0","averageRating":"0","averageRatingStars":"0","smallImageUrl":"//mojo.generalmills.com/api/public/content/w6Jw3bt35kOrtBQrUXc00A_gmi_hi_res_jpeg.jpeg?v=8fa0c44b\u0026t=205ad118875f48b5b556c2955695e2f6","mediumImageUrl":"//mojo.generalmills.com/api/public/content/w6Jw3bt35kOrtBQrUXc00A_gmi_hi_res_jpeg.jpeg?v=8fa0c44b\u0026t=9df44d78ea5c47f98018cc1578c6de79"},{"contentId":"6ccd9f1e-a1a9-4fbc-9bb0-f99eb80e71cd","contentType":"Recipe","title":"Homemade Pizza (The Easy Way)","isFavorite":false,"linkUrl":"/recipes/homemade-pizza-the-easy-way/6ccd9f1e-a1a9-4fbc-9bb0-f99eb80e71cd","numberOfRatings":"0","averageRating":"0","averageRatingStars":"0","smallImageUrl":"//mojo.generalmills.com/api/public/content/Aey8D8UfVECZTN5C2y-Xgg_gmi_hi_res_jpeg.jpeg?v=e4d77c89\u0026t=205ad118875f48b5b556c2955695e2f6","mediumImageUrl":"//mojo.generalmills.com/api/public/content/Aey8D8UfVECZTN5C2y-Xgg_gmi_hi_res_jpeg.jpeg?v=e4d77c89\u0026t=9df44d78ea5c47f98018cc1578c6de79"},{"contentId":"563fbf09-d041-4518-a492-07dcfe45c920","contentType":"Recipe","title":"Pizza Cones","isFavorite":false,"linkUrl":"/recipes/pizza-cones/563fbf09-d041-4518-a492-07dcfe45c920","numberOfRatings":"0","averageRating":"0","averageRatingStars":"0","smallImageUrl":"//mojo.generalmills.com/api/public/content/G-3aiz7iKUSXz1LngaqyVA_gmi_hi_res_jpeg.jpeg?v=fc17d9a4\u0026t=205ad118875f48b5b556c2955695e2f6","mediumImageUrl":"//mojo.generalmills.com/api/public/content/G-3aiz7iKUSXz1LngaqyVA_gmi_hi_res_jpeg.jpeg?v=fc17d9a4\u0026t=9df44d78ea5c47f98018cc1578c6de79"},{"contentId":"40d9a08d-e723-4c2d-88f0-b6e0b2e0137b","contentType":"Recipe","title":"Deep-Dish Pizza Casserole","isFavorite":false,"linkUrl":"/recipes/deep-dish-pizza-casserole/40d9a08d-e723-4c2d-88f0-b6e0b2e0137b","numberOfRatings":"0","averageRating":"0","averageRatingStars":"0","smallImageUrl":"//mojo.generalmills.com/api/public/content/bTccUzQp2UC-A3EbVmGKqg_gmi_hi_res_jpeg.jpeg?v=acac2acb\u0026t=205ad118875f48b5b556c2955695e2f6","mediumImageUrl":"//mojo.generalmills.com/api/public/content/bTccUzQp2UC-A3EbVmGKqg_gmi_hi_res_jpeg.jpeg?v=acac2acb\u0026t=9df44d78ea5c47f98018cc1578c6de79"}],"availableItems":[{"contentId":"6b99d141-0271-43d0-b3e2-54d369dd2a7c","contentType":"Recipe","title":"Mini Snowman Pizzas","isFavorite":false,"linkUrl":"/recipes/mini-snowman-pizzas/6b99d141-0271-43d0-b3e2-54d369dd2a7c","numberOfRatings":"0","averageRating":"0","averageRatingStars":"0","smallImageUrl":"//mojo.generalmills.com/api/public/content/LPWoxuZxhEiecnlDt-jhSQ_gmi_hi_res_jpeg.jpeg?v=1a22e69c\u0026t=205ad118875f48b5b556c2955695e2f6","mediumImageUrl":"//mojo.generalmills.com/api/public/content/LPWoxuZxhEiecnlDt-jhSQ_gmi_hi_res_jpeg.jpeg?v=1a22e69c\u0026t=9df44d78ea5c47f98018cc1578c6de79"},{"contentId":"a6925325-e710-43d6-9a28-bd1c1277c80e","contentType":"Recipe","title":"White Pizza Monkey Bread","isFavorite":false,"linkUrl":"/recipes/white-pizza-monkey-bread/a6925325-e710-43d6-9a28-bd1c1277c80e","numberOfRatings":"0","averageRating":"0","averageRatingStars":"0","smallImageUrl":"//mojo.generalmills.com/api/public/content/WnIhXznpikKOB4gL7QwkSg_gmi_hi_res_jpeg.jpeg?v=b5e64b9c\u0026t=205ad118875f48b5b556c2955695e2f6","mediumImageUrl":"//mojo.generalmills.com/api/public/content/WnIhXznpikKOB4gL7QwkSg_gmi_hi_res_jpeg.jpeg?v=b5e64b9c\u0026t=9df44d78ea5c47f98018cc1578c6de79"},{"contentId":"e12197ca-54de-46e1-8282-0d3e82addb5d","contentType":"Recipe","title":"Stuffed Pepperoni Pizza Braid","isFavorite":false,"linkUrl":"/recipes/stuffed-pepperoni-pizza-braid/e12197ca-54de-46e1-8282-0d3e82addb5d","numberOfRatings":"0","averageRating":"0","averageRatingStars":"0","smallImageUrl":"//mojo.generalmills.com/api/public/content/w6Jw3bt35kOrtBQrUXc00A_gmi_hi_res_jpeg.jpeg?v=8fa0c44b\u0026t=205ad118875f48b5b556c2955695e2f6","mediumImageUrl":"//mojo.generalmills.com/api/public/content/w6Jw3bt35kOrtBQrUXc00A_gmi_hi_res_jpeg.jpeg?v=8fa0c44b\u0026t=9df44d78ea5c47f98018cc1578c6de79"},{"contentId":"6ccd9f1e-a1a9-4fbc-9bb0-f99eb80e71cd","contentType":"Recipe","title":"Homemade Pizza (The Easy Way)","isFavorite":false,"linkUrl":"/recipes/homemade-pizza-the-easy-way/6ccd9f1e-a1a9-4fbc-9bb0-f99eb80e71cd","numberOfRatings":"0","averageRating":"0","averageRatingStars":"0","smallImageUrl":"//mojo.generalmills.com/api/public/content/Aey8D8UfVECZTN5C2y-Xgg_gmi_hi_res_jpeg.jpeg?v=e4d77c89\u0026t=205ad118875f48b5b556c2955695e2f6","mediumImageUrl":"//mojo.generalmills.com/api/public/content/Aey8D8UfVECZTN5C2y-Xgg_gmi_hi_res_jpeg.jpeg?v=e4d77c89\u0026t=9df44d78ea5c47f98018cc1578c6de79"},{"contentId":"563fbf09-d041-4518-a492-07dcfe45c920","contentType":"Recipe","title":"Pizza Cones","isFavorite":false,"linkUrl":"/recipes/pizza-cones/563fbf09-d041-4518-a492-07dcfe45c920","numberOfRatings":"0","averageRating":"0","averageRatingStars":"0","smallImageUrl":"//mojo.generalmills.com/api/public/content/G-3aiz7iKUSXz1LngaqyVA_gmi_hi_res_jpeg.jpeg?v=fc17d9a4\u0026t=205ad118875f48b5b556c2955695e2f6","mediumImageUrl":"//mojo.generalmills.com/api/public/content/G-3aiz7iKUSXz1LngaqyVA_gmi_hi_res_jpeg.jpeg?v=fc17d9a4\u0026t=9df44d78ea5c47f98018cc1578c6de79"},{"contentId":"40d9a08d-e723-4c2d-88f0-b6e0b2e0137b","contentType":"Recipe","title":"Deep-Dish Pizza Casserole","isFavorite":false,"linkUrl":"/recipes/deep-dish-pizza-casserole/40d9a08d-e723-4c2d-88f0-b6e0b2e0137b","numberOfRatings":"0","averageRating":"0","averageRatingStars":"0","smallImageUrl":"//mojo.generalmills.com/api/public/content/bTccUzQp2UC-A3EbVmGKqg_gmi_hi_res_jpeg.jpeg?v=acac2acb\u0026t=205ad118875f48b5b556c2955695e2f6","mediumImageUrl":"//mojo.generalmills.com/api/public/content/bTccUzQp2UC-A3EbVmGKqg_gmi_hi_res_jpeg.jpeg?v=acac2acb\u0026t=9df44d78ea5c47f98018cc1578c6de79"}]}};
var moduleName = 'relatedContent';
var isVueModule = true;
GeneralMills.PandoSites.RegisterControlInstance(moduleName, configuration, componentMetadata, isVueModule)
});
})();
(function() {
document.addEventListener('DOMContentLoaded', function() {
var componentMetadata = JSON.parse('\x7b\x22componentName\x22\x3a\x22RelatedContent_3189d52e-4fdf-44af-ba27-f9502579ef43\x22,\x22deferOptions\x22\x3a\x7b\x22deferComponent\x22\x3atrue,\x22deferType\x22\x3a\x22OnDemand\x22,\x22deferId\x22\x3a\x22r72ed7ad2453f4c98b458c151245355dc\x22,\x22deferredContainerId\x22\x3a\x22\x2fmain\x2frdpRelatedContent1\x22,\x22deferredContainerView\x22\x3a\x22RecipeDetail\x22\x7d,\x22viewName\x22\x3a\x22RelatedContent\x22\x7d');
var configuration = {"dataSourceId":"3189d52e-4fdf-44af-ba27-f9502579ef43","isCurrentUserAnonymous":true,"relatedContentList":{"contentId":"9c1bc613-b17f-456e-918d-5f68e8bb876f","listSettings":{"pageSize":3,"startPage":1,"listType":1,"title":"Explore Categories","useModalRegistration":false,"regAction":"","esrcCode":0,"favoriteButtonLabelFormat":"Add {0} to favorites","contentTypes":["Category"],"showImages":false,"showRatings":false,"allowFavoriting":false,"cssClassName":"relatedContentWithoutImages"},"items":[{"contentId":"cc25f1e3-ff27-4492-a664-8611bff814c1","contentType":"Category","title":"Appetizers","isFavorite":false,"linkUrl":"/courses/appetizer","numberOfRatings":"0","averageRating":"0","averageRatingStars":"0","smallImageUrl":"","mediumImageUrl":""},{"contentId":"c9b55ab5-ba6a-48f9-9b6e-c2e9e35b15e0","contentType":"Category","title":"Hot Appetizers","isFavorite":false,"linkUrl":"/courses/appetizer/hot-appetizer","numberOfRatings":"0","averageRating":"0","averageRatingStars":"0","smallImageUrl":"","mediumImageUrl":""},{"contentId":"f5101b42-bde1-44e6-ac31-90defb2d7910","contentType":"Category","title":"Slow-Cooker Appetizers","isFavorite":false,"linkUrl":"/courses/appetizer/slow-cooker-appetizer","numberOfRatings":"0","averageRating":"0","averageRatingStars":"0","smallImageUrl":"","mediumImageUrl":""}],"availableItems":[{"contentId":"cc25f1e3-ff27-4492-a664-8611bff814c1","contentType":"Category","title":"Appetizers","isFavorite":false,"linkUrl":"/courses/appetizer","numberOfRatings":"0","averageRating":"0","averageRatingStars":"0","smallImageUrl":"","mediumImageUrl":""},{"contentId":"c9b55ab5-ba6a-48f9-9b6e-c2e9e35b15e0","contentType":"Category","title":"Hot Appetizers","isFavorite":false,"linkUrl":"/courses/appetizer/hot-appetizer","numberOfRatings":"0","averageRating":"0","averageRatingStars":"0","smallImageUrl":"","mediumImageUrl":""},{"contentId":"f5101b42-bde1-44e6-ac31-90defb2d7910","contentType":"Category","title":"Slow-Cooker Appetizers","isFavorite":false,"linkUrl":"/courses/appetizer/slow-cooker-appetizer","numberOfRatings":"0","averageRating":"0","averageRatingStars":"0","smallImageUrl":"","mediumImageUrl":""}]}};
var moduleName = 'relatedContent';
var isVueModule = true;
GeneralMills.PandoSites.RegisterControlInstance(moduleName, configuration, componentMetadata, isVueModule)
});
})();
(function() {
document.addEventListener('DOMContentLoaded', function() {
var componentMetadata = JSON.parse('\x7b\x22componentName\x22\x3a\x22DoubleClick_745c15b5-a9ad-4519-81b8-8ce6135efb93\x22,\x22deferOptions\x22\x3a\x7b\x22deferComponent\x22\x3atrue,\x22deferType\x22\x3a\x22OnDemand\x22,\x22deferId\x22\x3a\x22r739bad1ae516483faf3f96f5122440c4\x22,\x22deferredContainerId\x22\x3a\x22\x2fmain\x2frdpSecondaryAd\x22,\x22deferredContainerView\x22\x3a\x22DoubleClick\x22\x7d,\x22viewName\x22\x3a\x22DoubleClick\x22\x7d');
var configuration = {"adId":"OMP/tablespoon/recipes/300x250_bottom","minPageWidth":"1000","maxPageWidth":"9999","defaultMinPageWidth":"1000","defaultMaxPageWidth":"9999","size":"[[300,600],[300,250]]","refreshWhenViewed":false,"adContainerId":"13152cd7-713b-4844-9125-67777f17c4fb","doubleClickAdContainerId":"f0ccb1e7-ec48-4655-b9ae-382f277e5953","adCaptionText":"Advertisement","networkCode":"/15704463/","relevantMetadata":["Appetizer","Pizza"],"privacyOptOut":false,"adProvider":"Legacy","sovrnCssClass":"","responsive":false,"contentType":"Recipe","itemId":"9c1bc613-b17f-456e-918d-5f68e8bb876f","continuesBelowText":"Recipe Continues Below"};
var moduleName = 'doubleClick';
var isVueModule = true;
GeneralMills.PandoSites.RegisterControlInstance(moduleName, configuration, componentMetadata, isVueModule)
});
})();
(function() {
document.addEventListener('DOMContentLoaded', function() {
var componentMetadata = JSON.parse('\x7b\x22componentName\x22\x3a\x22DoubleClick_adef0bec-8719-4457-8387-12e0f80eec2b\x22,\x22deferOptions\x22\x3a\x7b\x22deferComponent\x22\x3atrue,\x22deferType\x22\x3a\x22OnDemand\x22,\x22deferId\x22\x3a\x22re737b9b55ed44f96b5f51f17d8ada592\x22,\x22deferredContainerId\x22\x3a\x22\x2fmain\x2frdpSecondaryAd\x22,\x22deferredContainerView\x22\x3a\x22DoubleClick\x22\x7d,\x22viewName\x22\x3a\x22DoubleClick\x22\x7d');
var configuration = {"adId":"OMP/tablespoon/recipes/728x90_bottom","minPageWidth":"768","maxPageWidth":"999","defaultMinPageWidth":"1000","defaultMaxPageWidth":"9999","size":"[728, 90]","refreshWhenViewed":false,"adContainerId":"bfd73ea1-4255-4fb1-ac00-51e88b2ee128","doubleClickAdContainerId":"66b8c90a-d565-4612-9d57-8a4455503667","adCaptionText":"Advertisement","networkCode":"/15704463/","relevantMetadata":["Appetizer","Pizza"],"privacyOptOut":false,"adProvider":"Legacy","sovrnCssClass":"","responsive":false,"contentType":"Recipe","itemId":"9c1bc613-b17f-456e-918d-5f68e8bb876f","continuesBelowText":"Recipe Continues Below"};
var moduleName = 'doubleClick';
var isVueModule = true;
GeneralMills.PandoSites.RegisterControlInstance(moduleName, configuration, componentMetadata, isVueModule)
});
})();
(function() {
document.addEventListener('DOMContentLoaded', function() {
var componentMetadata = JSON.parse('\x7b\x22componentName\x22\x3a\x22DoubleClick_80e5634b-4b8b-4ab6-9d42-f87399323043\x22,\x22deferOptions\x22\x3a\x7b\x22deferComponent\x22\x3atrue,\x22deferType\x22\x3a\x22OnDemand\x22,\x22deferId\x22\x3a\x22r7c87b12a3d8d4bbe8efaaed5f4a2e185\x22,\x22deferredContainerId\x22\x3a\x22\x2fmain\x2frdpSecondaryAd\x22,\x22deferredContainerView\x22\x3a\x22DoubleClick\x22\x7d,\x22viewName\x22\x3a\x22DoubleClick\x22\x7d');
var configuration = {"adId":"OMP/m_tablespoon/recipes/300x250_bottom","minPageWidth":"299","maxPageWidth":"767","defaultMinPageWidth":"1000","defaultMaxPageWidth":"9999","size":"[[300,250], [300,600]]","refreshWhenViewed":false,"adContainerId":"63dbaf84-6a9e-4f39-828d-0365404311d5","doubleClickAdContainerId":"68b5225e-a5ea-47a6-a470-f04b99bfc51c","adCaptionText":"Advertisement","networkCode":"/15704463/","relevantMetadata":["Appetizer","Pizza"],"privacyOptOut":false,"adProvider":"Legacy","sovrnCssClass":"","responsive":false,"contentType":"Recipe","itemId":"9c1bc613-b17f-456e-918d-5f68e8bb876f","continuesBelowText":"Recipe Continues Below"};
var moduleName = 'doubleClick';
var isVueModule = true;
GeneralMills.PandoSites.RegisterControlInstance(moduleName, configuration, componentMetadata, isVueModule)
});
})();
(function() {
document.addEventListener('DOMContentLoaded', function() {
var componentMetadata = JSON.parse('\x7b\x22componentName\x22\x3a\x22DoubleClick_34589d2e-66d8-4e9a-9c4f-fb0e3ab39458\x22,\x22deferOptions\x22\x3a\x7b\x22deferComponent\x22\x3atrue,\x22deferType\x22\x3a\x22OnDemand\x22,\x22deferId\x22\x3a\x22r981e07a2c9a742d6a5e44cc22f38ba49\x22,\x22deferredContainerId\x22\x3a\x22\x2fmain\x2frdpTernaryAd\x22,\x22deferredContainerView\x22\x3a\x22DoubleClick\x22\x7d,\x22viewName\x22\x3a\x22DoubleClick\x22\x7d');
var configuration = {"adId":"OMP/tablespoon/recipes/300x250_bottom2","minPageWidth":"1000","maxPageWidth":"9999","defaultMinPageWidth":"1000","defaultMaxPageWidth":"9999","size":"[[300,600],[300,250]]","refreshWhenViewed":false,"adContainerId":"782cc8b2-314b-4233-abc0-47c19208d9fa","doubleClickAdContainerId":"ec9e203d-6bd6-47cb-96c3-cf2f720bddc4","adCaptionText":"Advertisement","networkCode":"/15704463/","relevantMetadata":["Appetizer","Pizza"],"privacyOptOut":false,"adProvider":"Legacy","sovrnCssClass":"","responsive":false,"contentType":"Recipe","itemId":"9c1bc613-b17f-456e-918d-5f68e8bb876f","continuesBelowText":"Recipe Continues Below"};
var moduleName = 'doubleClick';
var isVueModule = true;
GeneralMills.PandoSites.RegisterControlInstance(moduleName, configuration, componentMetadata, isVueModule)
});
})();