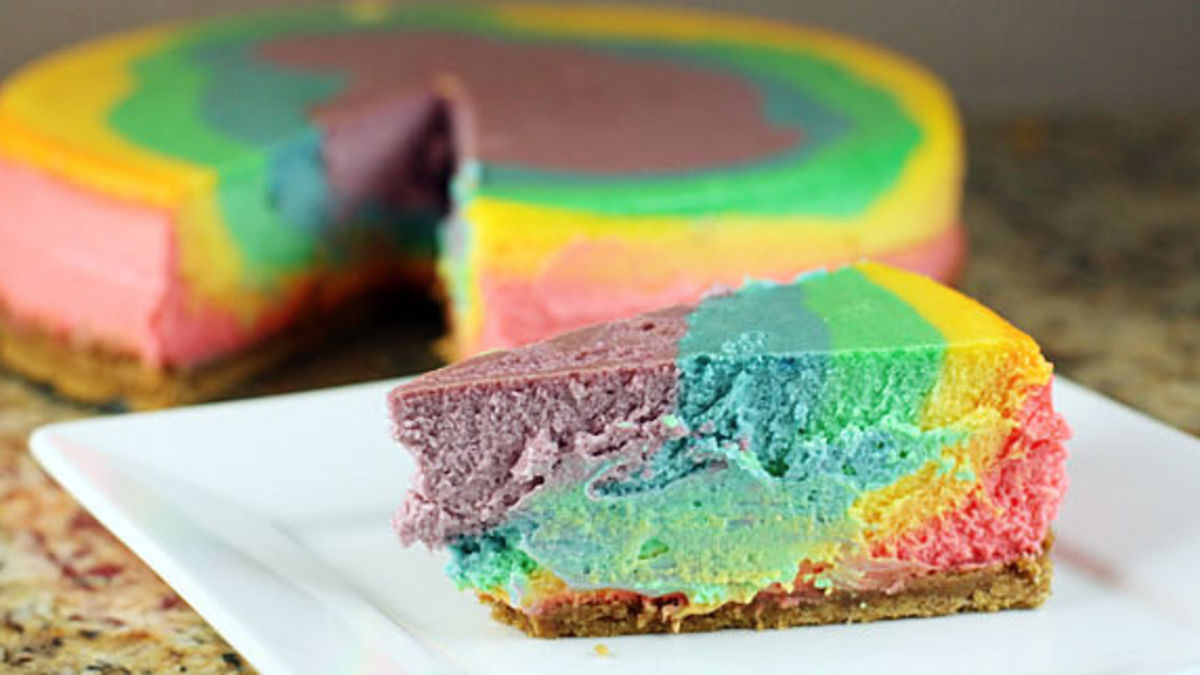
The only thing better than homemade cheesecake is swirls of homemade cheesecake in all the colors of the rainbow. Beyond being beautiful, this cheesecake is silky, smooth, light and tasty all at the same time. It's the kind of cheesecake that needs no topping.
More About This Recipe
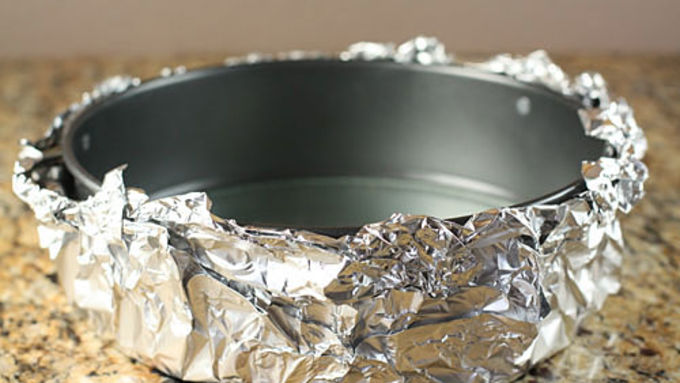
- There's a hidden secret to this Rainbow Cheesecake recipe. A surprise. And no, the surprise isn't the awesome rainbow layers that appear on each slice of cake. The surprise is that it's the best cheesecake you'll ever eat. Beyond being beautiful, it's silky, smooth, light, and tasty all at the same time. It's the kind of cheesecake that needs no topping. The downside of making this amazing cheesecake from scratch, however, is that it takes roughly 8 hours to make. So plan accordingly! You’ll need a springform pan, which is the only way to get the cake to mold correctly. You also need to make sure your springform pan is waterproof because you need to actually bake this cake in a water bath. Have no fear though. This isn't hard. Just take a few layers of foil and carefully wrap it around the pan in both directions. Fold it carefully all around the edges until it fits snugly against the pan. (Be careful not to rip the foil.) Now, of course, you don't have to do the whole rainbow thing. If you leave it out you'll still be left with a very awesome standard-colored cheesecake that will wow your guests. And yes, I realize that the rainbow actually has seven colors, but for this dish it's pretty impossible to tell the difference between violet and indigo. So six will do! Once you have your colors mixed, pour them into the prepared pan with the crust in a logical order, which for me was: red, orange, yellow, green, blue, purple. The trick is to pour each color right in the center of the dish. This will cause them to spread out evenly so each slice has all the layers! When it's done baking, the goal is to cool it down as slowly as possible so the cake doesn't crack a lot. The best way to do this is to turn off the oven, crack the door a bit, and let it cool in the water bath inside the oven for about an hour. When it comes out, remove it from the water bath, cover it loosely with foil and store it in the fridge for at least 4 hours.
- There's no doubt this take some time. But it's a really fun project and one that'll reward your work with a perfect cheesecake.
- • Mini Oreo™ Cheesecake Bites • No-Bake Dulce de Leche Cheesecake • White Russian Cheesecake Cookie Bars • Mini Honey Nut Cheerios™ Cheesecakes • Brownie S'mores Cheesecake
Rainbow Cheesecake
- Prep Time 45 min
- Total 8 hr 0 min
- Servings 16
- Ingredients 13
Ingredients
Crust
- 2 cups finely crushed graham crackers
- 2 tablespoons sugar
- 1/2 teaspoon ground cinnamon
- 1 pinch salt
- 6 tablespoons unsalted butter, softened
Filling
- 4 packages (8 oz each) cream cheese, room temperature
- 1 1/3 cups sugar
- 2 teaspoons vanilla
- 1 pinch salt
- 1 cup sour cream
- 1 cup heavy cream
- 4 large eggs
- 1 each of liquid food colors (blue, yellow, green, red)
Instructions
-
Step1Preheat oven 350°F. Before you get started with the crust, wrap a 9-inch springform pan in a few layers of foil to make sure the pan stays watertight during baking. Be careful not to rip the foil, or water will get into the pan and ruin your cheesecake.
![]()
-
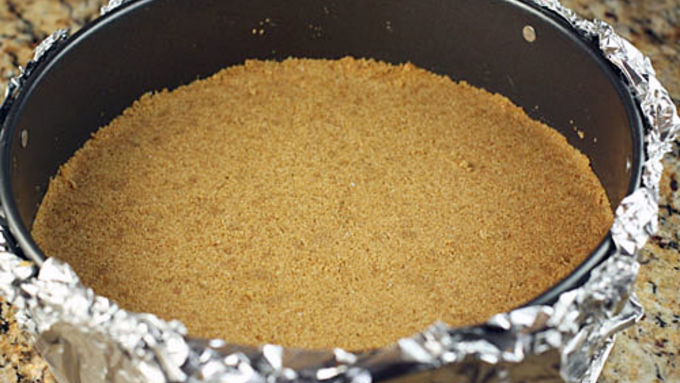
Step2Mix crushed grapham crackers, 2 tablespoons sugar, 1/2 teaspoon cinnamon and pinch of salt together in a bowl. Add butter and mix with clean fingers until pea-sized crumbs form. Press all of the graham cracker mixture into the prepared springform pan. Tip: To get a flat, even crust surface, press down firmly with the flat bottom of a measuring cup.
![]()
-
Step3Bake the crust for 10 minutes on a low oven rack. Remove from the oven, and allow it to cool completely before adding the filling. Turn oven temperature down to 325°F.
-
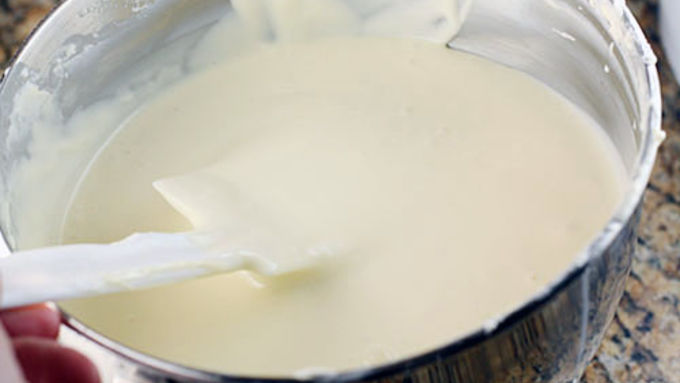
Step4To make filling, cut cream cheese into pieces and add to a mixing bowl. Whip until smooth, about 4 minutes. Then add 1 1/3 cups sugar, and continue to beat until smooth again, another 4-5 minutes. Next, add vanilla, salt, sour cream and heavy cream; beat until smooth. Add in 1 egg at a time, beating briefly between each egg.
![]()
-
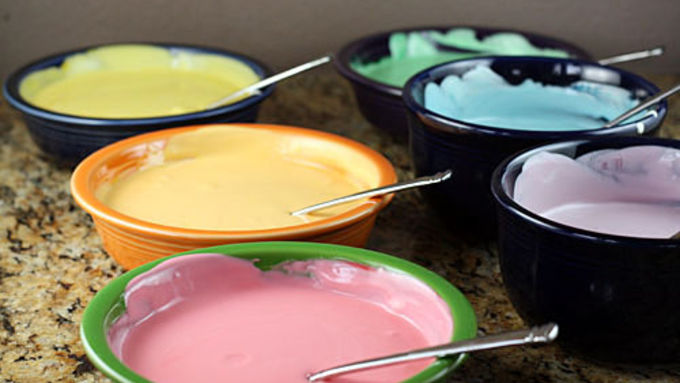
Step5Once the mixture is well combined and very smooth, divide evenly into 6 dishes. Add food color to each dish to get the desired colors. (Red = 25 drops of red, Orange = 18 drops yellow + 6 drops red, Yellow = 18 drops yellow, Green = 18 drops green, Blue = 18 drops blue, Violet = 18 drops red + 12 drops blue)
![]()
-
Step6Pour colored mixtures into cooled crust. Start with red filling, and slowly pour it right in the center of the crust. Continue to build the rainbow by pouring the fillings directly in the center. This will create layers so that each slice has some of each color.
![]()
-
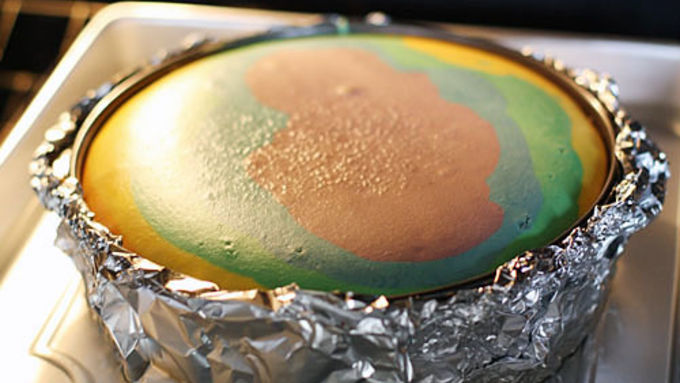
Step7Place cheesecake into a baking dish on oven rack, and fill baking dish with boiling water about 1 inch up the side of the springform pan. Bake at 325°F in the water bath for 1 hour and 40 minutes to 1 hour 50 minutes or until set but still jiggles slightly 2 inches from the edge. If cheesecake begins to brown on top, cover loosely with foil during last 5 minutes of baking.
![]()
-
Step8Turn off the oven, open the oven door a crack, and let the cake cool in the oven for 1 hour. Cooling it slowly will help prevent the top of the cake from cracking. Then loosely wrap the dish in foil (so the foil isn't touching the top of the cake) and refrigerate for at least 4 hours before serving.
-
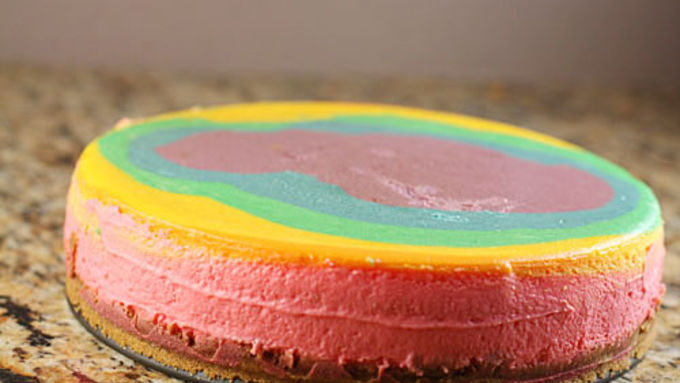
Step9When ready to remove the cake from the pan, run a clean narrow knife along the inside edge to loosen the sides of the cheesecake from the pan. Remove the foil, unlock the spring and carefully lift off the outer ring.
![]()
-
Step10Serve alone or with a simple fruit sauce, like cherry or raspberry. Although this cheesecake is so rich and creamy that it really doesn't need a topping.

Nutrition
450
Calories
34g
Total Fat
6g
Protein
30g
Total Carbohydrate
24g
Sugars
Nutrition Facts
Serving Size: 1 Serving
- Calories
- 450
- Calories from Fat
- 300
- Total Fat
- 34g
- 52%
- Saturated Fat
- 19g
- 94%
- Trans Fat
- 1g
- Cholesterol
- 145mg
- 48%
- Sodium
- 300mg
- 13%
- Potassium
- 150mg
- 4%
- Total Carbohydrate
- 30g
- 10%
- Dietary Fiber
- 0g
- 0%
- Sugars
- 24g
- Protein
- 6g
% Daily Value*:
- Vitamin A
- 25%
- 25%
- Vitamin C
- 0%
- 0%
- Calcium
- 10%
- 10%
- Iron
- 4%
- 4%
Exchanges:
0 Starch; 0 Fruit; 1 Other Carbohydrate; 0 Skim Milk; 0 Low-Fat Milk; 1 Milk; 0 Vegetable; 0 Very Lean Meat; 0 Lean Meat; 0 High-Fat Meat; 5 Fat;Carbohydrate Choice
2
(function() {
document.addEventListener('DOMContentLoaded', function() {
var componentMetadata = JSON.parse('\x7b\x22componentName\x22\x3a\x22RelatedContent_86838426-dd26-481a-9735-69435bca607d\x22,\x22deferOptions\x22\x3a\x7b\x22deferComponent\x22\x3afalse,\x22deferType\x22\x3a\x22None\x22,\x22deferId\x22\x3a\x22r7239ad7ee29f4b2b815a05b966ef1d27\x22,\x22deferredContainerId\x22\x3a\x22\x2fmain\x2frdpRelatedContent1_NonDeferred\x22,\x22deferredContainerView\x22\x3anull\x7d,\x22viewName\x22\x3a\x22RelatedContent\x22\x7d');
var configuration = {"dataSourceId":"86838426-dd26-481a-9735-69435bca607d","isCurrentUserAnonymous":true,"isAnonymousUserWithFavorites":false,"relatedContentList":{"contentId":"a8f49949-91b4-438b-a615-50c5ced7165f","listSettings":{"pageSize":3,"startPage":1,"listType":1,"title":"Try These Next","useModalRegistration":false,"regAction":"","esrcCode":0,"favoriteButtonLabelFormat":"Add {0} to favorites","contentTypes":["Category"],"showImages":false,"imageSize":0,"showRatings":false,"allowFavoriting":false,"cssClassName":"relatedContentWithoutImages","favoriteButtonText":""},"items":[{"contentId":"03f67351-23e8-4156-80c0-7fe088497aaa","contentType":"Category","title":"Vegetarian Dinner","isFavorite":false,"linkUrl":"/courses/dinner/vegetarian-dinner","numberOfRatings":"0","averageRating":"0","averageRatingStars":"0","smallImageUrl":"","mediumImageUrl":""},{"contentId":"3f0c6be3-ebb3-4a76-8429-f0fdeadffee1","contentType":"Category","title":"Cheesecake","isFavorite":false,"linkUrl":"/courses/dessert/cheesecake","numberOfRatings":"0","averageRating":"0","averageRatingStars":"0","smallImageUrl":"","mediumImageUrl":""},{"contentId":"8677f01b-3b1f-4761-b0d4-cf5305a681d6","contentType":"Category","title":"Cakes","isFavorite":false,"linkUrl":"/courses/dessert/cake","numberOfRatings":"0","averageRating":"0","averageRatingStars":"0","smallImageUrl":"","mediumImageUrl":""}],"availableItems":[{"contentId":"03f67351-23e8-4156-80c0-7fe088497aaa","contentType":"Category","title":"Vegetarian Dinner","isFavorite":false,"linkUrl":"/courses/dinner/vegetarian-dinner","numberOfRatings":"0","averageRating":"0","averageRatingStars":"0","smallImageUrl":"","mediumImageUrl":""},{"contentId":"3f0c6be3-ebb3-4a76-8429-f0fdeadffee1","contentType":"Category","title":"Cheesecake","isFavorite":false,"linkUrl":"/courses/dessert/cheesecake","numberOfRatings":"0","averageRating":"0","averageRatingStars":"0","smallImageUrl":"","mediumImageUrl":""},{"contentId":"8677f01b-3b1f-4761-b0d4-cf5305a681d6","contentType":"Category","title":"Cakes","isFavorite":false,"linkUrl":"/courses/dessert/cake","numberOfRatings":"0","averageRating":"0","averageRatingStars":"0","smallImageUrl":"","mediumImageUrl":""}]}};
var moduleName = 'relatedContent';
var isVueModule = true;
GeneralMills.PandoSites.RegisterControlInstance(moduleName, configuration, componentMetadata, isVueModule)
});
})();
(function() {
document.addEventListener('DOMContentLoaded', function() {
var componentMetadata = JSON.parse('\x7b\x22componentName\x22\x3a\x22RelatedContent_9930dad2-817c-4363-b508-21f459b3c521\x22,\x22deferOptions\x22\x3a\x7b\x22deferComponent\x22\x3atrue,\x22deferType\x22\x3a\x22OnDemand\x22,\x22deferId\x22\x3a\x22ra5e15cd8d01f4d1d9103777489467f04\x22,\x22deferredContainerId\x22\x3a\x22\x2fmain\x2frdpRelatedContent1\x22,\x22deferredContainerView\x22\x3a\x22RecipeDetailRedesign\x22\x7d,\x22viewName\x22\x3a\x22RelatedContent\x22\x7d');
var configuration = {"dataSourceId":"9930dad2-817c-4363-b508-21f459b3c521","isCurrentUserAnonymous":true,"isAnonymousUserWithFavorites":false,"relatedContentList":{"contentId":"a8f49949-91b4-438b-a615-50c5ced7165f","listSettings":{"pageSize":6,"startPage":1,"listType":1,"title":"","useModalRegistration":false,"regAction":"","esrcCode":0,"favoriteButtonLabelFormat":"Add {0} to favorites","contentTypes":[],"showImages":true,"imageSize":1,"showRatings":false,"allowFavoriting":true,"cssClassName":"","favoriteButtonText":"Save"},"items":[{"contentId":"42c2b8ef-2863-43b6-b75e-c2f393aceae3","contentType":"Recipe","title":"Pistachio Cheesecake","isFavorite":false,"linkUrl":"/recipes/pistachio-cheesecake/42c2b8ef-2863-43b6-b75e-c2f393aceae3","numberOfRatings":"0","averageRating":"0","averageRatingStars":"0","smallImageUrl":"//mojo.generalmills.com/api/public/content/lLBFe50pokywfsgP13PMnQ_webp_base.webp?v=95be9031\u0026t=67e847e026fb43aa8d6e3f5ef39a4ef7","mediumImageUrl":"//mojo.generalmills.com/api/public/content/lLBFe50pokywfsgP13PMnQ_webp_base.webp?v=95be9031\u0026t=3653fe2f5ecd4a47a5a51c97e429947c"},{"contentId":"1d3ac7fc-6df0-4370-806a-ec8895df7281","contentType":"Recipe","title":"Puerto Rican Coquito Cheesecake","isFavorite":false,"linkUrl":"/recipes/puerto-rican-coquito-cheesecake/1d3ac7fc-6df0-4370-806a-ec8895df7281","numberOfRatings":"0","averageRating":"0","averageRatingStars":"0","smallImageUrl":"//mojo.generalmills.com/api/public/content/nWnvprlIH0mfIIhahPiaMg_webp_base.webp?v=51419cca\u0026t=67e847e026fb43aa8d6e3f5ef39a4ef7","mediumImageUrl":"//mojo.generalmills.com/api/public/content/nWnvprlIH0mfIIhahPiaMg_webp_base.webp?v=51419cca\u0026t=3653fe2f5ecd4a47a5a51c97e429947c"},{"contentId":"4282c4ad-8f3f-441e-a34e-2b1251fda676","contentType":"Recipe","title":"Brownie S’mores Cheesecake","isFavorite":false,"linkUrl":"/recipes/brownie-smores-cheesecake/4282c4ad-8f3f-441e-a34e-2b1251fda676","numberOfRatings":"0","averageRating":"0","averageRatingStars":"0","smallImageUrl":"//mojo.generalmills.com/api/public/content/Qu7G0zAQXUOcBFKprRB_sA_webp_base.webp?v=7681645e\u0026t=67e847e026fb43aa8d6e3f5ef39a4ef7","mediumImageUrl":"//mojo.generalmills.com/api/public/content/Qu7G0zAQXUOcBFKprRB_sA_webp_base.webp?v=7681645e\u0026t=3653fe2f5ecd4a47a5a51c97e429947c"},{"contentId":"2735a42f-4d79-4dcd-96e8-40d88c7bba08","contentType":"Recipe","title":"Basic Cheesecake","isFavorite":false,"linkUrl":"/recipes/basic-cheesecake/2735a42f-4d79-4dcd-96e8-40d88c7bba08","numberOfRatings":"0","averageRating":"0","averageRatingStars":"0","smallImageUrl":"//mojo.generalmills.com/api/public/content/wYaQHIlcQk6U6TSndRjjzA_webp_base.webp?v=582c7def\u0026t=67e847e026fb43aa8d6e3f5ef39a4ef7","mediumImageUrl":"//rms-media-prod.generalmills.com/69fdd10c-04c4-43e9-86c6-d62b83b0cd53.jpg"},{"contentId":"ebaad954-78e5-4b05-800c-7996ed5e20ba","contentType":"Recipe","title":"No-Bake Dulce de Leche Cheesecake","isFavorite":false,"linkUrl":"/recipes/no-bake-dulce-de-leche-cheesecake/ebaad954-78e5-4b05-800c-7996ed5e20ba","numberOfRatings":"0","averageRating":"0","averageRatingStars":"0","smallImageUrl":"//mojo.generalmills.com/api/public/content/Ml5Qq_-oDEer7qzEla28bA_webp_base.webp?v=c0cd9f36\u0026t=67e847e026fb43aa8d6e3f5ef39a4ef7","mediumImageUrl":"//mojo.generalmills.com/api/public/content/Ml5Qq_-oDEer7qzEla28bA_webp_base.webp?v=c0cd9f36\u0026t=3653fe2f5ecd4a47a5a51c97e429947c"},{"contentId":"8ccc3131-1e61-4793-835e-4390716d91a4","contentType":"Recipe","title":"Rainbow Cheesecake Hearts","isFavorite":false,"linkUrl":"/recipes/rainbow-cheesecake-hearts/8ccc3131-1e61-4793-835e-4390716d91a4","numberOfRatings":"0","averageRating":"0","averageRatingStars":"0","smallImageUrl":"//mojo.generalmills.com/api/public/content/K7QOhq03F0uL86d9nagDHQ_webp_base.webp?v=ad4bea7c\u0026t=67e847e026fb43aa8d6e3f5ef39a4ef7","mediumImageUrl":"//mojo.generalmills.com/api/public/content/K7QOhq03F0uL86d9nagDHQ_webp_base.webp?v=ad4bea7c\u0026t=3653fe2f5ecd4a47a5a51c97e429947c"}],"availableItems":[{"contentId":"42c2b8ef-2863-43b6-b75e-c2f393aceae3","contentType":"Recipe","title":"Pistachio Cheesecake","isFavorite":false,"linkUrl":"/recipes/pistachio-cheesecake/42c2b8ef-2863-43b6-b75e-c2f393aceae3","numberOfRatings":"0","averageRating":"0","averageRatingStars":"0","smallImageUrl":"//mojo.generalmills.com/api/public/content/lLBFe50pokywfsgP13PMnQ_webp_base.webp?v=95be9031\u0026t=67e847e026fb43aa8d6e3f5ef39a4ef7","mediumImageUrl":"//mojo.generalmills.com/api/public/content/lLBFe50pokywfsgP13PMnQ_webp_base.webp?v=95be9031\u0026t=3653fe2f5ecd4a47a5a51c97e429947c"},{"contentId":"1d3ac7fc-6df0-4370-806a-ec8895df7281","contentType":"Recipe","title":"Puerto Rican Coquito Cheesecake","isFavorite":false,"linkUrl":"/recipes/puerto-rican-coquito-cheesecake/1d3ac7fc-6df0-4370-806a-ec8895df7281","numberOfRatings":"0","averageRating":"0","averageRatingStars":"0","smallImageUrl":"//mojo.generalmills.com/api/public/content/nWnvprlIH0mfIIhahPiaMg_webp_base.webp?v=51419cca\u0026t=67e847e026fb43aa8d6e3f5ef39a4ef7","mediumImageUrl":"//mojo.generalmills.com/api/public/content/nWnvprlIH0mfIIhahPiaMg_webp_base.webp?v=51419cca\u0026t=3653fe2f5ecd4a47a5a51c97e429947c"},{"contentId":"4282c4ad-8f3f-441e-a34e-2b1251fda676","contentType":"Recipe","title":"Brownie S’mores Cheesecake","isFavorite":false,"linkUrl":"/recipes/brownie-smores-cheesecake/4282c4ad-8f3f-441e-a34e-2b1251fda676","numberOfRatings":"0","averageRating":"0","averageRatingStars":"0","smallImageUrl":"//mojo.generalmills.com/api/public/content/Qu7G0zAQXUOcBFKprRB_sA_webp_base.webp?v=7681645e\u0026t=67e847e026fb43aa8d6e3f5ef39a4ef7","mediumImageUrl":"//mojo.generalmills.com/api/public/content/Qu7G0zAQXUOcBFKprRB_sA_webp_base.webp?v=7681645e\u0026t=3653fe2f5ecd4a47a5a51c97e429947c"},{"contentId":"2735a42f-4d79-4dcd-96e8-40d88c7bba08","contentType":"Recipe","title":"Basic Cheesecake","isFavorite":false,"linkUrl":"/recipes/basic-cheesecake/2735a42f-4d79-4dcd-96e8-40d88c7bba08","numberOfRatings":"0","averageRating":"0","averageRatingStars":"0","smallImageUrl":"//mojo.generalmills.com/api/public/content/wYaQHIlcQk6U6TSndRjjzA_webp_base.webp?v=582c7def\u0026t=67e847e026fb43aa8d6e3f5ef39a4ef7","mediumImageUrl":"//rms-media-prod.generalmills.com/69fdd10c-04c4-43e9-86c6-d62b83b0cd53.jpg"},{"contentId":"ebaad954-78e5-4b05-800c-7996ed5e20ba","contentType":"Recipe","title":"No-Bake Dulce de Leche Cheesecake","isFavorite":false,"linkUrl":"/recipes/no-bake-dulce-de-leche-cheesecake/ebaad954-78e5-4b05-800c-7996ed5e20ba","numberOfRatings":"0","averageRating":"0","averageRatingStars":"0","smallImageUrl":"//mojo.generalmills.com/api/public/content/Ml5Qq_-oDEer7qzEla28bA_webp_base.webp?v=c0cd9f36\u0026t=67e847e026fb43aa8d6e3f5ef39a4ef7","mediumImageUrl":"//mojo.generalmills.com/api/public/content/Ml5Qq_-oDEer7qzEla28bA_webp_base.webp?v=c0cd9f36\u0026t=3653fe2f5ecd4a47a5a51c97e429947c"},{"contentId":"8ccc3131-1e61-4793-835e-4390716d91a4","contentType":"Recipe","title":"Rainbow Cheesecake Hearts","isFavorite":false,"linkUrl":"/recipes/rainbow-cheesecake-hearts/8ccc3131-1e61-4793-835e-4390716d91a4","numberOfRatings":"0","averageRating":"0","averageRatingStars":"0","smallImageUrl":"//mojo.generalmills.com/api/public/content/K7QOhq03F0uL86d9nagDHQ_webp_base.webp?v=ad4bea7c\u0026t=67e847e026fb43aa8d6e3f5ef39a4ef7","mediumImageUrl":"//mojo.generalmills.com/api/public/content/K7QOhq03F0uL86d9nagDHQ_webp_base.webp?v=ad4bea7c\u0026t=3653fe2f5ecd4a47a5a51c97e429947c"}]}};
var moduleName = 'relatedContent';
var isVueModule = true;
GeneralMills.PandoSites.RegisterControlInstance(moduleName, configuration, componentMetadata, isVueModule)
});
})();


© 2026 ®/TM General Mills All Rights Reserved