(function() {
document.addEventListener('DOMContentLoaded', function() {
var componentMetadata = JSON.parse('\x7b\x22componentName\x22\x3a\x22ActionToolbar_c91d3ca3-260f-49e5-a185-3914efed63d4\x22,\x22deferOptions\x22\x3a\x7b\x22deferComponent\x22\x3afalse,\x22deferType\x22\x3a\x22None\x22,\x22deferId\x22\x3a\x22r2a8a5acd6946455185d3f673ba50aeff\x22,\x22deferredContainerId\x22\x3a\x22\x2fmain\x2fdockingActionToolbar\x22,\x22deferredContainerView\x22\x3anull\x7d,\x22viewName\x22\x3a\x22ActionToolbar\x22\x7d');
var configuration = {"contentId":"bc48a0fb-ef26-42bc-8333-7d28e1cf7248","toolbarSettings":{"id":"c91d3ca3-260f-49e5-a185-3914efed63d4","registrationUrl":"/GMI/CoreSites/TBSP/Home/register/reg-fp","regAction":"FAVORITE","eSourceCode":11275,"namePassedToEvents":"RDPToolbarSTICKY","buttons":[{"addFavoriteErrorMessage":"Sorry, something went wrong. Please save again.","removeFavoriteErrorMessage":"Error occurred while removing from favorites","registrationUrl":"/GMI/CoreSites/TBSP/Home/register/reg-fp","regAction":"FAVORITE","eSourceCode":11275,"isCurrentUserAnonymous":false,"isFavoriteItem":false,"id":"718b4e01-b2be-40cf-8f0c-bca3b01db0ed","allowedForAnonymousUsers":false,"type":"Favorite","displayName":"Save","namePassedToEvents":"Favorite","cssClassName":"atButtonFavorite","privacyOptOutMessage":"\u003cdiv class=\u0027privacyMessage\u0027\u003e\n\u003ch3\u003eThis feature is not available with your current cookie settings.\u003c/h3\u003e\n\u003cp\u003eYou can \u003ca href=\u0027#\u0027 data-show-preference-center=\u00271\u0027\u003eupdate your privacy settings\u003c/a\u003e to enable this content. Please enable “Functional Cookies” to use this feature.\u003c/p\u003e\n\u003c/div\u003e","showPrivacyOptOutMessage":false},{"nestedButtons":[{"layoutParameter":"p%3d1","id":"219a704d-bb63-40af-8f0d-f8389062f7e9","allowedForAnonymousUsers":true,"type":"Print","displayName":"Print Recipe","namePassedToEvents":"Print","cssClassName":"atButtonPrint","privacyOptOutMessage":"\u003cdiv class=\u0027privacyMessage\u0027\u003e\n\u003ch3\u003eThis feature is not available with your current cookie settings.\u003c/h3\u003e\n\u003cp\u003eYou can \u003ca href=\u0027#\u0027 data-show-preference-center=\u00271\u0027\u003eupdate your privacy settings\u003c/a\u003e to enable this content. Please enable “Functional Cookies” to use this feature.\u003c/p\u003e\n\u003c/div\u003e","showPrivacyOptOutMessage":false},{"providerName":"pinterest","providerNamePassedToEvents":"Pinterest","shareUrlFormat":"//pinterest.com/pin/create/link/?url={0}","id":"585d4198-c691-4eae-bb63-66cc1927e44a","allowedForAnonymousUsers":true,"type":"Social","displayName":"Save To Pinterest","namePassedToEvents":"Pinterest","cssClassName":"atButtonPinterest","privacyOptOutMessage":"\u003cdiv class=\u0027privacyMessage\u0027\u003e\n\u003ch3\u003eThis feature is not available with your current cookie settings.\u003c/h3\u003e\n\u003cp\u003eYou can \u003ca href=\u0027#\u0027 data-show-preference-center=\u00271\u0027\u003eupdate your privacy settings\u003c/a\u003e to enable this content. Please enable “Functional Cookies” to use this feature.\u003c/p\u003e\n\u003c/div\u003e","showPrivacyOptOutMessage":false},{"templateId":"95752b5c-7e75-4367-bca7-fdd3abb0ebcb","dialogHeading":"Email Recipe","emailCode":"TBSP_ContentEmail","dialogSettings":{"cancelButtonText":"Cancel","copyToSenderLabel":"Send a Copy to Myself","emailAddressesLabel":"* Email Address(es)","emailInstructionText":"Separate email addresses with commas","fromText":"From:","privacyPolicyText":"\u003cp\u003e\u0026copy;2024 General Mills, Inc. All Rights Reserved. This information will only be used to send an email to your friend(s) and will not be saved. Please read our \u003ca rel=\u0022noopener noreferrer\u0022 rel=\u0022noopener noreferrer\u0022 href=\u0022http://www.generalmills.com/company/privacy-policies/privacy-policy-us\u0022 target=\u0022_blank\u0022 shape=\u0022rect\u0022\u003ePrivacy Policy\u003c/a\u003e.\u003c/p\u003e","requiredFieldText":"* Required","sendButtonText":"Send","senderEmailAddressLabel":"* Your Email Address","senderFirstNameLabel":"* Your First Name","sendToText":"Send To:"},"id":"fad236f8-3084-4a50-bc7d-283bc5511677","allowedForAnonymousUsers":true,"type":"Email","displayName":"Share via Email","namePassedToEvents":"Email","cssClassName":"atButtonEmail","privacyOptOutMessage":"\u003cdiv class=\u0027privacyMessage\u0027\u003e\n\u003ch3\u003eThis feature is not available with your current cookie settings.\u003c/h3\u003e\n\u003cp\u003eYou can \u003ca href=\u0027#\u0027 data-show-preference-center=\u00271\u0027\u003eupdate your privacy settings\u003c/a\u003e to enable this content. Please enable “Functional Cookies” to use this feature.\u003c/p\u003e\n\u003c/div\u003e","showPrivacyOptOutMessage":false},{"providerName":"facebook","providerNamePassedToEvents":"Facebook","shareUrlFormat":"//facebook.com/sharer/sharer.php?u={0}","id":"fc7a5260-abb4-42be-958a-d172ba87442b","allowedForAnonymousUsers":true,"type":"Social","displayName":"Share on Facebook","namePassedToEvents":"Facebook","cssClassName":"atButtonFacebook","privacyOptOutMessage":"\u003cdiv class=\u0027privacyMessage\u0027\u003e\n\u003ch3\u003eThis feature is not available with your current cookie settings.\u003c/h3\u003e\n\u003cp\u003eYou can \u003ca href=\u0027#\u0027 data-show-preference-center=\u00271\u0027\u003eupdate your privacy settings\u003c/a\u003e to enable this content. Please enable “Functional Cookies” to use this feature.\u003c/p\u003e\n\u003c/div\u003e","showPrivacyOptOutMessage":false},{"successMessage":"Copied.","errorMessage":"Press Ctrl+C and Enter to copy to clipboard","successMessageDuration":3000,"errorMessageDuration":10000,"id":"263303a9-5fe6-480d-910a-608f153d379a","allowedForAnonymousUsers":true,"type":"CopyLink","displayName":"Copy Link","namePassedToEvents":"Copy","cssClassName":"atButtonCopyLink","privacyOptOutMessage":"\u003cdiv class=\u0027privacyMessage\u0027\u003e\n\u003ch3\u003eThis feature is not available with your current cookie settings.\u003c/h3\u003e\n\u003cp\u003eYou can \u003ca href=\u0027#\u0027 data-show-preference-center=\u00271\u0027\u003eupdate your privacy settings\u003c/a\u003e to enable this content. Please enable “Functional Cookies” to use this feature.\u003c/p\u003e\n\u003c/div\u003e","showPrivacyOptOutMessage":false}],"id":"46a2d62f-b80c-49bf-969f-5d28640dc94a","allowedForAnonymousUsers":true,"type":"Reveal","displayName":"Share","namePassedToEvents":"Share","cssClassName":"atButtonReveal","privacyOptOutMessage":"\u003cdiv class=\u0027privacyMessage\u0027\u003e\n\u003ch3\u003eThis feature is not available with your current cookie settings.\u003c/h3\u003e\n\u003cp\u003eYou can \u003ca href=\u0027#\u0027 data-show-preference-center=\u00271\u0027\u003eupdate your privacy settings\u003c/a\u003e to enable this content. Please enable “Functional Cookies” to use this feature.\u003c/p\u003e\n\u003c/div\u003e","showPrivacyOptOutMessage":false},{"errorMessage":"","id":"0a1bab6c-f930-4359-b8b4-a72470a4d8ee","allowedForAnonymousUsers":true,"type":"WakeLock","displayName":"Keep Screen On","namePassedToEvents":"Wakelock","cssClassName":"","privacyOptOutMessage":"\u003cdiv class=\u0027privacyMessage\u0027\u003e\n\u003ch3\u003eThis feature is not available with your current cookie settings.\u003c/h3\u003e\n\u003cp\u003eYou can \u003ca href=\u0027#\u0027 data-show-preference-center=\u00271\u0027\u003eupdate your privacy settings\u003c/a\u003e to enable this content. Please enable “Functional Cookies” to use this feature.\u003c/p\u003e\n\u003c/div\u003e","showPrivacyOptOutMessage":false}],"isSticky":true},"userSettings":{"isCurrentUserAnonymous":true,"isFavoriteItem":false},"pageAttributes":{"url":"https%3a%2f%2fwww.tablespoon.com%2frecipes%2fchocolate-peppermint-patty-cookies%2fbc48a0fb-ef26-42bc-8333-7d28e1cf7248","contentId":"bc48a0fb-ef26-42bc-8333-7d28e1cf7248"},"recaptchaPublicKey":"6LfW_icUAAAAAL_CG700pddUxLNYIxgRJe3vOg2Z"};
var moduleName = 'actionToolbar';
var isVueModule = true;
GeneralMills.PandoSites.RegisterControlInstance(moduleName, configuration, componentMetadata, isVueModule)
});
})();
(function() {
document.addEventListener('DOMContentLoaded', function() {
var componentMetadata = JSON.parse('\x7b\x22componentName\x22\x3a\x22ActionToolbar_c91d3ca3-260f-49e5-a185-3914efed63d4\x22,\x22deferOptions\x22\x3a\x7b\x22deferComponent\x22\x3afalse,\x22deferType\x22\x3a\x22None\x22,\x22deferId\x22\x3a\x22rbdc2718d35e142d3a74e1c3058b1e46e\x22,\x22deferredContainerId\x22\x3a\x22\x2fmain\x2fdockingActionToolbarMobile\x22,\x22deferredContainerView\x22\x3anull\x7d,\x22viewName\x22\x3a\x22ActionToolbar\x22\x7d');
var configuration = {"contentId":"bc48a0fb-ef26-42bc-8333-7d28e1cf7248","toolbarSettings":{"id":"c91d3ca3-260f-49e5-a185-3914efed63d4","registrationUrl":"/GMI/CoreSites/TBSP/Home/register/reg-fp","regAction":"FAVORITE","eSourceCode":11275,"namePassedToEvents":"RDPToolbarSTICKY","buttons":[{"addFavoriteErrorMessage":"Sorry, something went wrong. Please save again.","removeFavoriteErrorMessage":"Error occurred while removing from favorites","registrationUrl":"/GMI/CoreSites/TBSP/Home/register/reg-fp","regAction":"FAVORITE","eSourceCode":11275,"isCurrentUserAnonymous":false,"isFavoriteItem":false,"id":"718b4e01-b2be-40cf-8f0c-bca3b01db0ed","allowedForAnonymousUsers":false,"type":"Favorite","displayName":"Save","namePassedToEvents":"Favorite","cssClassName":"atButtonFavorite","privacyOptOutMessage":"\u003cdiv class=\u0027privacyMessage\u0027\u003e\n\u003ch3\u003eThis feature is not available with your current cookie settings.\u003c/h3\u003e\n\u003cp\u003eYou can \u003ca href=\u0027#\u0027 data-show-preference-center=\u00271\u0027\u003eupdate your privacy settings\u003c/a\u003e to enable this content. Please enable “Functional Cookies” to use this feature.\u003c/p\u003e\n\u003c/div\u003e","showPrivacyOptOutMessage":false},{"nestedButtons":[{"layoutParameter":"p%3d1","id":"219a704d-bb63-40af-8f0d-f8389062f7e9","allowedForAnonymousUsers":true,"type":"Print","displayName":"Print Recipe","namePassedToEvents":"Print","cssClassName":"atButtonPrint","privacyOptOutMessage":"\u003cdiv class=\u0027privacyMessage\u0027\u003e\n\u003ch3\u003eThis feature is not available with your current cookie settings.\u003c/h3\u003e\n\u003cp\u003eYou can \u003ca href=\u0027#\u0027 data-show-preference-center=\u00271\u0027\u003eupdate your privacy settings\u003c/a\u003e to enable this content. Please enable “Functional Cookies” to use this feature.\u003c/p\u003e\n\u003c/div\u003e","showPrivacyOptOutMessage":false},{"providerName":"pinterest","providerNamePassedToEvents":"Pinterest","shareUrlFormat":"//pinterest.com/pin/create/link/?url={0}","id":"585d4198-c691-4eae-bb63-66cc1927e44a","allowedForAnonymousUsers":true,"type":"Social","displayName":"Save To Pinterest","namePassedToEvents":"Pinterest","cssClassName":"atButtonPinterest","privacyOptOutMessage":"\u003cdiv class=\u0027privacyMessage\u0027\u003e\n\u003ch3\u003eThis feature is not available with your current cookie settings.\u003c/h3\u003e\n\u003cp\u003eYou can \u003ca href=\u0027#\u0027 data-show-preference-center=\u00271\u0027\u003eupdate your privacy settings\u003c/a\u003e to enable this content. Please enable “Functional Cookies” to use this feature.\u003c/p\u003e\n\u003c/div\u003e","showPrivacyOptOutMessage":false},{"templateId":"95752b5c-7e75-4367-bca7-fdd3abb0ebcb","dialogHeading":"Email Recipe","emailCode":"TBSP_ContentEmail","dialogSettings":{"cancelButtonText":"Cancel","copyToSenderLabel":"Send a Copy to Myself","emailAddressesLabel":"* Email Address(es)","emailInstructionText":"Separate email addresses with commas","fromText":"From:","privacyPolicyText":"\u003cp\u003e\u0026copy;2024 General Mills, Inc. All Rights Reserved. This information will only be used to send an email to your friend(s) and will not be saved. Please read our \u003ca rel=\u0022noopener noreferrer\u0022 rel=\u0022noopener noreferrer\u0022 href=\u0022http://www.generalmills.com/company/privacy-policies/privacy-policy-us\u0022 target=\u0022_blank\u0022 shape=\u0022rect\u0022\u003ePrivacy Policy\u003c/a\u003e.\u003c/p\u003e","requiredFieldText":"* Required","sendButtonText":"Send","senderEmailAddressLabel":"* Your Email Address","senderFirstNameLabel":"* Your First Name","sendToText":"Send To:"},"id":"fad236f8-3084-4a50-bc7d-283bc5511677","allowedForAnonymousUsers":true,"type":"Email","displayName":"Share via Email","namePassedToEvents":"Email","cssClassName":"atButtonEmail","privacyOptOutMessage":"\u003cdiv class=\u0027privacyMessage\u0027\u003e\n\u003ch3\u003eThis feature is not available with your current cookie settings.\u003c/h3\u003e\n\u003cp\u003eYou can \u003ca href=\u0027#\u0027 data-show-preference-center=\u00271\u0027\u003eupdate your privacy settings\u003c/a\u003e to enable this content. Please enable “Functional Cookies” to use this feature.\u003c/p\u003e\n\u003c/div\u003e","showPrivacyOptOutMessage":false},{"providerName":"facebook","providerNamePassedToEvents":"Facebook","shareUrlFormat":"//facebook.com/sharer/sharer.php?u={0}","id":"fc7a5260-abb4-42be-958a-d172ba87442b","allowedForAnonymousUsers":true,"type":"Social","displayName":"Share on Facebook","namePassedToEvents":"Facebook","cssClassName":"atButtonFacebook","privacyOptOutMessage":"\u003cdiv class=\u0027privacyMessage\u0027\u003e\n\u003ch3\u003eThis feature is not available with your current cookie settings.\u003c/h3\u003e\n\u003cp\u003eYou can \u003ca href=\u0027#\u0027 data-show-preference-center=\u00271\u0027\u003eupdate your privacy settings\u003c/a\u003e to enable this content. Please enable “Functional Cookies” to use this feature.\u003c/p\u003e\n\u003c/div\u003e","showPrivacyOptOutMessage":false},{"successMessage":"Copied.","errorMessage":"Press Ctrl+C and Enter to copy to clipboard","successMessageDuration":3000,"errorMessageDuration":10000,"id":"263303a9-5fe6-480d-910a-608f153d379a","allowedForAnonymousUsers":true,"type":"CopyLink","displayName":"Copy Link","namePassedToEvents":"Copy","cssClassName":"atButtonCopyLink","privacyOptOutMessage":"\u003cdiv class=\u0027privacyMessage\u0027\u003e\n\u003ch3\u003eThis feature is not available with your current cookie settings.\u003c/h3\u003e\n\u003cp\u003eYou can \u003ca href=\u0027#\u0027 data-show-preference-center=\u00271\u0027\u003eupdate your privacy settings\u003c/a\u003e to enable this content. Please enable “Functional Cookies” to use this feature.\u003c/p\u003e\n\u003c/div\u003e","showPrivacyOptOutMessage":false}],"id":"46a2d62f-b80c-49bf-969f-5d28640dc94a","allowedForAnonymousUsers":true,"type":"Reveal","displayName":"Share","namePassedToEvents":"Share","cssClassName":"atButtonReveal","privacyOptOutMessage":"\u003cdiv class=\u0027privacyMessage\u0027\u003e\n\u003ch3\u003eThis feature is not available with your current cookie settings.\u003c/h3\u003e\n\u003cp\u003eYou can \u003ca href=\u0027#\u0027 data-show-preference-center=\u00271\u0027\u003eupdate your privacy settings\u003c/a\u003e to enable this content. Please enable “Functional Cookies” to use this feature.\u003c/p\u003e\n\u003c/div\u003e","showPrivacyOptOutMessage":false},{"errorMessage":"","id":"0a1bab6c-f930-4359-b8b4-a72470a4d8ee","allowedForAnonymousUsers":true,"type":"WakeLock","displayName":"Keep Screen On","namePassedToEvents":"Wakelock","cssClassName":"","privacyOptOutMessage":"\u003cdiv class=\u0027privacyMessage\u0027\u003e\n\u003ch3\u003eThis feature is not available with your current cookie settings.\u003c/h3\u003e\n\u003cp\u003eYou can \u003ca href=\u0027#\u0027 data-show-preference-center=\u00271\u0027\u003eupdate your privacy settings\u003c/a\u003e to enable this content. Please enable “Functional Cookies” to use this feature.\u003c/p\u003e\n\u003c/div\u003e","showPrivacyOptOutMessage":false}],"isSticky":true},"userSettings":{"isCurrentUserAnonymous":true,"isFavoriteItem":false},"pageAttributes":{"url":"https%3a%2f%2fwww.tablespoon.com%2frecipes%2fchocolate-peppermint-patty-cookies%2fbc48a0fb-ef26-42bc-8333-7d28e1cf7248","contentId":"bc48a0fb-ef26-42bc-8333-7d28e1cf7248"},"recaptchaPublicKey":"6LfW_icUAAAAAL_CG700pddUxLNYIxgRJe3vOg2Z"};
var moduleName = 'actionToolbar';
var isVueModule = true;
GeneralMills.PandoSites.RegisterControlInstance(moduleName, configuration, componentMetadata, isVueModule)
});
})();
Ingredients
-
1
box Betty Crocker™ Delights Super Moist™ Dark Chocolate Cake Mix
-
1
stick (1/2 cup) softened butter
-
1
egg
-
1
teaspoon vanilla extract
-
1
teaspoon peppermint extract or flavoring, divided
-
Flour and confectioner's sugar for rolling
-
Circle cookie cutter (about 2 to 2-1/2 inches in diameter)
-
1
tub (16 oz) Betty Crocker™ Rich & Creamy Vanilla Frosting
-
Store-bought vanilla fondant
-
Red gel paste food coloring
-
Black edible marker (optional)
(function() {
document.addEventListener('DOMContentLoaded', function() {
var componentMetadata = JSON.parse('\x7b\x22componentName\x22\x3a\x22RecipeIngredients_a2352866-1a21-4a5d-9dd4-1744f7700fb5\x22,\x22deferOptions\x22\x3a\x7b\x22deferComponent\x22\x3afalse,\x22deferType\x22\x3a\x22None\x22,\x22deferId\x22\x3a\x22r3386c7f472854990b48460efc70858a1\x22,\x22deferredContainerId\x22\x3a\x22\x2fmain\x2frdpIngredients\x22,\x22deferredContainerView\x22\x3anull\x7d,\x22viewName\x22\x3a\x22RecipeIngredients\x22\x7d');
var configuration = {};
var moduleName = 'recipeIngredients';
var isVueModule = false;
GeneralMills.PandoSites.RegisterControlInstance(moduleName, configuration, componentMetadata, isVueModule)
});
})();
Steps
-
1
Preheat oven to 375°F. Mix together the cake mix, butter, egg, vanilla extract and 1/2 teaspoon peppermint extract or flavoring until a dough forms. Cover the dough and refrigerate for two hours.
-
2
On a floured surface, roll the cookie dough 1/8-inch thick. Cut out circles with the cookie cutter. Place the circles on a baking tray lined with parchment paper. Bake the cookies in preheated oven for 10 to 14 minutes, or until set and the edges are firm. Let the cookies cool completely.
-
3
Stir 1/2 teaspoon of peppermint extract into the can of frosting. Cover and set aside.
-
4
Take a piece of store-bought fondant about the size of your hand, knead briefly, and roll out to 1/4-inch thickness on a surface dusted with confectioner's sugar. Move the fondant frequently when rolling so it doesn't stick to the counter, and use additional confectioner's sugar as needed to prevent sticking. Cut out circles using the same cookie cutter used for the cookies. Place the circles on a baking tray lined with wax or parchment paper. Cover the fondant circles with a piece of wax paper until ready to use.
-
5
Take a smaller piece of fondant (about the size of the palm of your hand), add several drops of red food coloring and knead very well. Add more drops of coloring and continue to knead until the desired shade is achieved. If the fondant becomes too sticky, let it rest at room temperature for 15 minutes or until it is easier to use, or dust your hands with confectioner's sugar.
-
6
Roll the red fondant on a piece of wax paper. Use a light dusting of confectioner's sugar if needed to prevent sticking. Cut strips of fondant 1/2-inch thick with the pizza roller, then cut crosswise to form rectangles 1/2-inch by 3/8-inch thick. Set aside.
-
7
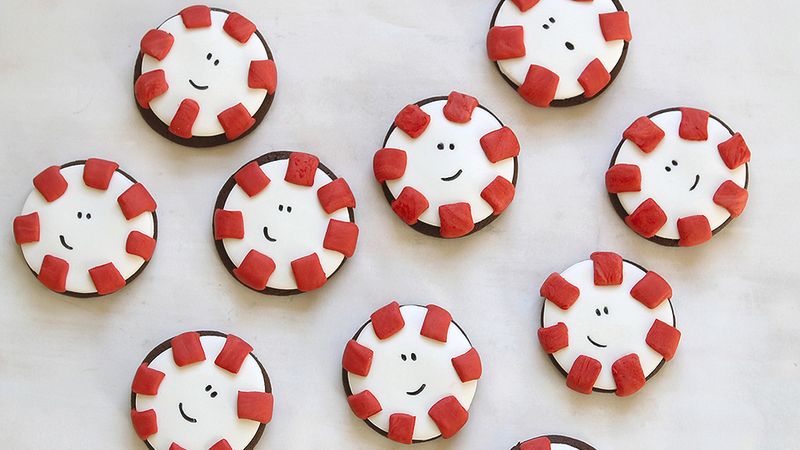
To assemble the cookies, spread a thin layer of the peppermint frosting on the center of a cookie, stopping short of the edges. Place a white fondant circle on top and smooth with your fingers. Gently place and smooth red stripes around the edge of the white fondant. Use small dabs of water to adhere the red stripes as needed.
-
8
If desired, draw smiley faces with the black edible writer.
(function() {
document.addEventListener('DOMContentLoaded', function() {
var componentMetadata = JSON.parse('\x7b\x22componentName\x22\x3a\x22RecipeSteps_a2352866-1a21-4a5d-9dd4-1744f7700fb5\x22,\x22deferOptions\x22\x3a\x7b\x22deferComponent\x22\x3atrue,\x22deferType\x22\x3a\x22OnDemand\x22,\x22deferId\x22\x3a\x22r54947daf1a1347038038057de8e3c2b9\x22,\x22deferredContainerId\x22\x3a\x22\x2fmain\x2frdpSteps\x22,\x22deferredContainerView\x22\x3a\x22RecipeDetail\x22\x7d,\x22viewName\x22\x3a\x22RecipeSteps\x22\x7d');
var configuration = {"initAreImagesHidden":false,"hideImagesEventName":"HideStepShots","showImagesEventName":"ShowStepShots","hideImagesButtonText":"Hide Images","showImagesButtonText":"Show Images","hideImagesClass":"rdpHideStepImages"};
var moduleName = 'recipeStepShots';
var isVueModule = true;
GeneralMills.PandoSites.RegisterControlInstance(moduleName, configuration, componentMetadata, isVueModule)
});
})();
Expert Tips
-
tip 1
Find fondant, gel paste food coloring and the black edible writer in a craft or specialty store, or online.
-
tip 2
A pizza roller works well to roll out the fondant in this recipe.
(function() {
document.addEventListener('DOMContentLoaded', function() {
var componentMetadata = JSON.parse('\x7b\x22componentName\x22\x3a\x22RecipeTipsNonPrint_a2352866-1a21-4a5d-9dd4-1744f7700fb5\x22,\x22deferOptions\x22\x3a\x7b\x22deferComponent\x22\x3atrue,\x22deferType\x22\x3a\x22Simple\x22,\x22deferId\x22\x3a\x22r7d7465f5536c480fa45062228e3f06c3\x22,\x22deferredContainerId\x22\x3a\x22\x2fmain\x2frdpTips\x22,\x22deferredContainerView\x22\x3a\x22RecipeDetail\x22\x7d,\x22viewName\x22\x3a\x22RecipeTipsNonPrint\x22\x7d');
var configuration = {};
var moduleName = 'expandableTextContainer';
var isVueModule = true;
GeneralMills.PandoSites.RegisterControlInstance(moduleName, configuration, componentMetadata, isVueModule)
});
})();
Nutrition Information
No nutrition information available for this recipe
(function() {
document.addEventListener('DOMContentLoaded', function() {
var componentMetadata = JSON.parse('\x7b\x22componentName\x22\x3a\x22RecipeNutritionNonPrint_a2352866-1a21-4a5d-9dd4-1744f7700fb5\x22,\x22deferOptions\x22\x3a\x7b\x22deferComponent\x22\x3atrue,\x22deferType\x22\x3a\x22Simple\x22,\x22deferId\x22\x3a\x22rd0177f9b93c747c3854fd555d621b5cb\x22,\x22deferredContainerId\x22\x3a\x22\x2fmain\x2frdpNutrition\x22,\x22deferredContainerView\x22\x3a\x22RecipeDetail\x22\x7d,\x22viewName\x22\x3a\x22RecipeNutritionNonPrint\x22\x7d');
var configuration = {"initIsExpanded":false,"expandEventName":"NutritionExpand","collapseEventName":"NutritionCollapse"};
var moduleName = 'recipeNutrition';
var isVueModule = true;
GeneralMills.PandoSites.RegisterControlInstance(moduleName, configuration, componentMetadata, isVueModule)
});
})();
More About This Recipe
-
Cute as a button. A peppermint patty button!
When I took my first bite of these chocolate cut-out cookies with a hint of peppermint, I just about cried at the deliciousness. After decorating them with their little smiles, I just about cried from the cuteness. Great. How can I eat them now? With them looking at me all happy?
This is my new go-to chocolate cut out cookie. It's even made from chocolate cake mix, which means it’s super easy to mix up. You don’t have to add the peppermint extract, and I’ll likely skip it for the other eleven months of the year, but it does add a lovely seasonal flavor.
Don’t fear the fondant, either. It’s surprisingly easy to work with when you use store-bought (found in the craft store). And the decoration on these cuties is very simple.
To make the chocolate cut-out cookies, mix together Betty Crocker chocolate cake mix with a stick of softened butter, one egg, a teaspoon of vanilla extract and half a teaspoon of peppermint extract or flavoring. Mix until a dough forms. Cover the dough and refrigerate for two hours.
On a floured surface, roll the dough about 1/8-inch thick. A thinner dough helps limit spreading, and at 1/8-inch, my cookies baked well and held their shape perfectly. Just be sure to not roll your dough too thick. Cut out your circles. The cookie cutter shown here is 2 1/4-inches in diameter, but you can use any circle that’s comparable in size.
Place the circles on a baking tray lined with parchment paper and bake until set and the edges are firm. Let the cookies cool completely.
Meanwhile, prepare the frosting and fondant.
To make the frosting, stir 1/2-teaspoon of peppermint extract or flavoring into a can of Betty Crocker vanilla frosting. Cover and set aside.
While we’re here with the frosting: If you skip the fondant decoration, you can spread the frosting instead and then sprinkle with the tops with crushed candy canes for a bit of chocolate mint heaven.
To prepare the fondant, take a chunk of store-bought white fondant and briefly knead it. Roll it out on a surface dusted with confectioner’s sugarto about 1/4-inch thick.
Move the fondant frequently when rolling so it doesn’t stick to the counter. The fondant should be easy to handle, not sticky and difficult. If the fondant is giving you any trouble at all, dust your hands and the fondant with confectioner’s sugar. Cut out circles using the same cookie cutter you used for the cookies. Place the circles on a baking tray lined with wax or parchment paper. Cover with a piece of wax paper until your chocolate cookies are ready to decorate.
To prepare the red fondant, start with a smaller piece of fondant (enough to fit in the palm of your hand). Add a few drops of red food coloring and knead very well, adding more drops of food coloring until the desired shade is reached.
Warning: If you don't use gloves, your hands will be stained for a day or two, so don’t knead red coloring into fondant the day before that hand modeling shoot.
Adding food coloring to fondant can make it even stickier, so dust your hands with confectioner’s sugar if you need to, or let the fondant rest at room temperature uncovered for 15 minutes to stiffen a bit.
Roll the red fondant out on a piece of wax paper. It will help you limit the use of confectioner’s sugar on the red surface of the fondant. But go ahead and use a light dusting of confectioner’s sugar if needed.
Cut strips of fondant 1/2-inch thick with the pizza roller. Cut crosswise with the pizza roller to form rectangles about 1/2-inch by 3/8-inch.
To assemble your cookies, spread a thin layer of the peppermint frosting on the center of a cookie, stopping short of the edges. Place a white fondant circle on top and smooth with your fingers.
Gently smush and smooth red stripes around the edge of the white fondant. Use small dabs of water to adhere the red stripes as needed.
When you’ve decorated the cookies with fondant, if you like, draw smiley faces with the black edible writer. Or, any face! Look at this gloomy Gus. And his pal there seems shocked at his own minty freshness.
But whether gloomy and shocked, or all smiley and happy, these chocolate peppermint cookies are adorable. And did I mention delicious?
(function() {
document.addEventListener('DOMContentLoaded', function() {
var componentMetadata = JSON.parse('\x7b\x22componentName\x22\x3a\x22RecipeTipCategory_a2352866-1a21-4a5d-9dd4-1744f7700fb5\x22,\x22deferOptions\x22\x3a\x7b\x22deferComponent\x22\x3atrue,\x22deferType\x22\x3a\x22Simple\x22,\x22deferId\x22\x3a\x22r9841cbf42cf6461da327ba0dbb3341c5\x22,\x22deferredContainerId\x22\x3a\x22\x2fmain\x2frdpStories\x22,\x22deferredContainerView\x22\x3a\x22RecipeDetail\x22\x7d,\x22viewName\x22\x3a\x22RecipeTipCategory\x22\x7d');
var configuration = {"expandEventName":"MoreAboutRecipeExpand","collapseEventName":"MoreAboutRecipeCollapse"};
var moduleName = 'recipeTipCategory';
var isVueModule = true;
GeneralMills.PandoSites.RegisterControlInstance(moduleName, configuration, componentMetadata, isVueModule)
});
})();
© 2024 ®/TM General Mills All Rights Reserved
(function() {
document.addEventListener('DOMContentLoaded', function() {
var componentMetadata = JSON.parse('\x7b\x22componentName\x22\x3a\x22DoubleClick_5f8292a2-3e9c-4318-94df-7fbdffc17662\x22,\x22deferOptions\x22\x3a\x7b\x22deferComponent\x22\x3atrue,\x22deferType\x22\x3a\x22OnDemand\x22,\x22deferId\x22\x3a\x22r0cee15574667457cb609bcbc7cbdc7ba\x22,\x22deferredContainerId\x22\x3a\x22\x2fmain\x2frdpFeatureAd\x22,\x22deferredContainerView\x22\x3a\x22DoubleClick\x22\x7d,\x22viewName\x22\x3a\x22DoubleClick\x22\x7d');
var configuration = {"adId":"OMP/tablespoon/recipes/300x250_AutoRefresh_top","minPageWidth":"1000","maxPageWidth":"9999","defaultMinPageWidth":"1000","defaultMaxPageWidth":"9999","size":"[300, 250]","refreshWhenViewed":true,"adContainerId":"45d6a780-e72a-45e4-aad0-a2dd2f2ce8c2","doubleClickAdContainerId":"7e9ee2ba-2143-4360-bbb8-77d729b69b58","adCaptionText":"Advertisement","networkCode":"/15704463/","relevantMetadata":["Dessert","Chocolate","Christmas"],"privacyOptOut":false,"adProvider":"Legacy","sovrnCssClass":"","responsive":false,"contentType":"Recipe","itemId":"bc48a0fb-ef26-42bc-8333-7d28e1cf7248","continuesBelowText":"Recipe Continues Below"};
var moduleName = 'doubleClick';
var isVueModule = true;
GeneralMills.PandoSites.RegisterControlInstance(moduleName, configuration, componentMetadata, isVueModule)
});
})();
(function() {
document.addEventListener('DOMContentLoaded', function() {
var componentMetadata = JSON.parse('\x7b\x22componentName\x22\x3a\x22DoubleClick_c259ff4d-47bb-4fe7-add7-de2effa54403\x22,\x22deferOptions\x22\x3a\x7b\x22deferComponent\x22\x3atrue,\x22deferType\x22\x3a\x22OnDemand\x22,\x22deferId\x22\x3a\x22r29f5ae69fe4f47dd8403ca9f55c6443f\x22,\x22deferredContainerId\x22\x3a\x22\x2fmain\x2frdpFeatureAd\x22,\x22deferredContainerView\x22\x3a\x22DoubleClick\x22\x7d,\x22viewName\x22\x3a\x22DoubleClick\x22\x7d');
var configuration = {"adId":"OMP/tablespoon/recipes/728x90_top","minPageWidth":"768","maxPageWidth":"999","defaultMinPageWidth":"1000","defaultMaxPageWidth":"9999","size":"[728, 90]","refreshWhenViewed":false,"adContainerId":"8cad5c3f-dbb7-403a-8185-39932d142891","doubleClickAdContainerId":"65d3952c-f007-44b5-8f69-b2f418bf4bab","adCaptionText":"Advertisement","networkCode":"/15704463/","relevantMetadata":["Dessert","Chocolate","Christmas"],"privacyOptOut":false,"adProvider":"Legacy","sovrnCssClass":"","responsive":false,"contentType":"Recipe","itemId":"bc48a0fb-ef26-42bc-8333-7d28e1cf7248","continuesBelowText":"Recipe Continues Below"};
var moduleName = 'doubleClick';
var isVueModule = true;
GeneralMills.PandoSites.RegisterControlInstance(moduleName, configuration, componentMetadata, isVueModule)
});
})();
(function() {
document.addEventListener('DOMContentLoaded', function() {
var componentMetadata = JSON.parse('\x7b\x22componentName\x22\x3a\x22DoubleClick_6c874281-d7ee-4246-91de-0f51cce6949e\x22,\x22deferOptions\x22\x3a\x7b\x22deferComponent\x22\x3atrue,\x22deferType\x22\x3a\x22OnDemand\x22,\x22deferId\x22\x3a\x22rd295e02cd1724fe5b206c1772324c3b9\x22,\x22deferredContainerId\x22\x3a\x22\x2fmain\x2frdpFeatureAd\x22,\x22deferredContainerView\x22\x3a\x22DoubleClick\x22\x7d,\x22viewName\x22\x3a\x22DoubleClick\x22\x7d');
var configuration = {"adId":"OMP/m_tablespoon/recipes/300x250_top","minPageWidth":"299","maxPageWidth":"767","defaultMinPageWidth":"1000","defaultMaxPageWidth":"9999","size":"[[300,250], [300,600]]","refreshWhenViewed":false,"adContainerId":"3a807b7a-9e35-4882-a6d1-e252a6482c07","doubleClickAdContainerId":"aac4011b-c33e-4147-bda5-9c49ccc8b919","adCaptionText":"Advertisement","networkCode":"/15704463/","relevantMetadata":["Dessert","Chocolate","Christmas"],"privacyOptOut":false,"adProvider":"Legacy","sovrnCssClass":"","responsive":false,"contentType":"Recipe","itemId":"bc48a0fb-ef26-42bc-8333-7d28e1cf7248","continuesBelowText":"Recipe Continues Below"};
var moduleName = 'doubleClick';
var isVueModule = true;
GeneralMills.PandoSites.RegisterControlInstance(moduleName, configuration, componentMetadata, isVueModule)
});
})();
(function() {
document.addEventListener('DOMContentLoaded', function() {
var componentMetadata = JSON.parse('\x7b\x22componentName\x22\x3a\x22RelatedContent_51c5b479-ce04-468f-b3cd-042a1083ee73\x22,\x22deferOptions\x22\x3a\x7b\x22deferComponent\x22\x3atrue,\x22deferType\x22\x3a\x22OnDemand\x22,\x22deferId\x22\x3a\x22re4d9a358840b47f59bcdeb358acf2aa5\x22,\x22deferredContainerId\x22\x3a\x22\x2fmain\x2frdpRelatedContent1\x22,\x22deferredContainerView\x22\x3a\x22RecipeDetail\x22\x7d,\x22viewName\x22\x3a\x22RelatedContent\x22\x7d');
var configuration = {"dataSourceId":"51c5b479-ce04-468f-b3cd-042a1083ee73","isCurrentUserAnonymous":true,"relatedContentList":{"contentId":"bc48a0fb-ef26-42bc-8333-7d28e1cf7248","listSettings":{"pageSize":6,"startPage":1,"listType":1,"title":"Try These Next","useModalRegistration":false,"regAction":"","esrcCode":0,"favoriteButtonLabelFormat":"Add {0} to favorites","contentTypes":[],"showImages":true,"showRatings":false,"allowFavoriting":true,"cssClassName":""},"items":[{"contentId":"e396f1ed-cce2-4044-a6fc-6f1618d55a6a","contentType":"Recipe","title":"Black Forest Cookies","isFavorite":false,"linkUrl":"/recipes/black-forest-cookies/e396f1ed-cce2-4044-a6fc-6f1618d55a6a","numberOfRatings":"0","averageRating":"0","averageRatingStars":"0","smallImageUrl":"//mojo.generalmills.com/api/public/content/YzCNm9SDCkiv-Ke9SIzPfQ_gmi_hi_res_jpeg.jpeg?v=e489a7c5\u0026t=205ad118875f48b5b556c2955695e2f6","mediumImageUrl":"//mojo.generalmills.com/api/public/content/YzCNm9SDCkiv-Ke9SIzPfQ_gmi_hi_res_jpeg.jpeg?v=e489a7c5\u0026t=9df44d78ea5c47f98018cc1578c6de79"},{"contentId":"cf23bb53-feeb-4776-8def-6d1acb91410b","contentType":"Recipe","title":"Pecan Pie Cookies","isFavorite":false,"linkUrl":"/recipes/pecan-pie-cookies/cf23bb53-feeb-4776-8def-6d1acb91410b","numberOfRatings":"0","averageRating":"0","averageRatingStars":"0","smallImageUrl":"//mojo.generalmills.com/api/public/content/QuHQnvYYhkqQ3ukFwXA69A_gmi_hi_res_jpeg.jpeg?v=62f296bb\u0026t=205ad118875f48b5b556c2955695e2f6","mediumImageUrl":"//mojo.generalmills.com/api/public/content/QuHQnvYYhkqQ3ukFwXA69A_gmi_hi_res_jpeg.jpeg?v=62f296bb\u0026t=9df44d78ea5c47f98018cc1578c6de79"},{"contentId":"9b9ede43-4bc7-4637-8f90-b85493bda74a","contentType":"Recipe","title":"White Chocolate Cranberry Cookies","isFavorite":false,"linkUrl":"/recipes/white-chocolate-cranberry-cookies/9b9ede43-4bc7-4637-8f90-b85493bda74a","numberOfRatings":"0","averageRating":"0","averageRatingStars":"0","smallImageUrl":"//mojo.generalmills.com/api/public/content/CuwzfdghEEijDRUiGCloYw_gmi_hi_res_jpeg.jpeg?v=f1147442\u0026t=205ad118875f48b5b556c2955695e2f6","mediumImageUrl":"//mojo.generalmills.com/api/public/content/CuwzfdghEEijDRUiGCloYw_gmi_hi_res_jpeg.jpeg?v=f1147442\u0026t=9df44d78ea5c47f98018cc1578c6de79"},{"contentId":"d4b7e18d-3858-476c-b9cc-a3edc974caeb","contentType":"Recipe","title":"Peppermint Schnapps Brownies","isFavorite":false,"linkUrl":"/recipes/peppermint-schnapps-brownies/d4b7e18d-3858-476c-b9cc-a3edc974caeb","numberOfRatings":"0","averageRating":"0","averageRatingStars":"0","smallImageUrl":"//mojo.generalmills.com/api/public/content/k_Dne7SMJ0-ZzC_it6rxnQ_gmi_hi_res_jpeg.jpeg?v=df1424d4\u0026t=205ad118875f48b5b556c2955695e2f6","mediumImageUrl":"//mojo.generalmills.com/api/public/content/k_Dne7SMJ0-ZzC_it6rxnQ_gmi_hi_res_jpeg.jpeg?v=df1424d4\u0026t=9df44d78ea5c47f98018cc1578c6de79"},{"contentId":"6d4b80e4-98cb-444b-bddf-9d8cbd79d914","contentType":"Recipe","title":"Easy Shortbread Cookies","isFavorite":false,"linkUrl":"/recipes/easy-shortbread-cookies/6d4b80e4-98cb-444b-bddf-9d8cbd79d914","numberOfRatings":"0","averageRating":"0","averageRatingStars":"0","smallImageUrl":"//mojo.generalmills.com/api/public/content/WJe_Lw0T10mFD2yQT4DYJw_gmi_hi_res_jpeg.jpeg?v=6f4b3e7b\u0026t=205ad118875f48b5b556c2955695e2f6","mediumImageUrl":"//mojo.generalmills.com/api/public/content/WJe_Lw0T10mFD2yQT4DYJw_gmi_hi_res_jpeg.jpeg?v=6f4b3e7b\u0026t=9df44d78ea5c47f98018cc1578c6de79"},{"contentId":"5096586f-e341-4529-852e-c6d7511403f5","contentType":"Recipe","title":"Cookies for Santa Bark","isFavorite":false,"linkUrl":"/recipes/cookies-for-santa-bark/5096586f-e341-4529-852e-c6d7511403f5","numberOfRatings":"0","averageRating":"0","averageRatingStars":"0","smallImageUrl":"//mojo.generalmills.com/api/public/content/1JnmMn8Lm0iFnN_7J_FlbQ_gmi_hi_res_jpeg.jpeg?v=73f8aede\u0026t=205ad118875f48b5b556c2955695e2f6","mediumImageUrl":"//mojo.generalmills.com/api/public/content/1JnmMn8Lm0iFnN_7J_FlbQ_gmi_hi_res_jpeg.jpeg?v=73f8aede\u0026t=9df44d78ea5c47f98018cc1578c6de79"}],"availableItems":[{"contentId":"e396f1ed-cce2-4044-a6fc-6f1618d55a6a","contentType":"Recipe","title":"Black Forest Cookies","isFavorite":false,"linkUrl":"/recipes/black-forest-cookies/e396f1ed-cce2-4044-a6fc-6f1618d55a6a","numberOfRatings":"0","averageRating":"0","averageRatingStars":"0","smallImageUrl":"//mojo.generalmills.com/api/public/content/YzCNm9SDCkiv-Ke9SIzPfQ_gmi_hi_res_jpeg.jpeg?v=e489a7c5\u0026t=205ad118875f48b5b556c2955695e2f6","mediumImageUrl":"//mojo.generalmills.com/api/public/content/YzCNm9SDCkiv-Ke9SIzPfQ_gmi_hi_res_jpeg.jpeg?v=e489a7c5\u0026t=9df44d78ea5c47f98018cc1578c6de79"},{"contentId":"cf23bb53-feeb-4776-8def-6d1acb91410b","contentType":"Recipe","title":"Pecan Pie Cookies","isFavorite":false,"linkUrl":"/recipes/pecan-pie-cookies/cf23bb53-feeb-4776-8def-6d1acb91410b","numberOfRatings":"0","averageRating":"0","averageRatingStars":"0","smallImageUrl":"//mojo.generalmills.com/api/public/content/QuHQnvYYhkqQ3ukFwXA69A_gmi_hi_res_jpeg.jpeg?v=62f296bb\u0026t=205ad118875f48b5b556c2955695e2f6","mediumImageUrl":"//mojo.generalmills.com/api/public/content/QuHQnvYYhkqQ3ukFwXA69A_gmi_hi_res_jpeg.jpeg?v=62f296bb\u0026t=9df44d78ea5c47f98018cc1578c6de79"},{"contentId":"9b9ede43-4bc7-4637-8f90-b85493bda74a","contentType":"Recipe","title":"White Chocolate Cranberry Cookies","isFavorite":false,"linkUrl":"/recipes/white-chocolate-cranberry-cookies/9b9ede43-4bc7-4637-8f90-b85493bda74a","numberOfRatings":"0","averageRating":"0","averageRatingStars":"0","smallImageUrl":"//mojo.generalmills.com/api/public/content/CuwzfdghEEijDRUiGCloYw_gmi_hi_res_jpeg.jpeg?v=f1147442\u0026t=205ad118875f48b5b556c2955695e2f6","mediumImageUrl":"//mojo.generalmills.com/api/public/content/CuwzfdghEEijDRUiGCloYw_gmi_hi_res_jpeg.jpeg?v=f1147442\u0026t=9df44d78ea5c47f98018cc1578c6de79"},{"contentId":"d4b7e18d-3858-476c-b9cc-a3edc974caeb","contentType":"Recipe","title":"Peppermint Schnapps Brownies","isFavorite":false,"linkUrl":"/recipes/peppermint-schnapps-brownies/d4b7e18d-3858-476c-b9cc-a3edc974caeb","numberOfRatings":"0","averageRating":"0","averageRatingStars":"0","smallImageUrl":"//mojo.generalmills.com/api/public/content/k_Dne7SMJ0-ZzC_it6rxnQ_gmi_hi_res_jpeg.jpeg?v=df1424d4\u0026t=205ad118875f48b5b556c2955695e2f6","mediumImageUrl":"//mojo.generalmills.com/api/public/content/k_Dne7SMJ0-ZzC_it6rxnQ_gmi_hi_res_jpeg.jpeg?v=df1424d4\u0026t=9df44d78ea5c47f98018cc1578c6de79"},{"contentId":"6d4b80e4-98cb-444b-bddf-9d8cbd79d914","contentType":"Recipe","title":"Easy Shortbread Cookies","isFavorite":false,"linkUrl":"/recipes/easy-shortbread-cookies/6d4b80e4-98cb-444b-bddf-9d8cbd79d914","numberOfRatings":"0","averageRating":"0","averageRatingStars":"0","smallImageUrl":"//mojo.generalmills.com/api/public/content/WJe_Lw0T10mFD2yQT4DYJw_gmi_hi_res_jpeg.jpeg?v=6f4b3e7b\u0026t=205ad118875f48b5b556c2955695e2f6","mediumImageUrl":"//mojo.generalmills.com/api/public/content/WJe_Lw0T10mFD2yQT4DYJw_gmi_hi_res_jpeg.jpeg?v=6f4b3e7b\u0026t=9df44d78ea5c47f98018cc1578c6de79"},{"contentId":"5096586f-e341-4529-852e-c6d7511403f5","contentType":"Recipe","title":"Cookies for Santa Bark","isFavorite":false,"linkUrl":"/recipes/cookies-for-santa-bark/5096586f-e341-4529-852e-c6d7511403f5","numberOfRatings":"0","averageRating":"0","averageRatingStars":"0","smallImageUrl":"//mojo.generalmills.com/api/public/content/1JnmMn8Lm0iFnN_7J_FlbQ_gmi_hi_res_jpeg.jpeg?v=73f8aede\u0026t=205ad118875f48b5b556c2955695e2f6","mediumImageUrl":"//mojo.generalmills.com/api/public/content/1JnmMn8Lm0iFnN_7J_FlbQ_gmi_hi_res_jpeg.jpeg?v=73f8aede\u0026t=9df44d78ea5c47f98018cc1578c6de79"}]}};
var moduleName = 'relatedContent';
var isVueModule = true;
GeneralMills.PandoSites.RegisterControlInstance(moduleName, configuration, componentMetadata, isVueModule)
});
})();
(function() {
document.addEventListener('DOMContentLoaded', function() {
var componentMetadata = JSON.parse('\x7b\x22componentName\x22\x3a\x22RelatedContent_3189d52e-4fdf-44af-ba27-f9502579ef43\x22,\x22deferOptions\x22\x3a\x7b\x22deferComponent\x22\x3atrue,\x22deferType\x22\x3a\x22OnDemand\x22,\x22deferId\x22\x3a\x22rf5c51d552288414db95643a3eb6d369e\x22,\x22deferredContainerId\x22\x3a\x22\x2fmain\x2frdpRelatedContent1\x22,\x22deferredContainerView\x22\x3a\x22RecipeDetail\x22\x7d,\x22viewName\x22\x3a\x22RelatedContent\x22\x7d');
var configuration = {"dataSourceId":"3189d52e-4fdf-44af-ba27-f9502579ef43","isCurrentUserAnonymous":true,"relatedContentList":{"contentId":"bc48a0fb-ef26-42bc-8333-7d28e1cf7248","listSettings":{"pageSize":3,"startPage":1,"listType":1,"title":"Explore Categories","useModalRegistration":false,"regAction":"","esrcCode":0,"favoriteButtonLabelFormat":"Add {0} to favorites","contentTypes":["Category"],"showImages":false,"showRatings":false,"allowFavoriting":false,"cssClassName":"relatedContentWithoutImages"},"items":[{"contentId":"4f5ca0cb-9b19-4384-a538-dcd74c5fb461","contentType":"Category","title":"Christmas Recipes","isFavorite":false,"linkUrl":"/parties-and-holidays/holiday/christmas","numberOfRatings":"0","averageRating":"0","averageRatingStars":"0","smallImageUrl":"/-/media/GMI/Core-Sites/TBSP/Images/recipe-hero/appetizer/3-ingredient-cranberry-brie-bites_hero.jpg?sc_lang=en?W=276","mediumImageUrl":"/-/media/GMI/Core-Sites/TBSP/Images/recipe-hero/appetizer/3-ingredient-cranberry-brie-bites_hero.jpg?sc_lang=en?W=680"},{"contentId":"6fe76eb3-016c-488a-beb6-09fdbc42bf4b","contentType":"Category","title":"Holiday Drinks Recipes, Dishes and Ideas from Tablespoon","isFavorite":false,"linkUrl":"/courses/drinks/holiday-drinks","numberOfRatings":"0","averageRating":"0","averageRatingStars":"0","smallImageUrl":"","mediumImageUrl":""},{"contentId":"32e81f7d-1693-42b3-89f3-645314f3f01d","contentType":"Category","title":"Hot Chocolate Recipes, Dishes and Ideas from Tablespoon","isFavorite":false,"linkUrl":"/courses/drinks/hot-chocolate","numberOfRatings":"0","averageRating":"0","averageRatingStars":"0","smallImageUrl":"","mediumImageUrl":""}],"availableItems":[{"contentId":"4f5ca0cb-9b19-4384-a538-dcd74c5fb461","contentType":"Category","title":"Christmas Recipes","isFavorite":false,"linkUrl":"/parties-and-holidays/holiday/christmas","numberOfRatings":"0","averageRating":"0","averageRatingStars":"0","smallImageUrl":"/-/media/GMI/Core-Sites/TBSP/Images/recipe-hero/appetizer/3-ingredient-cranberry-brie-bites_hero.jpg?sc_lang=en?W=276","mediumImageUrl":"/-/media/GMI/Core-Sites/TBSP/Images/recipe-hero/appetizer/3-ingredient-cranberry-brie-bites_hero.jpg?sc_lang=en?W=680"},{"contentId":"6fe76eb3-016c-488a-beb6-09fdbc42bf4b","contentType":"Category","title":"Holiday Drinks Recipes, Dishes and Ideas from Tablespoon","isFavorite":false,"linkUrl":"/courses/drinks/holiday-drinks","numberOfRatings":"0","averageRating":"0","averageRatingStars":"0","smallImageUrl":"","mediumImageUrl":""},{"contentId":"32e81f7d-1693-42b3-89f3-645314f3f01d","contentType":"Category","title":"Hot Chocolate Recipes, Dishes and Ideas from Tablespoon","isFavorite":false,"linkUrl":"/courses/drinks/hot-chocolate","numberOfRatings":"0","averageRating":"0","averageRatingStars":"0","smallImageUrl":"","mediumImageUrl":""}]}};
var moduleName = 'relatedContent';
var isVueModule = true;
GeneralMills.PandoSites.RegisterControlInstance(moduleName, configuration, componentMetadata, isVueModule)
});
})();
(function() {
document.addEventListener('DOMContentLoaded', function() {
var componentMetadata = JSON.parse('\x7b\x22componentName\x22\x3a\x22DoubleClick_745c15b5-a9ad-4519-81b8-8ce6135efb93\x22,\x22deferOptions\x22\x3a\x7b\x22deferComponent\x22\x3atrue,\x22deferType\x22\x3a\x22OnDemand\x22,\x22deferId\x22\x3a\x22r9ee307c680d84264b7a02b2fb79bb49c\x22,\x22deferredContainerId\x22\x3a\x22\x2fmain\x2frdpSecondaryAd\x22,\x22deferredContainerView\x22\x3a\x22DoubleClick\x22\x7d,\x22viewName\x22\x3a\x22DoubleClick\x22\x7d');
var configuration = {"adId":"OMP/tablespoon/recipes/300x250_bottom","minPageWidth":"1000","maxPageWidth":"9999","defaultMinPageWidth":"1000","defaultMaxPageWidth":"9999","size":"[[300,600],[300,250]]","refreshWhenViewed":false,"adContainerId":"5059c94d-9d0c-405e-9ece-bfb0987ed68f","doubleClickAdContainerId":"50658774-70c8-446f-80d1-eb25966df7d9","adCaptionText":"Advertisement","networkCode":"/15704463/","relevantMetadata":["Dessert","Chocolate","Christmas"],"privacyOptOut":false,"adProvider":"Legacy","sovrnCssClass":"","responsive":false,"contentType":"Recipe","itemId":"bc48a0fb-ef26-42bc-8333-7d28e1cf7248","continuesBelowText":"Recipe Continues Below"};
var moduleName = 'doubleClick';
var isVueModule = true;
GeneralMills.PandoSites.RegisterControlInstance(moduleName, configuration, componentMetadata, isVueModule)
});
})();
(function() {
document.addEventListener('DOMContentLoaded', function() {
var componentMetadata = JSON.parse('\x7b\x22componentName\x22\x3a\x22DoubleClick_adef0bec-8719-4457-8387-12e0f80eec2b\x22,\x22deferOptions\x22\x3a\x7b\x22deferComponent\x22\x3atrue,\x22deferType\x22\x3a\x22OnDemand\x22,\x22deferId\x22\x3a\x22r457c7ccf0b714abea0f3edf6d03cd252\x22,\x22deferredContainerId\x22\x3a\x22\x2fmain\x2frdpSecondaryAd\x22,\x22deferredContainerView\x22\x3a\x22DoubleClick\x22\x7d,\x22viewName\x22\x3a\x22DoubleClick\x22\x7d');
var configuration = {"adId":"OMP/tablespoon/recipes/728x90_bottom","minPageWidth":"768","maxPageWidth":"999","defaultMinPageWidth":"1000","defaultMaxPageWidth":"9999","size":"[728, 90]","refreshWhenViewed":false,"adContainerId":"86a2226f-4fca-48c9-bb4e-86ebedb53366","doubleClickAdContainerId":"60a5562b-f947-481f-8667-5d2249532115","adCaptionText":"Advertisement","networkCode":"/15704463/","relevantMetadata":["Dessert","Chocolate","Christmas"],"privacyOptOut":false,"adProvider":"Legacy","sovrnCssClass":"","responsive":false,"contentType":"Recipe","itemId":"bc48a0fb-ef26-42bc-8333-7d28e1cf7248","continuesBelowText":"Recipe Continues Below"};
var moduleName = 'doubleClick';
var isVueModule = true;
GeneralMills.PandoSites.RegisterControlInstance(moduleName, configuration, componentMetadata, isVueModule)
});
})();
(function() {
document.addEventListener('DOMContentLoaded', function() {
var componentMetadata = JSON.parse('\x7b\x22componentName\x22\x3a\x22DoubleClick_80e5634b-4b8b-4ab6-9d42-f87399323043\x22,\x22deferOptions\x22\x3a\x7b\x22deferComponent\x22\x3atrue,\x22deferType\x22\x3a\x22OnDemand\x22,\x22deferId\x22\x3a\x22r5be257855a6441f3a55737efa61a8558\x22,\x22deferredContainerId\x22\x3a\x22\x2fmain\x2frdpSecondaryAd\x22,\x22deferredContainerView\x22\x3a\x22DoubleClick\x22\x7d,\x22viewName\x22\x3a\x22DoubleClick\x22\x7d');
var configuration = {"adId":"OMP/m_tablespoon/recipes/300x250_bottom","minPageWidth":"299","maxPageWidth":"767","defaultMinPageWidth":"1000","defaultMaxPageWidth":"9999","size":"[[300,250], [300,600]]","refreshWhenViewed":false,"adContainerId":"4decf414-98df-4d6c-a789-e23aca2bfbd3","doubleClickAdContainerId":"aca3424f-a630-4258-be21-0373e00b88cf","adCaptionText":"Advertisement","networkCode":"/15704463/","relevantMetadata":["Dessert","Chocolate","Christmas"],"privacyOptOut":false,"adProvider":"Legacy","sovrnCssClass":"","responsive":false,"contentType":"Recipe","itemId":"bc48a0fb-ef26-42bc-8333-7d28e1cf7248","continuesBelowText":"Recipe Continues Below"};
var moduleName = 'doubleClick';
var isVueModule = true;
GeneralMills.PandoSites.RegisterControlInstance(moduleName, configuration, componentMetadata, isVueModule)
});
})();
(function() {
document.addEventListener('DOMContentLoaded', function() {
var componentMetadata = JSON.parse('\x7b\x22componentName\x22\x3a\x22DoubleClick_34589d2e-66d8-4e9a-9c4f-fb0e3ab39458\x22,\x22deferOptions\x22\x3a\x7b\x22deferComponent\x22\x3atrue,\x22deferType\x22\x3a\x22OnDemand\x22,\x22deferId\x22\x3a\x22r8342683ef54447c794546e262996cd47\x22,\x22deferredContainerId\x22\x3a\x22\x2fmain\x2frdpTernaryAd\x22,\x22deferredContainerView\x22\x3a\x22DoubleClick\x22\x7d,\x22viewName\x22\x3a\x22DoubleClick\x22\x7d');
var configuration = {"adId":"OMP/tablespoon/recipes/300x250_bottom2","minPageWidth":"1000","maxPageWidth":"9999","defaultMinPageWidth":"1000","defaultMaxPageWidth":"9999","size":"[[300,600],[300,250]]","refreshWhenViewed":false,"adContainerId":"01e426f6-5bc0-43e2-b3f4-0dc23263aa6c","doubleClickAdContainerId":"6d4f79f4-8bfd-4d52-b856-18179528233e","adCaptionText":"Advertisement","networkCode":"/15704463/","relevantMetadata":["Dessert","Chocolate","Christmas"],"privacyOptOut":false,"adProvider":"Legacy","sovrnCssClass":"","responsive":false,"contentType":"Recipe","itemId":"bc48a0fb-ef26-42bc-8333-7d28e1cf7248","continuesBelowText":"Recipe Continues Below"};
var moduleName = 'doubleClick';
var isVueModule = true;
GeneralMills.PandoSites.RegisterControlInstance(moduleName, configuration, componentMetadata, isVueModule)
});
})();