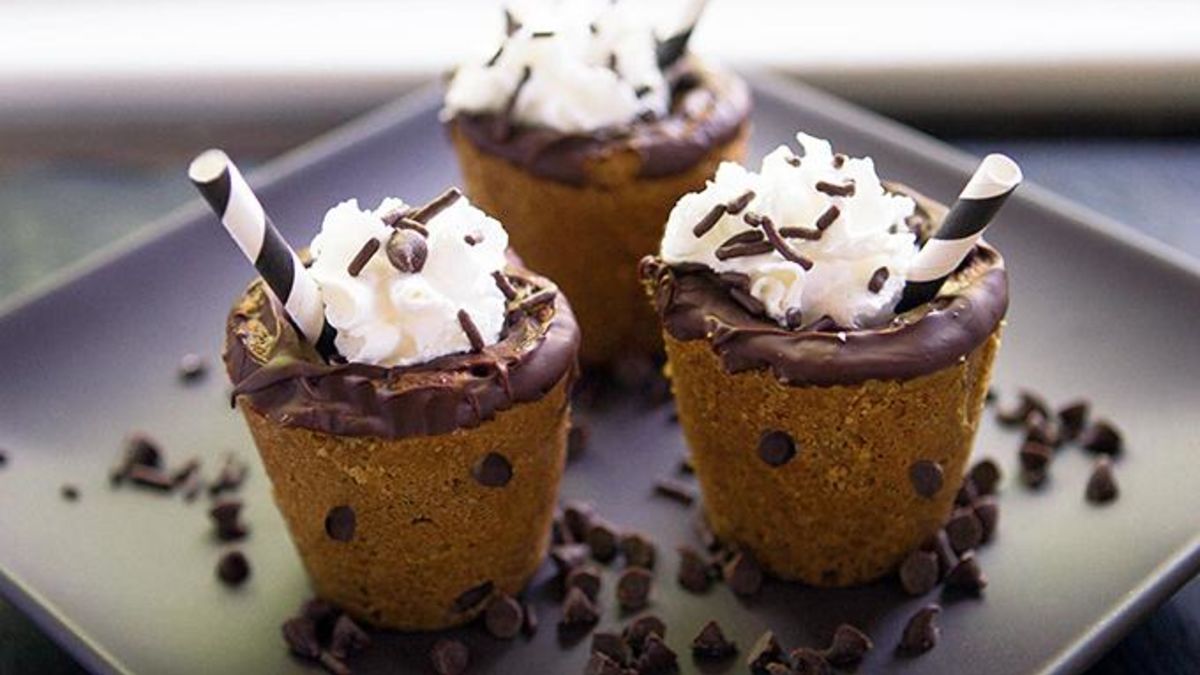
Deliciously creamy mudslide jello shots are poured inside chewy chocolate chip cookie shot glasses. YES, you CAN eat the shot glasses!
More About This Recipe
-
And you thought this was gonna be a boring party...
Think making your own cookie shot glasses has to be hard? No way! I’ve simmered down the process and made it so simple, you’ll want to make them for every meal.
You won’t find me disagreeing. Mudslide cookie shots are one meal replacement I could totally get behind!
To get started, grab a tube of Pillsbury chocolate chip cookie dough.
You’ll also need a mini popover pan and a bottle of nonstick baking spray – the kind with flour in it. Spray the pan, then press the cookie dough into 6 of the popover cups.
Wrap wine corks in aluminum foil. You'll see why in a sec...
Place one foil-covered cork inside each popover cup. This will keep the dough from puffing into the center of the cup, and allow your shot glasses to get fully cooked inside without burning on the outside.
Remove the corks from each cookie cup when they come out of the oven.
Cool the cups completely, then remove them from the popover pan.
Rim the little cookie cups just like you would a fancy drink. For these, just dip the rims in melted chocolate!
Mix up the mudslide jelly shots.
Fill the cups with the slightly-set mudslide jelly shot mixture, and pop ‘em in the fridge to set.
Garnish them with little straws (not for sipping 'cuz these are gelatin-like, but for the CUTE meter!), a whipped cream floret and some sprinkles and mini chocolate chips. NOW you're ready to party!
Brooke sometimes makes cookie shots for breakfast, then posts it all at Cheeky Kitchen. She joined Tablespoon to bring back the meal of champions, one bowl of slow-cooked muesli at a time. Hit up at Brooke's profile for more fast-fun-fab recipes that let you act lazy and eat like a boss.
Mudslide Jello Shots in Cookie Shot Glasses
- Prep Time 10 min
- Total 60 min
- Servings 6
- Ingredients 11
Ingredients
- 1 roll (16.5 oz) refrigerated Pillsbury™ Chocolate Chip Cookie Dough
- 1/2 cup warm water
- 1 envelope unflavored gelatin
- 1 bottle (200 ml) Kahlúa™ Mudslide liquor
- 1/4 cup dark chocolate chips, melted (for cup rims)
- 6 tablespoons whipped cream (for garnish, if desired)
- Chocolate candy sprinkles (for garnish, if desired)
- Mini chocolate chips (for garnish, if desired)
- 3 straws, cut into small lengths (for garnish, if desired)
- Nonstick baking spray
- SPECIAL EQUIPMENT: 6 wine corks, aluminum foil, mini popover pan
Instructions
-
Step1Spray six mini popover cups with nonstick BAKING spray (the sort with flour.) This will make it very easy to remove your cooled cookie cups without breaking them.
-
Step2Preheat oven to 350°F. Separate Pillsbury™ dough into 6 even balls. Form the balls around the bottom and sides of each popover cup.
-
Step3Cover 6 wine corks with aluminum foil. Spray with nonstick baking spray. Place a cork in the center of each cookie cup. Bake for 11-15 minutes, or until the edges of the cookie cups are golden brown.
-
Step4While cookies are baking, add warm water, gelatin, and mudslide liquor to a medium bow. Whisk until smooth, then place in fridge until slightly set up.
-
Step5Remove cookie cups from oven and allow to cool completely before gently removing from popover cups. Dip the top of each cookie cup in melted chocolate chips. Spoon slightly-set mudslide shot mixture into the center of each cup. Return to fridge and allow to set up completely, about 1 hour.
-
Step6Top each cookie cup with whipped cream, sprinkles and mini chocolate chips just before serving. Serve immediately!
Nutrition
No nutrition information available for this recipe
(function() {
document.addEventListener('DOMContentLoaded', function() {
var componentMetadata = JSON.parse('\x7b\x22componentName\x22\x3a\x22RelatedContent_86838426-dd26-481a-9735-69435bca607d\x22,\x22deferOptions\x22\x3a\x7b\x22deferComponent\x22\x3afalse,\x22deferType\x22\x3a\x22None\x22,\x22deferId\x22\x3a\x22r6d0e9d9c3b604e398ee841e939e41a88\x22,\x22deferredContainerId\x22\x3a\x22\x2fmain\x2frdpRelatedContent1_NonDeferred\x22,\x22deferredContainerView\x22\x3anull\x7d,\x22viewName\x22\x3a\x22RelatedContent\x22\x7d');
var configuration = {"dataSourceId":"86838426-dd26-481a-9735-69435bca607d","isCurrentUserAnonymous":true,"isAnonymousUserWithFavorites":false,"relatedContentList":{"contentId":"f22477ac-ad6f-4ad1-9a27-55060afa6ffd","listSettings":{"pageSize":3,"startPage":1,"listType":1,"title":"Try These Next","useModalRegistration":false,"regAction":"","esrcCode":0,"favoriteButtonLabelFormat":"Add {0} to favorites","contentTypes":["Category"],"showImages":false,"imageSize":0,"showRatings":false,"allowFavoriting":false,"cssClassName":"relatedContentWithoutImages","favoriteButtonText":""},"items":[{"contentId":"6fe76eb3-016c-488a-beb6-09fdbc42bf4b","contentType":"Category","title":"Holiday Drinks Recipes, Dishes and Ideas from Tablespoon","isFavorite":false,"linkUrl":"/courses/drinks/holiday-drinks","numberOfRatings":"0","averageRating":"0","averageRatingStars":"0","smallImageUrl":"","mediumImageUrl":""},{"contentId":"6553be93-d5a7-46df-849a-d5ad89572aaf","contentType":"Category","title":"Cocktail Recipes, Dishes and Ideas from Tablespoon","isFavorite":false,"linkUrl":"/courses/drinks/cocktail","numberOfRatings":"0","averageRating":"0","averageRatingStars":"0","smallImageUrl":"","mediumImageUrl":""},{"contentId":"155dfbb9-cf2c-4452-a734-2c0c585cfd28","contentType":"Category","title":"Jello Shot Recipes, Dishes and Ideas from Tablespoon","isFavorite":false,"linkUrl":"/courses/drinks/jello-shots","numberOfRatings":"0","averageRating":"0","averageRatingStars":"0","smallImageUrl":"","mediumImageUrl":""}],"availableItems":[{"contentId":"6fe76eb3-016c-488a-beb6-09fdbc42bf4b","contentType":"Category","title":"Holiday Drinks Recipes, Dishes and Ideas from Tablespoon","isFavorite":false,"linkUrl":"/courses/drinks/holiday-drinks","numberOfRatings":"0","averageRating":"0","averageRatingStars":"0","smallImageUrl":"","mediumImageUrl":""},{"contentId":"6553be93-d5a7-46df-849a-d5ad89572aaf","contentType":"Category","title":"Cocktail Recipes, Dishes and Ideas from Tablespoon","isFavorite":false,"linkUrl":"/courses/drinks/cocktail","numberOfRatings":"0","averageRating":"0","averageRatingStars":"0","smallImageUrl":"","mediumImageUrl":""},{"contentId":"155dfbb9-cf2c-4452-a734-2c0c585cfd28","contentType":"Category","title":"Jello Shot Recipes, Dishes and Ideas from Tablespoon","isFavorite":false,"linkUrl":"/courses/drinks/jello-shots","numberOfRatings":"0","averageRating":"0","averageRatingStars":"0","smallImageUrl":"","mediumImageUrl":""}]}};
var moduleName = 'relatedContent';
var isVueModule = true;
GeneralMills.PandoSites.RegisterControlInstance(moduleName, configuration, componentMetadata, isVueModule)
});
})();
(function() {
document.addEventListener('DOMContentLoaded', function() {
var componentMetadata = JSON.parse('\x7b\x22componentName\x22\x3a\x22RelatedContent_9930dad2-817c-4363-b508-21f459b3c521\x22,\x22deferOptions\x22\x3a\x7b\x22deferComponent\x22\x3atrue,\x22deferType\x22\x3a\x22OnDemand\x22,\x22deferId\x22\x3a\x22rd7cdca111579470fb901b8b210597ee7\x22,\x22deferredContainerId\x22\x3a\x22\x2fmain\x2frdpRelatedContent1\x22,\x22deferredContainerView\x22\x3a\x22RecipeDetailRedesign\x22\x7d,\x22viewName\x22\x3a\x22RelatedContent\x22\x7d');
var configuration = {"dataSourceId":"9930dad2-817c-4363-b508-21f459b3c521","isCurrentUserAnonymous":true,"isAnonymousUserWithFavorites":false,"relatedContentList":{"contentId":"f22477ac-ad6f-4ad1-9a27-55060afa6ffd","listSettings":{"pageSize":6,"startPage":1,"listType":1,"title":"","useModalRegistration":false,"regAction":"","esrcCode":0,"favoriteButtonLabelFormat":"Add {0} to favorites","contentTypes":[],"showImages":true,"imageSize":1,"showRatings":false,"allowFavoriting":true,"cssClassName":"","favoriteButtonText":"Save"},"items":[{"contentId":"81ac52e5-e3ad-4bc3-be00-a19f33130598","contentType":"Recipe","title":"RumChata™ Jello Shots in Cookie Shot Glasses","isFavorite":false,"linkUrl":"/recipes/rumchata-jello-shots-in-cookie-shot-glasses/81ac52e5-e3ad-4bc3-be00-a19f33130598","numberOfRatings":"0","averageRating":"0","averageRatingStars":"0","smallImageUrl":"//mojo.generalmills.com/api/public/content/q_L8AIjU80aH4TOqMfqggg_webp_base.webp?v=10f39567\u0026t=67e847e026fb43aa8d6e3f5ef39a4ef7","mediumImageUrl":"//mojo.generalmills.com/api/public/content/q_L8AIjU80aH4TOqMfqggg_webp_base.webp?v=10f39567\u0026t=3653fe2f5ecd4a47a5a51c97e429947c"},{"contentId":"7b618f6e-26f1-47a8-9f60-ee3d2e05cd63","contentType":"Recipe","title":"Stained Glass Holiday Jello Shots","isFavorite":false,"linkUrl":"/recipes/stained-glass-holiday-jello-shots/7b618f6e-26f1-47a8-9f60-ee3d2e05cd63","numberOfRatings":"0","averageRating":"0","averageRatingStars":"0","smallImageUrl":"//mojo.generalmills.com/api/public/content/fQKx34JTQUyLsdBsET1xGQ_webp_base.webp?v=193e2a63\u0026t=67e847e026fb43aa8d6e3f5ef39a4ef7","mediumImageUrl":"//mojo.generalmills.com/api/public/content/fQKx34JTQUyLsdBsET1xGQ_webp_base.webp?v=193e2a63\u0026t=3653fe2f5ecd4a47a5a51c97e429947c"},{"contentId":"264363eb-110a-4469-936d-996666ae98bc","contentType":"Recipe","title":"Holly Jolly Jello Shots","isFavorite":false,"linkUrl":"/recipes/holly-jolly-jello-shots/264363eb-110a-4469-936d-996666ae98bc","numberOfRatings":"0","averageRating":"0","averageRatingStars":"0","smallImageUrl":"//mojo.generalmills.com/api/public/content/c08aex3ObEe5woZVCRXY-A_webp_base.webp?v=1ab2b05e\u0026t=67e847e026fb43aa8d6e3f5ef39a4ef7","mediumImageUrl":"//mojo.generalmills.com/api/public/content/c08aex3ObEe5woZVCRXY-A_webp_base.webp?v=1ab2b05e\u0026t=3653fe2f5ecd4a47a5a51c97e429947c"},{"contentId":"b1e3dea8-6606-429d-9b66-fd65d6ab9087","contentType":"Recipe","title":"Apple Cider Jello Shots","isFavorite":false,"linkUrl":"/recipes/apple-cider-jello-shots/b1e3dea8-6606-429d-9b66-fd65d6ab9087","numberOfRatings":"0","averageRating":"0","averageRatingStars":"0","smallImageUrl":"//mojo.generalmills.com/api/public/content/PbWftsWfrk-FcuTB06qI0g_webp_base.webp?v=72ef0bab\u0026t=67e847e026fb43aa8d6e3f5ef39a4ef7","mediumImageUrl":"//mojo.generalmills.com/api/public/content/PbWftsWfrk-FcuTB06qI0g_webp_base.webp?v=72ef0bab\u0026t=3653fe2f5ecd4a47a5a51c97e429947c"},{"contentId":"7e5d88b3-cabb-4d35-90a1-51ece349248b","contentType":"Recipe","title":"Christmas Peppermint Jello Shots","isFavorite":false,"linkUrl":"/recipes/christmas-peppermint-jello-shots/7e5d88b3-cabb-4d35-90a1-51ece349248b","numberOfRatings":"0","averageRating":"0","averageRatingStars":"0","smallImageUrl":"//mojo.generalmills.com/api/public/content/9QhaGAtgqEaVTg2tgUqsVQ_webp_base.webp?v=4eba5619\u0026t=67e847e026fb43aa8d6e3f5ef39a4ef7","mediumImageUrl":"//mojo.generalmills.com/api/public/content/9QhaGAtgqEaVTg2tgUqsVQ_webp_base.webp?v=4eba5619\u0026t=3653fe2f5ecd4a47a5a51c97e429947c"},{"contentId":"2d3e4599-23cb-470e-b58b-3f4928f44d62","contentType":"Recipe","title":"Candy Cane Jello Shots","isFavorite":false,"linkUrl":"/recipes/candy-cane-jello-shots/2d3e4599-23cb-470e-b58b-3f4928f44d62","numberOfRatings":"0","averageRating":"0","averageRatingStars":"0","smallImageUrl":"//mojo.generalmills.com/api/public/content/ASZOdwTicUyBpSPuYLrljw_webp_base.webp?v=bba738fe\u0026t=67e847e026fb43aa8d6e3f5ef39a4ef7","mediumImageUrl":"//mojo.generalmills.com/api/public/content/ASZOdwTicUyBpSPuYLrljw_webp_base.webp?v=bba738fe\u0026t=3653fe2f5ecd4a47a5a51c97e429947c"}],"availableItems":[{"contentId":"81ac52e5-e3ad-4bc3-be00-a19f33130598","contentType":"Recipe","title":"RumChata™ Jello Shots in Cookie Shot Glasses","isFavorite":false,"linkUrl":"/recipes/rumchata-jello-shots-in-cookie-shot-glasses/81ac52e5-e3ad-4bc3-be00-a19f33130598","numberOfRatings":"0","averageRating":"0","averageRatingStars":"0","smallImageUrl":"//mojo.generalmills.com/api/public/content/q_L8AIjU80aH4TOqMfqggg_webp_base.webp?v=10f39567\u0026t=67e847e026fb43aa8d6e3f5ef39a4ef7","mediumImageUrl":"//mojo.generalmills.com/api/public/content/q_L8AIjU80aH4TOqMfqggg_webp_base.webp?v=10f39567\u0026t=3653fe2f5ecd4a47a5a51c97e429947c"},{"contentId":"7b618f6e-26f1-47a8-9f60-ee3d2e05cd63","contentType":"Recipe","title":"Stained Glass Holiday Jello Shots","isFavorite":false,"linkUrl":"/recipes/stained-glass-holiday-jello-shots/7b618f6e-26f1-47a8-9f60-ee3d2e05cd63","numberOfRatings":"0","averageRating":"0","averageRatingStars":"0","smallImageUrl":"//mojo.generalmills.com/api/public/content/fQKx34JTQUyLsdBsET1xGQ_webp_base.webp?v=193e2a63\u0026t=67e847e026fb43aa8d6e3f5ef39a4ef7","mediumImageUrl":"//mojo.generalmills.com/api/public/content/fQKx34JTQUyLsdBsET1xGQ_webp_base.webp?v=193e2a63\u0026t=3653fe2f5ecd4a47a5a51c97e429947c"},{"contentId":"264363eb-110a-4469-936d-996666ae98bc","contentType":"Recipe","title":"Holly Jolly Jello Shots","isFavorite":false,"linkUrl":"/recipes/holly-jolly-jello-shots/264363eb-110a-4469-936d-996666ae98bc","numberOfRatings":"0","averageRating":"0","averageRatingStars":"0","smallImageUrl":"//mojo.generalmills.com/api/public/content/c08aex3ObEe5woZVCRXY-A_webp_base.webp?v=1ab2b05e\u0026t=67e847e026fb43aa8d6e3f5ef39a4ef7","mediumImageUrl":"//mojo.generalmills.com/api/public/content/c08aex3ObEe5woZVCRXY-A_webp_base.webp?v=1ab2b05e\u0026t=3653fe2f5ecd4a47a5a51c97e429947c"},{"contentId":"b1e3dea8-6606-429d-9b66-fd65d6ab9087","contentType":"Recipe","title":"Apple Cider Jello Shots","isFavorite":false,"linkUrl":"/recipes/apple-cider-jello-shots/b1e3dea8-6606-429d-9b66-fd65d6ab9087","numberOfRatings":"0","averageRating":"0","averageRatingStars":"0","smallImageUrl":"//mojo.generalmills.com/api/public/content/PbWftsWfrk-FcuTB06qI0g_webp_base.webp?v=72ef0bab\u0026t=67e847e026fb43aa8d6e3f5ef39a4ef7","mediumImageUrl":"//mojo.generalmills.com/api/public/content/PbWftsWfrk-FcuTB06qI0g_webp_base.webp?v=72ef0bab\u0026t=3653fe2f5ecd4a47a5a51c97e429947c"},{"contentId":"7e5d88b3-cabb-4d35-90a1-51ece349248b","contentType":"Recipe","title":"Christmas Peppermint Jello Shots","isFavorite":false,"linkUrl":"/recipes/christmas-peppermint-jello-shots/7e5d88b3-cabb-4d35-90a1-51ece349248b","numberOfRatings":"0","averageRating":"0","averageRatingStars":"0","smallImageUrl":"//mojo.generalmills.com/api/public/content/9QhaGAtgqEaVTg2tgUqsVQ_webp_base.webp?v=4eba5619\u0026t=67e847e026fb43aa8d6e3f5ef39a4ef7","mediumImageUrl":"//mojo.generalmills.com/api/public/content/9QhaGAtgqEaVTg2tgUqsVQ_webp_base.webp?v=4eba5619\u0026t=3653fe2f5ecd4a47a5a51c97e429947c"},{"contentId":"2d3e4599-23cb-470e-b58b-3f4928f44d62","contentType":"Recipe","title":"Candy Cane Jello Shots","isFavorite":false,"linkUrl":"/recipes/candy-cane-jello-shots/2d3e4599-23cb-470e-b58b-3f4928f44d62","numberOfRatings":"0","averageRating":"0","averageRatingStars":"0","smallImageUrl":"//mojo.generalmills.com/api/public/content/ASZOdwTicUyBpSPuYLrljw_webp_base.webp?v=bba738fe\u0026t=67e847e026fb43aa8d6e3f5ef39a4ef7","mediumImageUrl":"//mojo.generalmills.com/api/public/content/ASZOdwTicUyBpSPuYLrljw_webp_base.webp?v=bba738fe\u0026t=3653fe2f5ecd4a47a5a51c97e429947c"}]}};
var moduleName = 'relatedContent';
var isVueModule = true;
GeneralMills.PandoSites.RegisterControlInstance(moduleName, configuration, componentMetadata, isVueModule)
});
})();

- Trademarks referred to herein are the properties of their respective owners.
© 2026 ®/TM General Mills All Rights Reserved