(function() {
document.addEventListener('DOMContentLoaded', function() {
var componentMetadata = JSON.parse('\x7b\x22componentName\x22\x3a\x22ActionToolbar_d4f0b4cc-dd76-4537-857b-56997525ceb8\x22,\x22deferOptions\x22\x3a\x7b\x22deferComponent\x22\x3atrue,\x22deferType\x22\x3a\x22OnDemand\x22,\x22deferId\x22\x3a\x22r8bc5501e0b02469c830333a1df0f7f1d\x22,\x22deferredContainerId\x22\x3a\x22\x2ffloatingActionToolbar\x2ffloatingActionToolbar_Interop\x22,\x22deferredContainerView\x22\x3a\x22InteropDeferWrapper\x22\x7d,\x22viewName\x22\x3a\x22ActionToolbar\x22\x7d');
var configuration = {"contentId":"933c827d-f201-4f5a-ad1a-914ea0e013ce","toolbarSettings":{"id":"d4f0b4cc-dd76-4537-857b-56997525ceb8","regAction":"FAVORITE","eSourceCode":16797,"namePassedToEvents":"ArticleStandardLongFormToolbar","buttons":[{"providerName":"pinterest","providerNamePassedToEvents":"Pinterest","shareUrlFormat":"//pinterest.com/pin/create/link/?url={0}","id":"76def9a1-42e6-4e8d-b963-2bb41556cef1","allowedForAnonymousUsers":true,"type":"Social","displayName":"Pinterest","toggleDisplayName":"","namePassedToEvents":"Pinterest","cssClassName":"atButtonPinterest","privacyOptOutMessage":"\u003cdiv class=\u0027privacyMessage\u0027\u003e\n\u003ch3\u003eThis feature is not available with your current cookie settings.\u003c/h3\u003e\n\u003cp\u003eYou can \u003ca href=\u0027#\u0027 data-show-preference-center=\u00271\u0027\u003eupdate your privacy settings\u003c/a\u003e to enable this content. Please enable “Functional Cookies” to use this feature.\u003c/p\u003e\n\u003c/div\u003e","showPrivacyOptOutMessage":false},{"addFavoriteErrorMessage":"Sorry, something went wrong. Please save again.","removeFavoriteErrorMessage":"Error occurred while removing from favorites","regAction":"FAVORITE","eSourceCode":16797,"isCurrentUserAnonymous":false,"isFavoriteItem":false,"id":"718b4e01-b2be-40cf-8f0c-bca3b01db0ed","allowedForAnonymousUsers":false,"type":"Favorite","displayName":"Save","toggleDisplayName":"Saved","namePassedToEvents":"Favorite","cssClassName":"atButtonFavorite","privacyOptOutMessage":"\u003cdiv class=\u0027privacyMessage\u0027\u003e\n\u003ch3\u003eThis feature is not available with your current cookie settings.\u003c/h3\u003e\n\u003cp\u003eYou can \u003ca href=\u0027#\u0027 data-show-preference-center=\u00271\u0027\u003eupdate your privacy settings\u003c/a\u003e to enable this content. Please enable “Functional Cookies” to use this feature.\u003c/p\u003e\n\u003c/div\u003e","showPrivacyOptOutMessage":false},{"providerName":"facebook","providerNamePassedToEvents":"Facebook","shareUrlFormat":"//facebook.com/sharer/sharer.php?u={0}","id":"efdb520e-282a-4ae1-8a04-1d444442d622","allowedForAnonymousUsers":true,"type":"Social","displayName":"Facebook","toggleDisplayName":"","namePassedToEvents":"Facebook","cssClassName":"atButtonFacebook","privacyOptOutMessage":"\u003cdiv class=\u0027privacyMessage\u0027\u003e\n\u003ch3\u003eThis feature is not available with your current cookie settings.\u003c/h3\u003e\n\u003cp\u003eYou can \u003ca href=\u0027#\u0027 data-show-preference-center=\u00271\u0027\u003eupdate your privacy settings\u003c/a\u003e to enable this content. Please enable “Functional Cookies” to use this feature.\u003c/p\u003e\n\u003c/div\u003e","showPrivacyOptOutMessage":false},{"templateId":"ec5776a6-84cf-4f91-ba79-ace5d6ae2fa2","dialogHeading":"Email Article","emailCode":"TBSP_ContentEmail","dialogSettings":{"cancelButtonText":"Cancel","copyToSenderLabel":"Send a Copy to Myself","emailAddressesLabel":"* Email Address(es)","emailInstructionText":"Separate email addresses with commas","fromText":"From:","privacyPolicyText":"\u003cp\u003e\u0026copy;2026 General Mills, Inc. All Rights Reserved. This information will only be used to send an email to your friend(s) and will not be saved. Please read our \u003ca rel=\u0022noopener noreferrer\u0022 rel=\u0022noopener noreferrer\u0022 href=\u0022http://www.generalmills.com/company/privacy-policies/privacy-policy-us\u0022 target=\u0022_blank\u0022 shape=\u0022rect\u0022\u003ePrivacy Policy\u003c/a\u003e.\u003c/p\u003e","requiredFieldText":"* Required","sendButtonText":"Send","senderEmailAddressLabel":"* Your Email Address","senderFirstNameLabel":"* Your First Name","sendToText":"Send To:"},"id":"1b476610-b2bd-4a56-ba87-47a4798f6dcb","allowedForAnonymousUsers":true,"type":"Email","displayName":"Email","toggleDisplayName":"","namePassedToEvents":"Email","cssClassName":"atButtonEmail","privacyOptOutMessage":"\u003cdiv class=\u0027privacyMessage\u0027\u003e\n\u003ch3\u003eThis feature is not available with your current cookie settings.\u003c/h3\u003e\n\u003cp\u003eYou can \u003ca href=\u0027#\u0027 data-show-preference-center=\u00271\u0027\u003eupdate your privacy settings\u003c/a\u003e to enable this content. Please enable “Functional Cookies” to use this feature.\u003c/p\u003e\n\u003c/div\u003e","showPrivacyOptOutMessage":false},{"layoutParameter":"p%3d1","id":"ab4bf4fc-919a-4252-81ca-c39edb8eadf0","allowedForAnonymousUsers":true,"type":"Print","displayName":"Print","toggleDisplayName":"","namePassedToEvents":"Print","cssClassName":"atButtonPrint","privacyOptOutMessage":"\u003cdiv class=\u0027privacyMessage\u0027\u003e\n\u003ch3\u003eThis feature is not available with your current cookie settings.\u003c/h3\u003e\n\u003cp\u003eYou can \u003ca href=\u0027#\u0027 data-show-preference-center=\u00271\u0027\u003eupdate your privacy settings\u003c/a\u003e to enable this content. Please enable “Functional Cookies” to use this feature.\u003c/p\u003e\n\u003c/div\u003e","showPrivacyOptOutMessage":false}],"isSticky":true},"userSettings":{"isCurrentUserAnonymous":true,"isFavoriteItem":false,"isAnonymousUserWithFavorites":false},"pageAttributes":{"url":"https%3a%2f%2fwww.tablespoon.com%2fholidays-parties%2fchristmas%2fcheap-diy-christmas-presents-that-cost-5-or-less","contentId":"933c827d-f201-4f5a-ad1a-914ea0e013ce"},"recaptchaPublicKey":"6LfW_icUAAAAAL_CG700pddUxLNYIxgRJe3vOg2Z"};
var moduleName = 'actionToolbar';
var isVueModule = true;
GeneralMills.PandoSites.RegisterControlInstance(moduleName, configuration, componentMetadata, isVueModule)
});
})();
1. Cookie Cutters + Cookie Mix
The easiest DIY gift on this (or any) list, guaranteed. Make a bunch of these at the start of the season and keep on hand for any emergency gift-giving occasions. They make great stocking stuffers or cheap Secret Santa gifts.
What you need:
How to make this gift:
1. String together cookie cutters with twine or ribbon.
2. Wrap a pouch of cookie mix with a flour sack towel, securing with tape if needed. Finish with additional twine or ribbon, and tie cookie cutters to bow on package.
Final cost: $4.74/each
2. Hand-Painted Wooden Spoons + Brownie Mix
Impress everyone with this hand-painted gift. Great for stocking stuffers, coworkers and hostess gifts.—everyone loves brownies, after all. (We followed the step-by-step tutorial from going home to roost, and it worked like a charm.)
What you need:
How to make this gift:
1. Wrap a small piece of tape around the handle of each spoon, about 3-4 inches from the head. Apply 2-3 coats of paint to the handles of the spoons and set upright in a glass or jar to dry (we used Oui by Yoplait jars, which were just the right size). Leave for a few hours until the paint has completely dried.
2. Time to cure the paint! Place dry spoons on a cookie sheet in a cool oven and preheat to 250°F. When the oven is up to temperature, set a timer for 30 minutes. Then turn off the oven and let the spoons cool down in the oven as well.
3. When spoons have cooled, it’s time to apply the butcher block conditioner. This is the trick to making cheap spoons look so pretty, and to keeping the wood from getting stained during cooking. Put a small amount of wood block treatment in a microwave-safe container and heat for about 30 seconds or until melted. Gently apply with a paper towel to the unpainted areas of the spoon. Repeat if necessary.
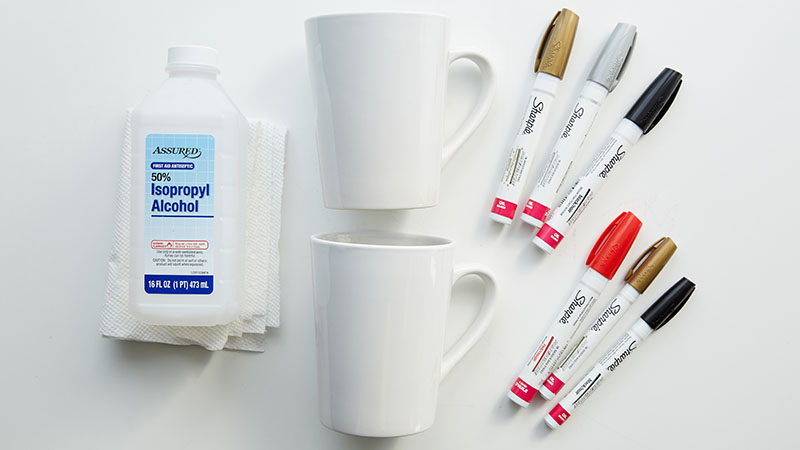
3. “This Is My Cake Mug” + Mug Cake Mix
Admit it: you want a cake mug now. DIY Sharpie mugs and mug cake recipes have both been kicking around Pinterest for a while now, and we’re pleased to report that we’ve perfected the techniques for you. There are a few keys to making a great Sharpie mug: time, cheap mugs (cheaper mugs work better for this than more expensive ones) and oil-based paint pens (don’t use regular permanent markers). And we tested no fewer than 15 versions of this mug cake to be sure it would work every time, no matter what. A mini jar full of the dry ingredients for one cake fits right inside a 14-oz coffee mug. You can write the full recipe on a gift tag, or right on the mug, like we did.
What you need:
How to make this gift:
1. Remove price stickers from mugs and thoroughly wipe exterior with rubbing alcohol to remove any dirt or oil.
2. Use paint pens to write on the outside of the mugs (don’t write on the inside, because the paint pens aren’t food safe). If you make a mistake, wipe off the paint with additional rubbing alcohol and start over.
We wrote our mug cake recipe on one side, and put a reminder about hand-washing on the bottom.
3. Turn mugs upside down and allow paint to dry 24 hours, or at least overnight.
4. Place upside-down mugs on a baking sheet in a COOL oven. Preheat oven to 400°F and let oven come up to temperature with mugs inside. Once the oven has preheated, set timer for 90 minutes. Turn off oven and leave mugs inside to cool down completely, about 2 hours.
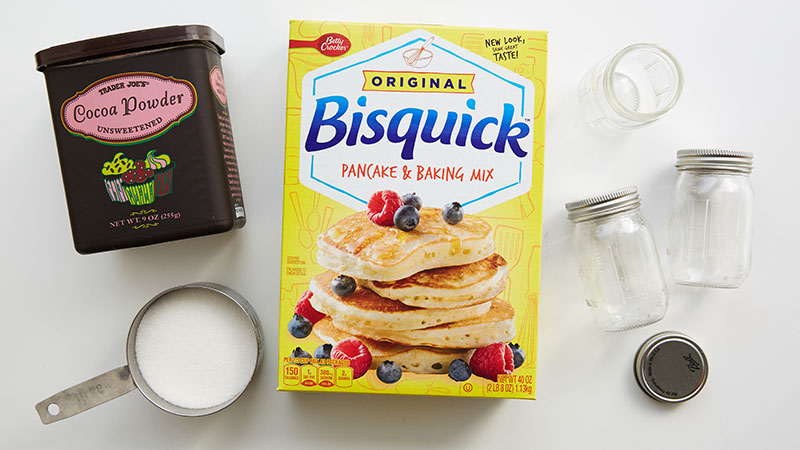
5. In a small bowl, whisk together Bisquick, sugar and cocoa powder until thoroughly combined.
Divide cake mix evenly between small glass jars (4 oz or larger).
6. Pair a jar of cake mix with each mug. Include instructions (below) on a gift tag, or write the whole mug cake recipe right there on the mug so they always have it handy.
Final cost: $4.54/each. The price will vary depending on where you get your supplies and how many colors of paint pens you used (our price is based on 2 pens).
Chocolate Mug Cake Recipe (yields 1)
Ingredients
- 4 tablespoons Bisquick™ original pancake and baking mix
- 2 tablespoons sugar
- 1 tablespoon unsweetened cocoa powder
- 3 tablespoons milk
- 2 tablespoons canola oil
- 1 egg white
- 1/8 teaspoon vanilla
Directions
Spray the inside of your mug with non-stick spray. Combine dry cake mix ingredients with 3 tablespoons milk, 2 tablespoons canola oil, 1 egg white and 1/8 teaspoon vanilla and pour batter into mug. Microwave 60-70 seconds, and let cool slightly before digging in.
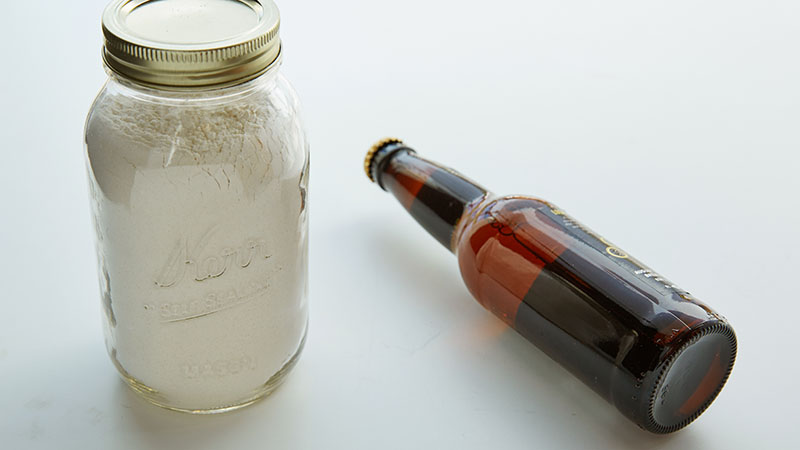
4. “Just Add Beer” Beer Bread Mix
One of our Tablespoon editors swears by this beer bread recipe from The Billfold, and has been making it for years. The best part? You probably already have most of the ingredients. (But for the sake of this experiment, we’ll go ahead and price it out anyway.)
What you need:
How to make this gift:
1. In a large bowl, whisk together dry ingredients. Transfer to a large glass canning jar.
2. Pair the jar of bread mix with a bottle of your favorite seasonal beer.
3. Bundle both inside a printed kitchen towel and attach a gift tag with instructions for baking (below).
Final cost: $5.21/each. This one went a little over the $5 limit because we bought just one canning jar. The price goes way down if you buy a case of 12. This case brings the per-jar cost down to $0.85, which would lower the cost of the gift from $5.21 to $3.97/each.
Beer Bread Recipe
(found on The Billfold)
Ingredients
- 3 cups flour
- 3 tablespoons sugar
- 1 tablespoon baking powder
- 1 teaspoon salt
- 1 bottle (12 oz) beer of choice
- 1-2 tablespoons cold butter, cut into small pieces (optional)
Directions
1. Preheat oven to 350°F. Spray inside of loaf pan with non-stick cooking spray.
2. In a medium bowl, combine dry ingredients and bottle of beer. Dough will be sticky.
3. Transfer dough to loaf pan and press lightly to form an even layer.
4. Optional: Place small pieces of butter over top of dough.
5. Bake 50-60 minutes. Bread is done when flicking the top of the loaf with your finger creates a hollow sound. Allow to cool slightly before serving.
For more hassle-free holiday ideas, check out our series: 24 Holiday Hacks to Keep You Sane.