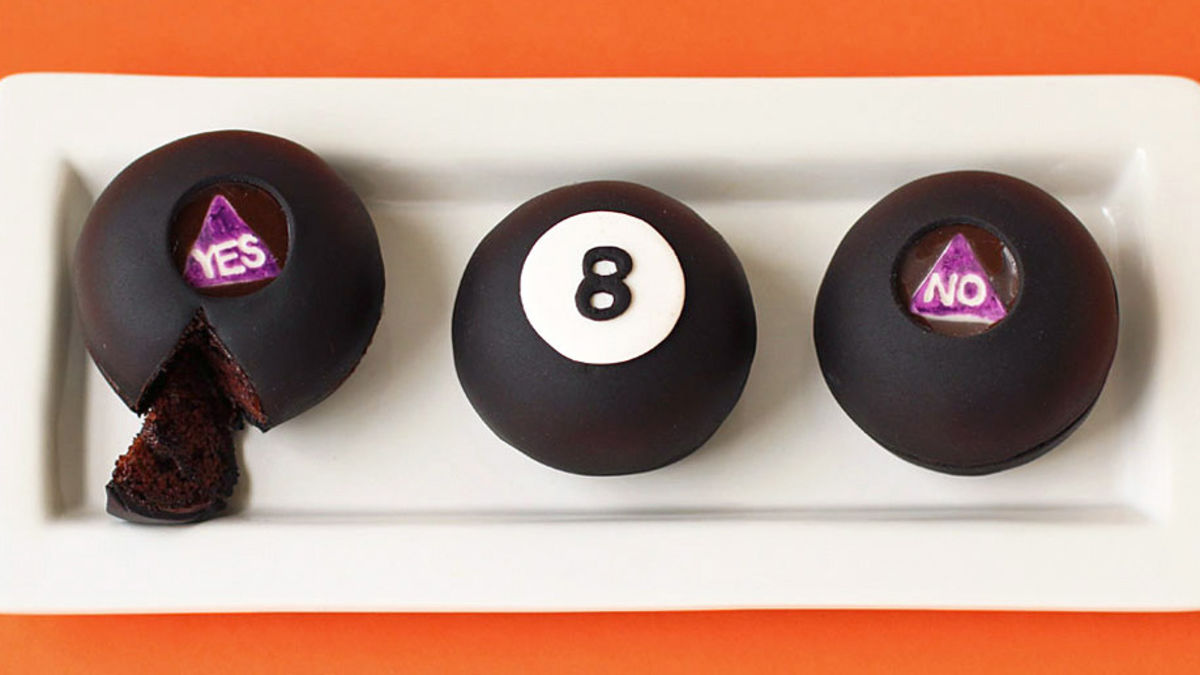
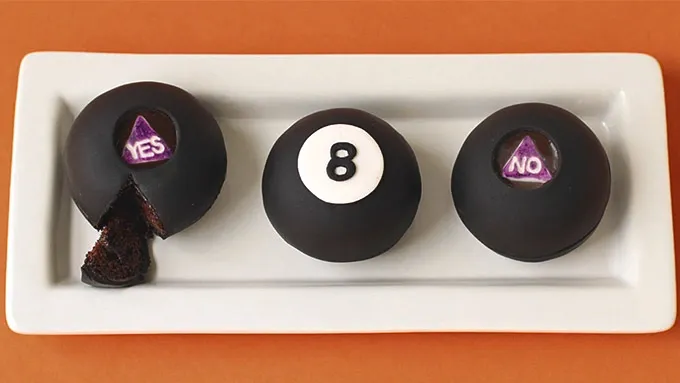
Chocolate cakes decorated to look like Magic 8 Balls!
More About This Recipe
- These realistic-looking cakes are the answer to your dessert cravings. How many times have you closed your eyes, asked a question, shook a Magic 8 Ball, and hoped for a good response? I have more times than I wish to admit. It's a fun yet silly way to get an answer to life's important questions when you're young, like "Does Billy like me," or "Will I pass my test?" It's an iconic toy that has entertained generations of kids and I thought it would be a challenge to make some Magic 8 Ball Cakes that look as realistic as possible. Did I get it right? I'll ask the 8 ball. "YES." Good answer! Since Magic 8 Balls are black, I decided my cake should be chocolate inside and I whipped up a batch of Betty Crocker chocolate fudge cake mix. To create a round cake I needed half-sphere pans and chose to use silicone molds that had 6 half-sphere cavities in each. I wanted my 8 balls to have the iconic plastic window in which you would see the answer to your questions. In order to create a clear edible window I used Isomalt instead of boiled sugar. If you’ve never worked with or even heard of Isomalt, it’s a sugar substitute that can be melted and remains clear once poured. I purchased Isomalt Nibs, which can simply be melted down and poured. I suggest when working with Isomalt that you use extreme caution! Once the Isomalt comes to a boil it is extremely hot and sticky. If it gets on your skin it will cause serious burns. If you aren't going to serve these the day you cover them in fondant, keep the two halves apart and stored with the flat side down, then attach them before serving. This will help maintain their round shape and keep the decoration from sticking to a serving platter. While these cakes may not give you the answers to all of your questions, they will definitely satisfy your dessert cravings!
Magic 8 Ball Cakes
- Prep Time 2 hr 0 min
- Total 4 hr 0 min
- Servings 9
- Ingredients 6
Ingredients
- 1 box Betty Crocker™ Super Moist™ Cake Mix Chocolate Fudge
- Eggs, water, and oil according to cake mix package
- 2 cans (16 oz) Betty Crocker™ Hershey'sSpecial Dark™ frosting
- 20 Isomalt nibs
- 6 oz white fondant
- 24 oz black fondant
Instructions
-
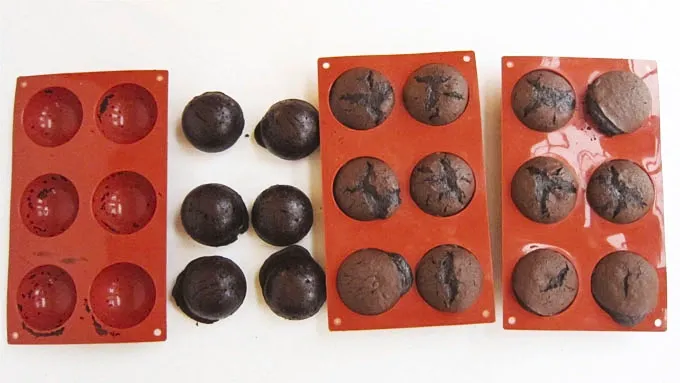
Step1Preheat oven to 350°F. Spray the inside of three 6-cavity half-sphere silicone molds with baking spray. Place the molds on baking sheets.
-
Step2Make cake mix according to package instructions. Equally divide batter among cavities in half sphere molds.
-
Step3Bake for 24 to 28 minutes, until a toothpick inserted in center comes out clean. Allow cakes to cool completely.
![]()
-
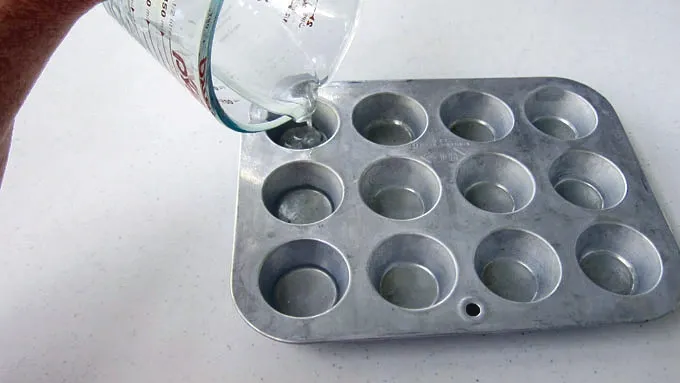
Step4Meanwhile, place an empty mini muffin tin in the hot oven for 10 minutes.
-
Step5Place the Isomalt nibs in a microwave-safe measuring cup. Heat on high for 1-2 minutes until it comes to a boil. Remove the cup from the microwave and allow most of the bubbles to disappear. Carefully pour into the cavities of the hot muffin tin, creating thin round discs. Allow this candy to harden for at least 15 minutes. Then turn the muffin tin over and pop the candies out.
![]()
-
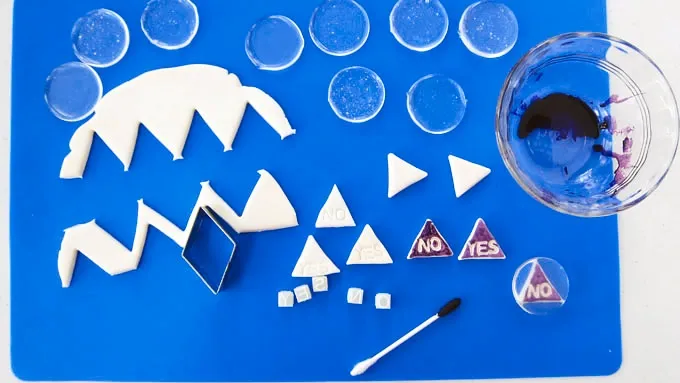
Step6Roll the white fondant out on a silicone mat. Cut triangles that will fit inside the dimensions of your round candy discs. Using small letter stamps, imprint the triangles with the words “yes” or “no.” Brush purple food coloring over the triangles and allow to dry.
![]()
-
Step7Place one candy disk over top of each triangle, allowing the words to show through the candy. Set aside.
-
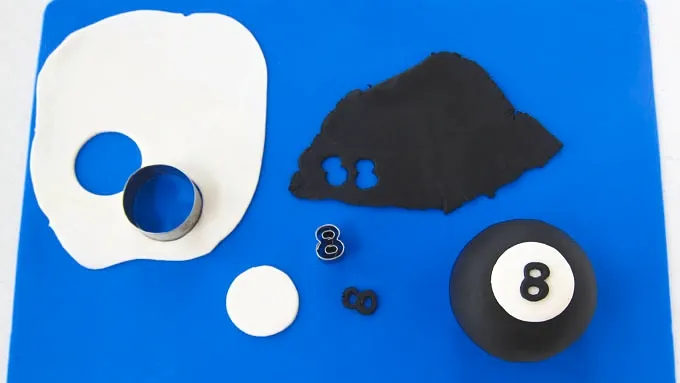
Step8Roll out the remaining white fondant and cut into 1-3/4 inch circles.
-
Step9Roll out a small amount of black fondant and cut 9 number 8 shapes using a small cutter. Attach the number 8’s to the centers of the white fondant circles using a small amount of water. Set aside.
-
Step10Once the cakes have cooled, trim the excess, making perfect half spheres. Then cut a 1-1/2 inch round by 1/2 inch deep well out of the tops of 9 of the cakes.
-
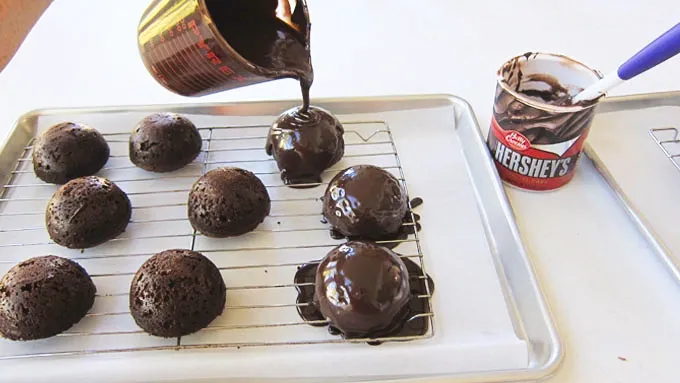
Step11Heat chocolate frosting and microwave for 45 to 90 seconds, until pourable.
-
Step12Set cakes on a cooling rack over a piece of parchment paper. Pour frosting over cakes, covering completely. Freeze the cakes for 30 minutes.
![]()
-
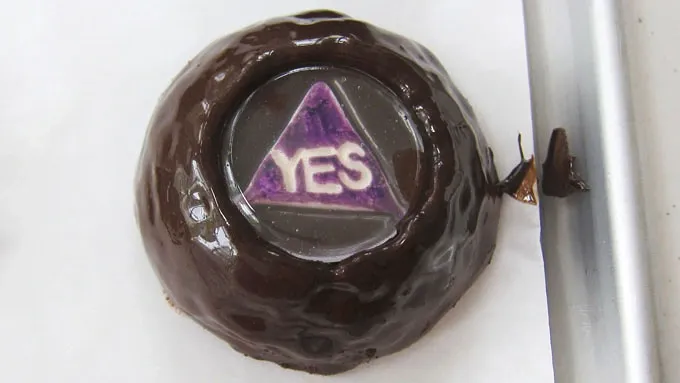
Step13Remove the cakes, with the wells cut, from the freezer and place one candy disk into each well.
![]()
-
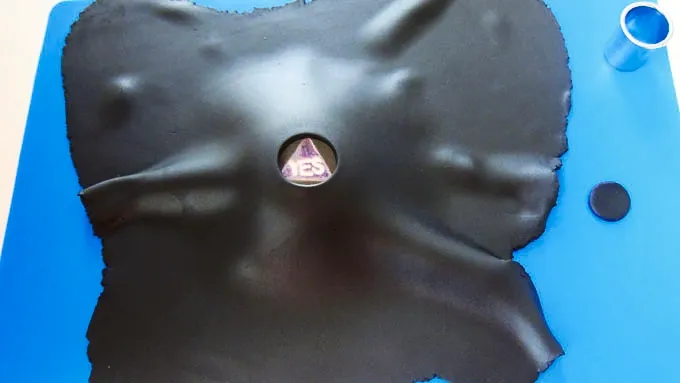
Step14Roll out black fondant to an 8-inch circle. Cut a 3/4-inch circle out of the center. Set one cake on your work surface, draping a piece of fondant on top. Smooth out the fondant, allowing the center hole to stretch to match the circumference of the candy disc. Then cut the fondant around the base of the cake. Repeat covering all nine cakes.
![]()
-
Step15Cut the remaining black fondant and cover the remaining cakes. Attach one number 8 fondant circle on top using a small amount of water.
![]()
-
Step16Use a small amount of frosting to attach two cake halves together, creating one Magic 8 Ball cake with a number 8 on one end and a candy disc on the other.
![]()
Nutrition
No nutrition information available for this recipe
(function() {
document.addEventListener('DOMContentLoaded', function() {
var componentMetadata = JSON.parse('\x7b\x22componentName\x22\x3a\x22RelatedContent_86838426-dd26-481a-9735-69435bca607d\x22,\x22deferOptions\x22\x3a\x7b\x22deferComponent\x22\x3afalse,\x22deferType\x22\x3a\x22None\x22,\x22deferId\x22\x3a\x22rb97793e645054e68bce8a194e19b5cb3\x22,\x22deferredContainerId\x22\x3a\x22\x2fmain\x2frdpRelatedContent1_NonDeferred\x22,\x22deferredContainerView\x22\x3anull\x7d,\x22viewName\x22\x3a\x22RelatedContent\x22\x7d');
var configuration = {"dataSourceId":"86838426-dd26-481a-9735-69435bca607d","isCurrentUserAnonymous":true,"isAnonymousUserWithFavorites":false,"relatedContentList":{"contentId":"bc806de6-3a00-4b68-b261-dfd125247e97","listSettings":{"pageSize":3,"startPage":1,"listType":1,"title":"Try These Next","useModalRegistration":false,"regAction":"","esrcCode":0,"favoriteButtonLabelFormat":"Add {0} to favorites","contentTypes":["Category"],"showImages":false,"imageSize":0,"showRatings":false,"allowFavoriting":false,"cssClassName":"relatedContentWithoutImages","favoriteButtonText":""},"items":[{"contentId":"f5d7ba6d-a251-4060-84b1-d4d41920dcdf","contentType":"Category","title":"Mexican Recipes, Dishes and Ideas from Tablespoon","isFavorite":false,"linkUrl":"/courses/dinner/world-cuisine/mexican","numberOfRatings":"0","averageRating":"0","averageRatingStars":"0","smallImageUrl":"https://rms-media-prod.generalmills.com/b3732bfd-f9d1-4ace-931e-8dcd7ffedc32.jpg","mediumImageUrl":"https://rms-media-prod.generalmills.com/34cb136a-d327-48df-ba07-867b90353b34.jpg"},{"contentId":"56e3a7c4-2bcc-4849-b433-c8a4f3f855a7","contentType":"Category","title":"Martini Recipes, Dishes and Ideas from Tablespoon","isFavorite":false,"linkUrl":"/courses/drinks/cocktail/martini","numberOfRatings":"0","averageRating":"0","averageRatingStars":"0","smallImageUrl":"","mediumImageUrl":""},{"contentId":"0f52e314-931b-4940-857b-ffc0e43376fa","contentType":"Category","title":"Mimosa Recipes, Dishes and Ideas from Tablespoon","isFavorite":false,"linkUrl":"/courses/drinks/cocktail/mimosa","numberOfRatings":"0","averageRating":"0","averageRatingStars":"0","smallImageUrl":"","mediumImageUrl":""}],"availableItems":[{"contentId":"f5d7ba6d-a251-4060-84b1-d4d41920dcdf","contentType":"Category","title":"Mexican Recipes, Dishes and Ideas from Tablespoon","isFavorite":false,"linkUrl":"/courses/dinner/world-cuisine/mexican","numberOfRatings":"0","averageRating":"0","averageRatingStars":"0","smallImageUrl":"https://rms-media-prod.generalmills.com/b3732bfd-f9d1-4ace-931e-8dcd7ffedc32.jpg","mediumImageUrl":"https://rms-media-prod.generalmills.com/34cb136a-d327-48df-ba07-867b90353b34.jpg"},{"contentId":"56e3a7c4-2bcc-4849-b433-c8a4f3f855a7","contentType":"Category","title":"Martini Recipes, Dishes and Ideas from Tablespoon","isFavorite":false,"linkUrl":"/courses/drinks/cocktail/martini","numberOfRatings":"0","averageRating":"0","averageRatingStars":"0","smallImageUrl":"","mediumImageUrl":""},{"contentId":"0f52e314-931b-4940-857b-ffc0e43376fa","contentType":"Category","title":"Mimosa Recipes, Dishes and Ideas from Tablespoon","isFavorite":false,"linkUrl":"/courses/drinks/cocktail/mimosa","numberOfRatings":"0","averageRating":"0","averageRatingStars":"0","smallImageUrl":"","mediumImageUrl":""}]}};
var moduleName = 'relatedContent';
var isVueModule = true;
GeneralMills.PandoSites.RegisterControlInstance(moduleName, configuration, componentMetadata, isVueModule)
});
})();
(function() {
document.addEventListener('DOMContentLoaded', function() {
var componentMetadata = JSON.parse('\x7b\x22componentName\x22\x3a\x22RelatedContent_9930dad2-817c-4363-b508-21f459b3c521\x22,\x22deferOptions\x22\x3a\x7b\x22deferComponent\x22\x3atrue,\x22deferType\x22\x3a\x22OnDemand\x22,\x22deferId\x22\x3a\x22rcba91301d00148feb00b8e24010e9691\x22,\x22deferredContainerId\x22\x3a\x22\x2fmain\x2frdpRelatedContent1\x22,\x22deferredContainerView\x22\x3a\x22RecipeDetailRedesign\x22\x7d,\x22viewName\x22\x3a\x22RelatedContent\x22\x7d');
var configuration = {"dataSourceId":"9930dad2-817c-4363-b508-21f459b3c521","isCurrentUserAnonymous":true,"isAnonymousUserWithFavorites":false,"relatedContentList":{"contentId":"bc806de6-3a00-4b68-b261-dfd125247e97","listSettings":{"pageSize":6,"startPage":1,"listType":1,"title":"","useModalRegistration":false,"regAction":"","esrcCode":0,"favoriteButtonLabelFormat":"Add {0} to favorites","contentTypes":[],"showImages":true,"imageSize":1,"showRatings":false,"allowFavoriting":true,"cssClassName":"","favoriteButtonText":"Save"},"items":[{"contentId":"28afd767-d85a-4075-8df5-d45873dd70f7","contentType":"Recipe","title":"Peanut Butter Cake Ball Buckeyes","isFavorite":false,"linkUrl":"/recipes/peanut-butter-cake-ball-buckeyes/28afd767-d85a-4075-8df5-d45873dd70f7","numberOfRatings":"0","averageRating":"0","averageRatingStars":"0","smallImageUrl":"//mojo.generalmills.com/api/public/content/vFfy5t_SUUeSR_uyU9gXJw_webp_base.webp?v=6ccd58f0\u0026t=67e847e026fb43aa8d6e3f5ef39a4ef7","mediumImageUrl":"//mojo.generalmills.com/api/public/content/vFfy5t_SUUeSR_uyU9gXJw_webp_base.webp?v=6ccd58f0\u0026t=3653fe2f5ecd4a47a5a51c97e429947c"},{"contentId":"b54b228d-4930-43ac-aa68-ba9d6b9184bb","contentType":"Recipe","title":"S’mores Cake Rolls","isFavorite":false,"linkUrl":"/recipes/smores-cake-rolls/b54b228d-4930-43ac-aa68-ba9d6b9184bb","numberOfRatings":"0","averageRating":"0","averageRatingStars":"0","smallImageUrl":"//mojo.generalmills.com/api/public/content/oY3dymmahU6MiLLRgxd3EQ_webp_base.webp?v=30ae9843\u0026t=67e847e026fb43aa8d6e3f5ef39a4ef7","mediumImageUrl":"//mojo.generalmills.com/api/public/content/oY3dymmahU6MiLLRgxd3EQ_webp_base.webp?v=30ae9843\u0026t=3653fe2f5ecd4a47a5a51c97e429947c"},{"contentId":"ef2cfeed-3954-4529-b573-0b91db7172c2","contentType":"Recipe","title":"Copycat Costco™ Double Chocolate Muffins","isFavorite":false,"linkUrl":"/recipes/copycat-costco-double-chocolate-muffins/ef2cfeed-3954-4529-b573-0b91db7172c2","numberOfRatings":"0","averageRating":"0","averageRatingStars":"0","smallImageUrl":"//mojo.generalmills.com/api/public/content/x9-4wetdNkiHcZ74mypJFQ_webp_base.webp?v=d92ad750\u0026t=67e847e026fb43aa8d6e3f5ef39a4ef7","mediumImageUrl":"//mojo.generalmills.com/api/public/content/x9-4wetdNkiHcZ74mypJFQ_webp_base.webp?v=d92ad750\u0026t=3653fe2f5ecd4a47a5a51c97e429947c"},{"contentId":"03ff625a-be8e-4de7-8364-7f9670ec46e2","contentType":"Recipe","title":"Chocolate Covered Pumpkin Cake Pops","isFavorite":false,"linkUrl":"/recipes/chocolate-covered-pumpkin-cake-pops/03ff625a-be8e-4de7-8364-7f9670ec46e2","numberOfRatings":"0","averageRating":"0","averageRatingStars":"0","smallImageUrl":"//mojo.generalmills.com/api/public/content/EDkPQja2QEeF_vzHvhA5lw_webp_base.webp?v=13f4b921\u0026t=67e847e026fb43aa8d6e3f5ef39a4ef7","mediumImageUrl":"//mojo.generalmills.com/api/public/content/EDkPQja2QEeF_vzHvhA5lw_webp_base.webp?v=13f4b921\u0026t=3653fe2f5ecd4a47a5a51c97e429947c"},{"contentId":"8ecb9373-6dfb-4c39-a7a2-b3cb9eed078f","contentType":"Recipe","title":"Thanksgiving Turkey Cake","isFavorite":false,"linkUrl":"/recipes/thanksgiving-turkey-cake/8ecb9373-6dfb-4c39-a7a2-b3cb9eed078f","numberOfRatings":"0","averageRating":"0","averageRatingStars":"0","smallImageUrl":"//mojo.generalmills.com/api/public/content/8FLbyhtU7E2cxvLGOgXjIQ_webp_base.webp?v=0fc9f7eb\u0026t=67e847e026fb43aa8d6e3f5ef39a4ef7","mediumImageUrl":"//mojo.generalmills.com/api/public/content/8FLbyhtU7E2cxvLGOgXjIQ_webp_base.webp?v=0fc9f7eb\u0026t=3653fe2f5ecd4a47a5a51c97e429947c"},{"contentId":"3d4d01f7-72cc-434a-ac13-f2f19c3379aa","contentType":"Recipe","title":"Cookie Stuffed Brownie Cupcakes","isFavorite":false,"linkUrl":"/recipes/cookie-stuffed-brownie-cupcakes/3d4d01f7-72cc-434a-ac13-f2f19c3379aa","numberOfRatings":"0","averageRating":"0","averageRatingStars":"0","smallImageUrl":"//mojo.generalmills.com/api/public/content/bUeMBFt-2Ey519eG0D5inQ_webp_base.webp?v=76a7e571\u0026t=67e847e026fb43aa8d6e3f5ef39a4ef7","mediumImageUrl":"//mojo.generalmills.com/api/public/content/bUeMBFt-2Ey519eG0D5inQ_webp_base.webp?v=76a7e571\u0026t=3653fe2f5ecd4a47a5a51c97e429947c"}],"availableItems":[{"contentId":"28afd767-d85a-4075-8df5-d45873dd70f7","contentType":"Recipe","title":"Peanut Butter Cake Ball Buckeyes","isFavorite":false,"linkUrl":"/recipes/peanut-butter-cake-ball-buckeyes/28afd767-d85a-4075-8df5-d45873dd70f7","numberOfRatings":"0","averageRating":"0","averageRatingStars":"0","smallImageUrl":"//mojo.generalmills.com/api/public/content/vFfy5t_SUUeSR_uyU9gXJw_webp_base.webp?v=6ccd58f0\u0026t=67e847e026fb43aa8d6e3f5ef39a4ef7","mediumImageUrl":"//mojo.generalmills.com/api/public/content/vFfy5t_SUUeSR_uyU9gXJw_webp_base.webp?v=6ccd58f0\u0026t=3653fe2f5ecd4a47a5a51c97e429947c"},{"contentId":"b54b228d-4930-43ac-aa68-ba9d6b9184bb","contentType":"Recipe","title":"S’mores Cake Rolls","isFavorite":false,"linkUrl":"/recipes/smores-cake-rolls/b54b228d-4930-43ac-aa68-ba9d6b9184bb","numberOfRatings":"0","averageRating":"0","averageRatingStars":"0","smallImageUrl":"//mojo.generalmills.com/api/public/content/oY3dymmahU6MiLLRgxd3EQ_webp_base.webp?v=30ae9843\u0026t=67e847e026fb43aa8d6e3f5ef39a4ef7","mediumImageUrl":"//mojo.generalmills.com/api/public/content/oY3dymmahU6MiLLRgxd3EQ_webp_base.webp?v=30ae9843\u0026t=3653fe2f5ecd4a47a5a51c97e429947c"},{"contentId":"ef2cfeed-3954-4529-b573-0b91db7172c2","contentType":"Recipe","title":"Copycat Costco™ Double Chocolate Muffins","isFavorite":false,"linkUrl":"/recipes/copycat-costco-double-chocolate-muffins/ef2cfeed-3954-4529-b573-0b91db7172c2","numberOfRatings":"0","averageRating":"0","averageRatingStars":"0","smallImageUrl":"//mojo.generalmills.com/api/public/content/x9-4wetdNkiHcZ74mypJFQ_webp_base.webp?v=d92ad750\u0026t=67e847e026fb43aa8d6e3f5ef39a4ef7","mediumImageUrl":"//mojo.generalmills.com/api/public/content/x9-4wetdNkiHcZ74mypJFQ_webp_base.webp?v=d92ad750\u0026t=3653fe2f5ecd4a47a5a51c97e429947c"},{"contentId":"03ff625a-be8e-4de7-8364-7f9670ec46e2","contentType":"Recipe","title":"Chocolate Covered Pumpkin Cake Pops","isFavorite":false,"linkUrl":"/recipes/chocolate-covered-pumpkin-cake-pops/03ff625a-be8e-4de7-8364-7f9670ec46e2","numberOfRatings":"0","averageRating":"0","averageRatingStars":"0","smallImageUrl":"//mojo.generalmills.com/api/public/content/EDkPQja2QEeF_vzHvhA5lw_webp_base.webp?v=13f4b921\u0026t=67e847e026fb43aa8d6e3f5ef39a4ef7","mediumImageUrl":"//mojo.generalmills.com/api/public/content/EDkPQja2QEeF_vzHvhA5lw_webp_base.webp?v=13f4b921\u0026t=3653fe2f5ecd4a47a5a51c97e429947c"},{"contentId":"8ecb9373-6dfb-4c39-a7a2-b3cb9eed078f","contentType":"Recipe","title":"Thanksgiving Turkey Cake","isFavorite":false,"linkUrl":"/recipes/thanksgiving-turkey-cake/8ecb9373-6dfb-4c39-a7a2-b3cb9eed078f","numberOfRatings":"0","averageRating":"0","averageRatingStars":"0","smallImageUrl":"//mojo.generalmills.com/api/public/content/8FLbyhtU7E2cxvLGOgXjIQ_webp_base.webp?v=0fc9f7eb\u0026t=67e847e026fb43aa8d6e3f5ef39a4ef7","mediumImageUrl":"//mojo.generalmills.com/api/public/content/8FLbyhtU7E2cxvLGOgXjIQ_webp_base.webp?v=0fc9f7eb\u0026t=3653fe2f5ecd4a47a5a51c97e429947c"},{"contentId":"3d4d01f7-72cc-434a-ac13-f2f19c3379aa","contentType":"Recipe","title":"Cookie Stuffed Brownie Cupcakes","isFavorite":false,"linkUrl":"/recipes/cookie-stuffed-brownie-cupcakes/3d4d01f7-72cc-434a-ac13-f2f19c3379aa","numberOfRatings":"0","averageRating":"0","averageRatingStars":"0","smallImageUrl":"//mojo.generalmills.com/api/public/content/bUeMBFt-2Ey519eG0D5inQ_webp_base.webp?v=76a7e571\u0026t=67e847e026fb43aa8d6e3f5ef39a4ef7","mediumImageUrl":"//mojo.generalmills.com/api/public/content/bUeMBFt-2Ey519eG0D5inQ_webp_base.webp?v=76a7e571\u0026t=3653fe2f5ecd4a47a5a51c97e429947c"}]}};
var moduleName = 'relatedContent';
var isVueModule = true;
GeneralMills.PandoSites.RegisterControlInstance(moduleName, configuration, componentMetadata, isVueModule)
});
})();
© 2025 ®/TM General Mills All Rights Reserved
