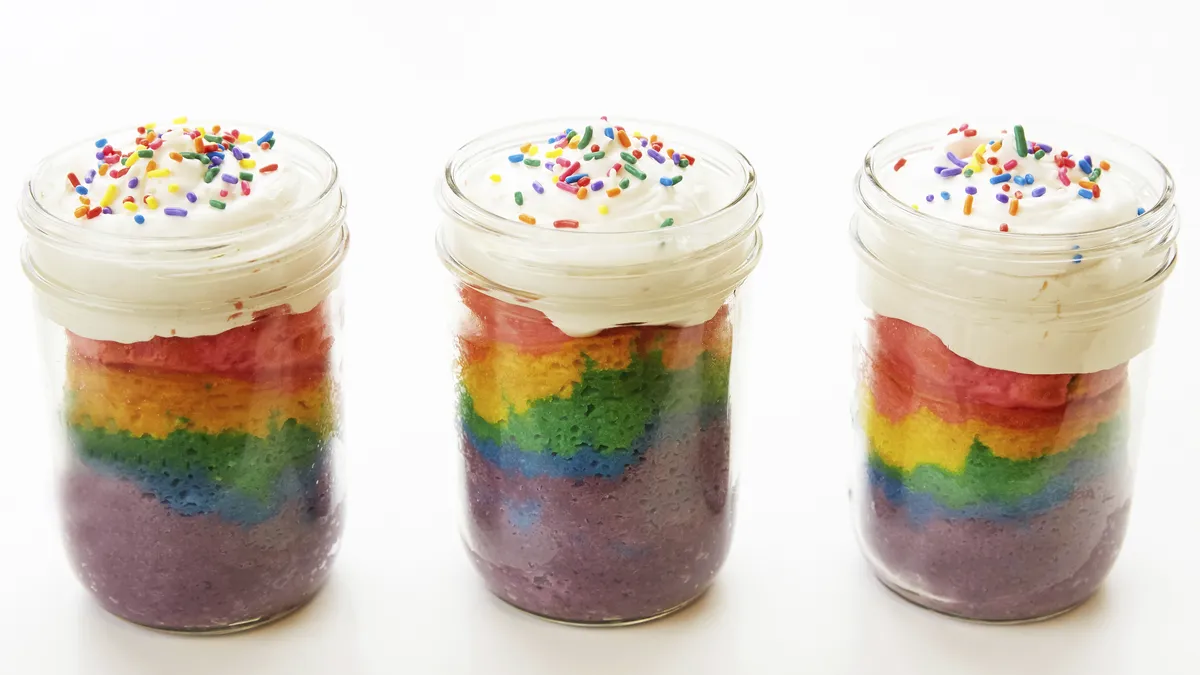
Rainbow Cake in a Jar
TBSP Erin
Updated Mar 2, 2023
Pretty ROYGBIV layers blend together in these personal-size mini cakes that you bake right in the jar.
More About This Recipe
- Goodness knows we love a good rainbow dessert recipe at Tablespoon, and these cute layered mini cakes are no exception! They look impressive, but they're easier to make than you'd think. The hardest part is coloring and layering the batter, and that's not even hard. (Don't you love it when the easy recipes are the most impressive looking?) We tested this recipe multiple times, and here are the tricks we picked up for guaranteeing rainbow cake success: • Batter amounts: it's definitely easiest to divide the batter into five equal batches for coloring, but we did find the bottom (purple) layer looked thicker than the others after baking. Basically, every time you pour in a new color, it kind of sinks to the bottom/center (gravity in action!) and pushes the batter that was already there up and out. So even though there's the same amount of each color batter, whatever one you put in first gets distributed up the sides of the jar more than the others. You may want to try tweaking the amounts of each color for a perfectly even rainbow, but we dig the tie-dye effect that naturally occurs when layering the colors. • Bake time: ovens vary, but we found we needed the full 40 minutes of bake time. You don't want the cakes to be over-done, but as long as they don't start to brown on top you should be okay. • Deflate-gate: as the cakes cool they sink in the jar just a little bit. Don't worry if this happens! It's just moisture escaping as things cool down, and it's totally okay.
Rainbow Cake in a Jar
- Prep Time 40 min
- Total 1 hr 20 min
- Servings 3
- Ingredients 7
Ingredients
- 1 box Betty Crocker™ Super Moist™ White Cake Mix
- Water, vegetable oil and egg whites called for on cake mix package
- Betty Crocker™ Food Color Gel Neon
- Food coloring drops (yellow, red, blue)
- 1 tub (12 oz) Betty Crocker™ Whipped Fluffy White Frosting
- 3 wide-mouth glass canning jars (1 pint each)
- Cooking spray
Instructions
-
Step1Preheat oven to 350°F. Wash canning jars and dry thoroughly. Set lids and rims aside. Spray inside of each glass jar with a generous amount of non-stick cooking spray.
-
Step2Make cake batter according to directions on cake mix box. Divide batter evenly between 5 bowls (there will be slightly under 1 cup of batter in each bowl). If you have large measuring cups, these work great for making sure the amounts are even.
-
Step3Add food coloring in the following amounts to each bowl and stir to blend well. First bowl: 15 drops of neon pink food coloring. Second bowl: 14 drops of regular yellow food coloring. Third bowl: 24 drops of regular green food coloring. Fourth bowl: 24 drops of regular blue food coloring. Fifth bowl: 8 drops of regular red + 7 drops of regular blue + 3 drops of neon purple food coloring.
-
Step4Spoon about 1/4 cup of each color batter into each of the jars, layering the colors in this order: purple (first), blue, green, yellow, pink (last). Use a paper towel to wipe any spills or drips from the jars.
-
Step5Place the jars in a glass baking dish. Add 1/4 inch of water to the bottom of the dish surrounding the jars. Bake for 35-40 minutes. Cake tops should spring back to the touch when done, but don't bake so long that the cakes are brown. You can also use a long bamboo skewer to test doneness if you have one.
-
Step6Allow cakes to cool completely (about one hour) and before frosting and decorating as desired.
Nutrition
No nutrition information available for this recipe
(function() {
document.addEventListener('DOMContentLoaded', function() {
var componentMetadata = JSON.parse('\x7b\x22componentName\x22\x3a\x22RelatedContent_86838426-dd26-481a-9735-69435bca607d\x22,\x22deferOptions\x22\x3a\x7b\x22deferComponent\x22\x3afalse,\x22deferType\x22\x3a\x22None\x22,\x22deferId\x22\x3a\x22r0dc3980fce7449538098ca603c929c48\x22,\x22deferredContainerId\x22\x3a\x22\x2fmain\x2frdpRelatedContent1_NonDeferred\x22,\x22deferredContainerView\x22\x3anull\x7d,\x22viewName\x22\x3a\x22RelatedContent\x22\x7d');
var configuration = {"dataSourceId":"86838426-dd26-481a-9735-69435bca607d","isCurrentUserAnonymous":true,"isAnonymousUserWithFavorites":false,"relatedContentList":{"contentId":"3f28cade-a116-449a-bf33-8e2889a149ea","listSettings":{"pageSize":3,"startPage":1,"listType":1,"title":"Try These Next","useModalRegistration":false,"regAction":"","esrcCode":0,"favoriteButtonLabelFormat":"Add {0} to favorites","contentTypes":["Category"],"showImages":false,"imageSize":0,"showRatings":false,"allowFavoriting":false,"cssClassName":"relatedContentWithoutImages","favoriteButtonText":""},"items":[{"contentId":"ac37eecf-6a88-49b9-8acf-266278f1d068","contentType":"Category","title":"Snack Mixes","isFavorite":false,"linkUrl":"/courses/snack/snack-mixes","numberOfRatings":"0","averageRating":"0","averageRatingStars":"0","smallImageUrl":"","mediumImageUrl":""},{"contentId":"8677f01b-3b1f-4761-b0d4-cf5305a681d6","contentType":"Category","title":"Cakes","isFavorite":false,"linkUrl":"/courses/dessert/cake","numberOfRatings":"0","averageRating":"0","averageRatingStars":"0","smallImageUrl":"","mediumImageUrl":""},{"contentId":"3d34b38d-f93f-4a7a-b2d0-9ad44d1bc698","contentType":"Category","title":"Trifle","isFavorite":false,"linkUrl":"/courses/dessert/trifle","numberOfRatings":"0","averageRating":"0","averageRatingStars":"0","smallImageUrl":"","mediumImageUrl":""}],"availableItems":[{"contentId":"ac37eecf-6a88-49b9-8acf-266278f1d068","contentType":"Category","title":"Snack Mixes","isFavorite":false,"linkUrl":"/courses/snack/snack-mixes","numberOfRatings":"0","averageRating":"0","averageRatingStars":"0","smallImageUrl":"","mediumImageUrl":""},{"contentId":"8677f01b-3b1f-4761-b0d4-cf5305a681d6","contentType":"Category","title":"Cakes","isFavorite":false,"linkUrl":"/courses/dessert/cake","numberOfRatings":"0","averageRating":"0","averageRatingStars":"0","smallImageUrl":"","mediumImageUrl":""},{"contentId":"3d34b38d-f93f-4a7a-b2d0-9ad44d1bc698","contentType":"Category","title":"Trifle","isFavorite":false,"linkUrl":"/courses/dessert/trifle","numberOfRatings":"0","averageRating":"0","averageRatingStars":"0","smallImageUrl":"","mediumImageUrl":""}]}};
var moduleName = 'relatedContent';
var isVueModule = true;
GeneralMills.PandoSites.RegisterControlInstance(moduleName, configuration, componentMetadata, isVueModule)
});
})();
(function() {
document.addEventListener('DOMContentLoaded', function() {
var componentMetadata = JSON.parse('\x7b\x22componentName\x22\x3a\x22RelatedContent_9930dad2-817c-4363-b508-21f459b3c521\x22,\x22deferOptions\x22\x3a\x7b\x22deferComponent\x22\x3atrue,\x22deferType\x22\x3a\x22OnDemand\x22,\x22deferId\x22\x3a\x22r28c5e356ebfd466fa557efbe05720259\x22,\x22deferredContainerId\x22\x3a\x22\x2fmain\x2frdpRelatedContent1\x22,\x22deferredContainerView\x22\x3a\x22RecipeDetailRedesign\x22\x7d,\x22viewName\x22\x3a\x22RelatedContent\x22\x7d');
var configuration = {"dataSourceId":"9930dad2-817c-4363-b508-21f459b3c521","isCurrentUserAnonymous":true,"isAnonymousUserWithFavorites":false,"relatedContentList":{"contentId":"3f28cade-a116-449a-bf33-8e2889a149ea","listSettings":{"pageSize":6,"startPage":1,"listType":1,"title":"","useModalRegistration":false,"regAction":"","esrcCode":0,"favoriteButtonLabelFormat":"Add {0} to favorites","contentTypes":[],"showImages":true,"imageSize":1,"showRatings":false,"allowFavoriting":true,"cssClassName":"","favoriteButtonText":"Save"},"items":[{"contentId":"5795d355-a6a5-4030-b414-235fe9b750bb","contentType":"Recipe","title":"Rainbow Pinata Cake","isFavorite":false,"linkUrl":"/recipes/rainbow-pinata-cake/5795d355-a6a5-4030-b414-235fe9b750bb","numberOfRatings":"0","averageRating":"0","averageRatingStars":"0","smallImageUrl":"//mojo.generalmills.com/api/public/content/GESkhYJVKUK1CAUqSOhC-w_webp_base.webp?v=63cb85b5\u0026t=67e847e026fb43aa8d6e3f5ef39a4ef7","mediumImageUrl":"//mojo.generalmills.com/api/public/content/GESkhYJVKUK1CAUqSOhC-w_webp_base.webp?v=63cb85b5\u0026t=3653fe2f5ecd4a47a5a51c97e429947c"},{"contentId":"9150c1ed-296b-44c1-b181-071f63d5b529","contentType":"Recipe","title":"Melted Rainbow Cake","isFavorite":false,"linkUrl":"/recipes/melted-rainbow-cake/9150c1ed-296b-44c1-b181-071f63d5b529","numberOfRatings":"0","averageRating":"0","averageRatingStars":"0","smallImageUrl":"//mojo.generalmills.com/api/public/content/2lSHTqp8dUG9r6WmOcZfUA_webp_base.webp?v=855b6c16\u0026t=67e847e026fb43aa8d6e3f5ef39a4ef7","mediumImageUrl":"//mojo.generalmills.com/api/public/content/2lSHTqp8dUG9r6WmOcZfUA_webp_base.webp?v=855b6c16\u0026t=3653fe2f5ecd4a47a5a51c97e429947c"},{"contentId":"5520407e-40fb-4e1e-af03-1de052753343","contentType":"Recipe","title":"Skittles™ Rainbow Cake","isFavorite":false,"linkUrl":"/recipes/skittles-rainbow-cake/5520407e-40fb-4e1e-af03-1de052753343","numberOfRatings":"0","averageRating":"0","averageRatingStars":"0","smallImageUrl":"//mojo.generalmills.com/api/public/content/OsvCqeM_wki9K4vDEGKrRw_webp_base.webp?v=acbcee18\u0026t=67e847e026fb43aa8d6e3f5ef39a4ef7","mediumImageUrl":"//mojo.generalmills.com/api/public/content/OsvCqeM_wki9K4vDEGKrRw_webp_base.webp?v=acbcee18\u0026t=3653fe2f5ecd4a47a5a51c97e429947c"},{"contentId":"40d8c4a6-b3ff-426d-b0fd-c7b2d39c3455","contentType":"Recipe","title":"Teeny Tiny Rainbow Cakes","isFavorite":false,"linkUrl":"/recipes/teeny-tiny-rainbow-cakes/40d8c4a6-b3ff-426d-b0fd-c7b2d39c3455","numberOfRatings":"0","averageRating":"0","averageRatingStars":"0","smallImageUrl":"//mojo.generalmills.com/api/public/content/O61ihwUNwUKLz76hS5Haow_webp_base.webp?v=573f6202\u0026t=67e847e026fb43aa8d6e3f5ef39a4ef7","mediumImageUrl":"//mojo.generalmills.com/api/public/content/O61ihwUNwUKLz76hS5Haow_webp_base.webp?v=573f6202\u0026t=3653fe2f5ecd4a47a5a51c97e429947c"},{"contentId":"15086094-ad54-4d4f-82b3-68bffd7a0c9a","contentType":"Recipe","title":"Rainbow Tie-Dye Surprise Cake","isFavorite":false,"linkUrl":"/recipes/rainbow-tie-dye-surprise-cake/15086094-ad54-4d4f-82b3-68bffd7a0c9a","numberOfRatings":"0","averageRating":"0","averageRatingStars":"0","smallImageUrl":"//mojo.generalmills.com/api/public/content/_xP2WkJwk0a6j7lg-dUEcQ_webp_base.webp?v=b4065216\u0026t=67e847e026fb43aa8d6e3f5ef39a4ef7","mediumImageUrl":"//mojo.generalmills.com/api/public/content/_xP2WkJwk0a6j7lg-dUEcQ_webp_base.webp?v=b4065216\u0026t=3653fe2f5ecd4a47a5a51c97e429947c"},{"contentId":"8ecb9373-6dfb-4c39-a7a2-b3cb9eed078f","contentType":"Recipe","title":"Thanksgiving Turkey Cake","isFavorite":false,"linkUrl":"/recipes/thanksgiving-turkey-cake/8ecb9373-6dfb-4c39-a7a2-b3cb9eed078f","numberOfRatings":"0","averageRating":"0","averageRatingStars":"0","smallImageUrl":"//mojo.generalmills.com/api/public/content/8FLbyhtU7E2cxvLGOgXjIQ_webp_base.webp?v=0fc9f7eb\u0026t=67e847e026fb43aa8d6e3f5ef39a4ef7","mediumImageUrl":"//mojo.generalmills.com/api/public/content/8FLbyhtU7E2cxvLGOgXjIQ_webp_base.webp?v=0fc9f7eb\u0026t=3653fe2f5ecd4a47a5a51c97e429947c"}],"availableItems":[{"contentId":"5795d355-a6a5-4030-b414-235fe9b750bb","contentType":"Recipe","title":"Rainbow Pinata Cake","isFavorite":false,"linkUrl":"/recipes/rainbow-pinata-cake/5795d355-a6a5-4030-b414-235fe9b750bb","numberOfRatings":"0","averageRating":"0","averageRatingStars":"0","smallImageUrl":"//mojo.generalmills.com/api/public/content/GESkhYJVKUK1CAUqSOhC-w_webp_base.webp?v=63cb85b5\u0026t=67e847e026fb43aa8d6e3f5ef39a4ef7","mediumImageUrl":"//mojo.generalmills.com/api/public/content/GESkhYJVKUK1CAUqSOhC-w_webp_base.webp?v=63cb85b5\u0026t=3653fe2f5ecd4a47a5a51c97e429947c"},{"contentId":"9150c1ed-296b-44c1-b181-071f63d5b529","contentType":"Recipe","title":"Melted Rainbow Cake","isFavorite":false,"linkUrl":"/recipes/melted-rainbow-cake/9150c1ed-296b-44c1-b181-071f63d5b529","numberOfRatings":"0","averageRating":"0","averageRatingStars":"0","smallImageUrl":"//mojo.generalmills.com/api/public/content/2lSHTqp8dUG9r6WmOcZfUA_webp_base.webp?v=855b6c16\u0026t=67e847e026fb43aa8d6e3f5ef39a4ef7","mediumImageUrl":"//mojo.generalmills.com/api/public/content/2lSHTqp8dUG9r6WmOcZfUA_webp_base.webp?v=855b6c16\u0026t=3653fe2f5ecd4a47a5a51c97e429947c"},{"contentId":"5520407e-40fb-4e1e-af03-1de052753343","contentType":"Recipe","title":"Skittles™ Rainbow Cake","isFavorite":false,"linkUrl":"/recipes/skittles-rainbow-cake/5520407e-40fb-4e1e-af03-1de052753343","numberOfRatings":"0","averageRating":"0","averageRatingStars":"0","smallImageUrl":"//mojo.generalmills.com/api/public/content/OsvCqeM_wki9K4vDEGKrRw_webp_base.webp?v=acbcee18\u0026t=67e847e026fb43aa8d6e3f5ef39a4ef7","mediumImageUrl":"//mojo.generalmills.com/api/public/content/OsvCqeM_wki9K4vDEGKrRw_webp_base.webp?v=acbcee18\u0026t=3653fe2f5ecd4a47a5a51c97e429947c"},{"contentId":"40d8c4a6-b3ff-426d-b0fd-c7b2d39c3455","contentType":"Recipe","title":"Teeny Tiny Rainbow Cakes","isFavorite":false,"linkUrl":"/recipes/teeny-tiny-rainbow-cakes/40d8c4a6-b3ff-426d-b0fd-c7b2d39c3455","numberOfRatings":"0","averageRating":"0","averageRatingStars":"0","smallImageUrl":"//mojo.generalmills.com/api/public/content/O61ihwUNwUKLz76hS5Haow_webp_base.webp?v=573f6202\u0026t=67e847e026fb43aa8d6e3f5ef39a4ef7","mediumImageUrl":"//mojo.generalmills.com/api/public/content/O61ihwUNwUKLz76hS5Haow_webp_base.webp?v=573f6202\u0026t=3653fe2f5ecd4a47a5a51c97e429947c"},{"contentId":"15086094-ad54-4d4f-82b3-68bffd7a0c9a","contentType":"Recipe","title":"Rainbow Tie-Dye Surprise Cake","isFavorite":false,"linkUrl":"/recipes/rainbow-tie-dye-surprise-cake/15086094-ad54-4d4f-82b3-68bffd7a0c9a","numberOfRatings":"0","averageRating":"0","averageRatingStars":"0","smallImageUrl":"//mojo.generalmills.com/api/public/content/_xP2WkJwk0a6j7lg-dUEcQ_webp_base.webp?v=b4065216\u0026t=67e847e026fb43aa8d6e3f5ef39a4ef7","mediumImageUrl":"//mojo.generalmills.com/api/public/content/_xP2WkJwk0a6j7lg-dUEcQ_webp_base.webp?v=b4065216\u0026t=3653fe2f5ecd4a47a5a51c97e429947c"},{"contentId":"8ecb9373-6dfb-4c39-a7a2-b3cb9eed078f","contentType":"Recipe","title":"Thanksgiving Turkey Cake","isFavorite":false,"linkUrl":"/recipes/thanksgiving-turkey-cake/8ecb9373-6dfb-4c39-a7a2-b3cb9eed078f","numberOfRatings":"0","averageRating":"0","averageRatingStars":"0","smallImageUrl":"//mojo.generalmills.com/api/public/content/8FLbyhtU7E2cxvLGOgXjIQ_webp_base.webp?v=0fc9f7eb\u0026t=67e847e026fb43aa8d6e3f5ef39a4ef7","mediumImageUrl":"//mojo.generalmills.com/api/public/content/8FLbyhtU7E2cxvLGOgXjIQ_webp_base.webp?v=0fc9f7eb\u0026t=3653fe2f5ecd4a47a5a51c97e429947c"}]}};
var moduleName = 'relatedContent';
var isVueModule = true;
GeneralMills.PandoSites.RegisterControlInstance(moduleName, configuration, componentMetadata, isVueModule)
});
})();

© 2026 ®/TM General Mills All Rights Reserved