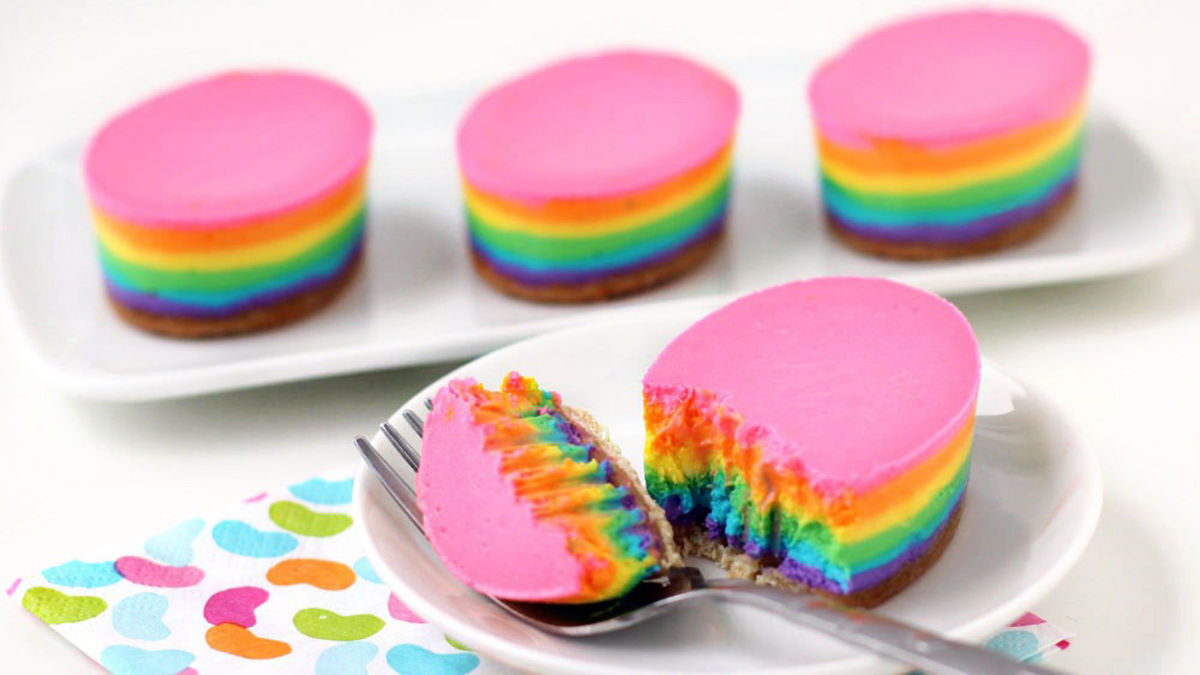
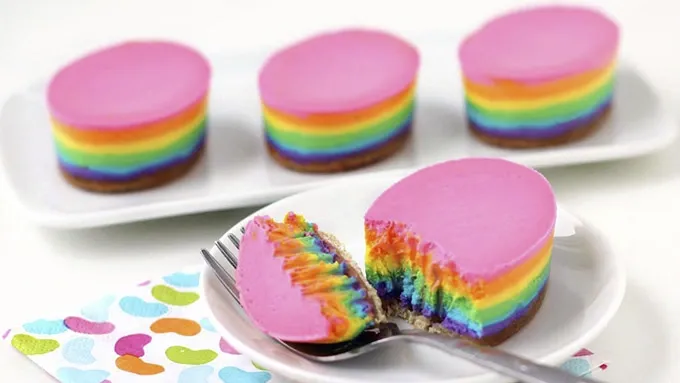
Egg-shaped cheesecakes with layers of rainbow colors.
More About This Recipe
- Don't you just love the Easter season? The dreary browns of winter blossom into bright and cheerful colors. It's the perfect time of year to create a festive rainbow dessert like these cheesecake eggs. It's a holiday tradition to color Easter eggs, so this year after you finish dipping hard boiled eggs into bowls filled with colored dyes, grab some Betty Crocker® Gel Food Colors, whip up a batch of lusciously creamy cheesecake filling, and color away. Fill your bowls with purple, blue, green, yellow, orange and pink cheesecake filling, then layer each color over a crunchy cookie crust to make the prettiest Easter egg dessert you've ever seen. To make these Easter egg-shaped desserts, you'll need two silicone molds with a total of 16 oval cavities. This fun, rainbow dessert is the perfect Easter treat!
Rainbow Cheesecake Easter Eggs
- Prep Time 60 min
- Total 6 hr 0 min
- Servings 16
- Ingredients 10
Ingredients
Cookie Crust
- 1 pouch (17.5 oz) Betty Crocker™ Sugar Cookie Mix
- 1 stick butter, softened
- 1 egg
Cheesecake Filling
- 3 blocks (8 oz) cream cheese, softened
- 1 cup sugar
- 3 large eggs
- 1/2 cup heavy whipping cream
- 1 teaspoon vanilla
- Betty Crocker™ gel food color white, optional
- Betty Crocker™ gel food color purple, blue, green, yellow, orange, pink
Instructions
-
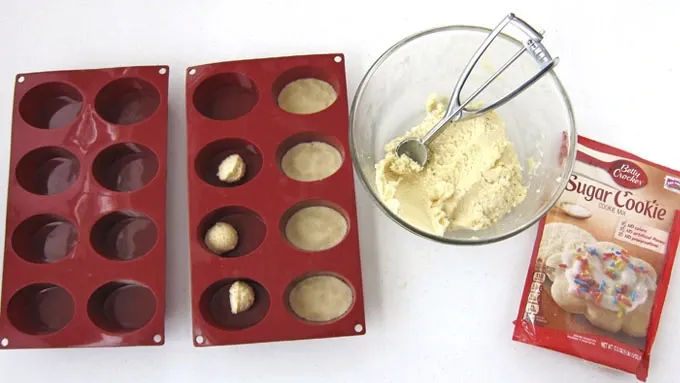
Step1Cookie Crust: Preheat oven to 325° F. Mix sugar cookie mix and butter together until well combined. Stir in one egg.
-
Step2Spoon 2 teaspoons of dough mixture into 2 silicone molds (with 8 oval-shaped cavities each). Press dough mixture into an even layer and bake for 10 minutes.
![]()
-
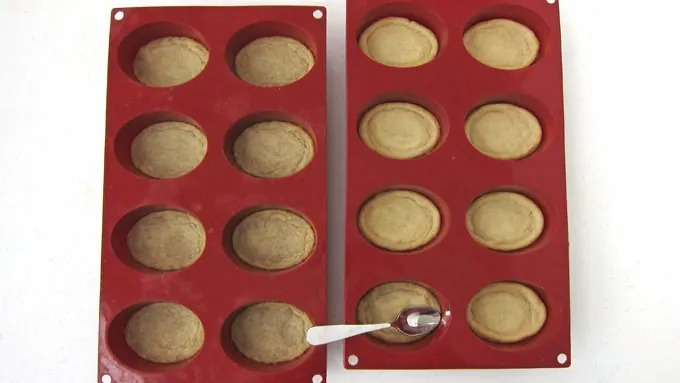
Step3Remove and immediately press down on dough around the puffed edges, flattening it into an even layer. Allow cookie crusts to cool completely.
![]()
-
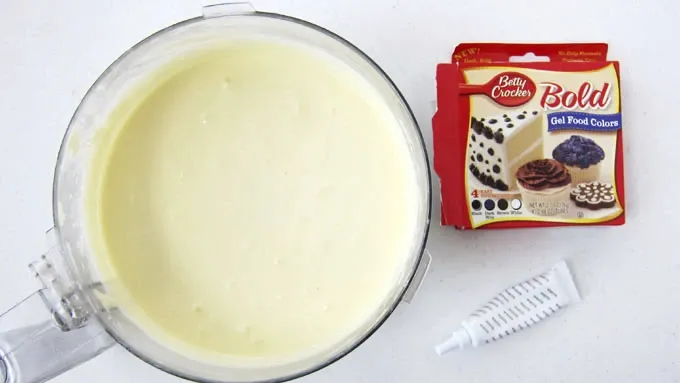
Step4Cheesecake Filling: Place cream cheese blocks in bowl of a food processor (or stand mixer). Pulse until cream cheese is smooth.
-
Step5Add sugar and pulse until combined. Add eggs, whipping cream, and vanilla and pulse until well-blended. If filling is overly yellow, add some Betty Crocker™ Gel Food Color White.
![]()
-
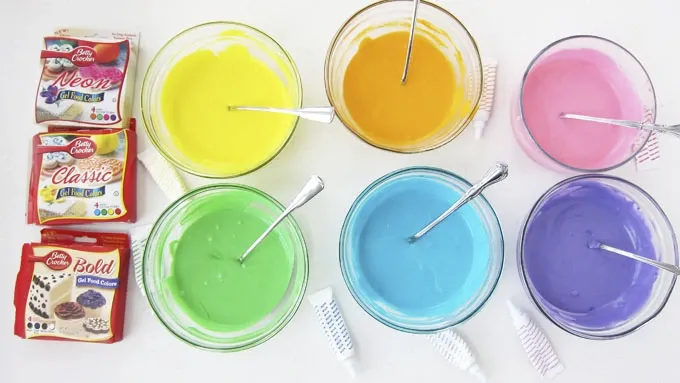
Step6Equally divide filling into 6 bowls. Color one bowl purple, another blue, green, yellow, orange and pink using Betty Crocker™ Gel Colors.
![]()
-
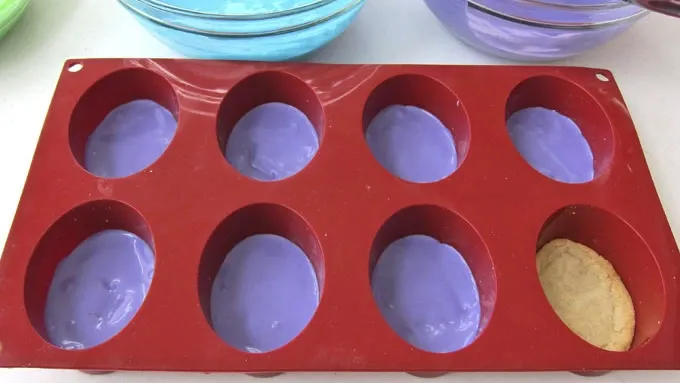
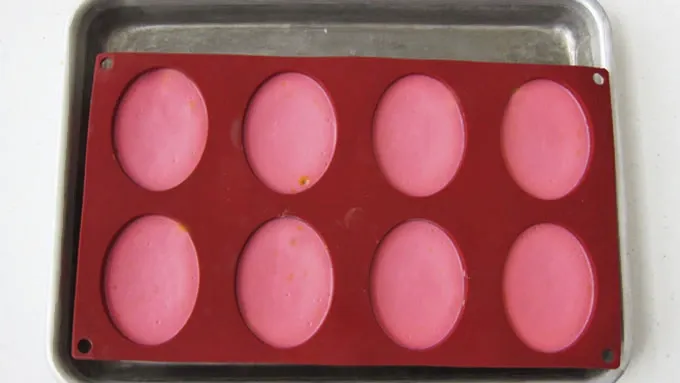
Step7Spoon about 2 teaspoons of purple filling over each oval-shaped cookie crust. Repeat creating a blue layer, then a green layer, a yellow layer, an orange layer and finally a pink layer, tapping the mold on the counter a few times after adding each color to remove any air bubbles.
![]()
-
Step8Set molds on 9 x 13-inch baking pans. Place pans in oven and pour about 3/4-inch boiling water into pans, being careful not to splash any onto cheesecakes.
![]()
-
Step9Bake for 20 minutes. Remove pans from oven. Allow silicone molds to sit in hot water for 15 minutes, then remove and set on counter for 30 minutes.
-
Step10Place in freezer for at least 3 hours, until cheesecakes are frozen solid.
-
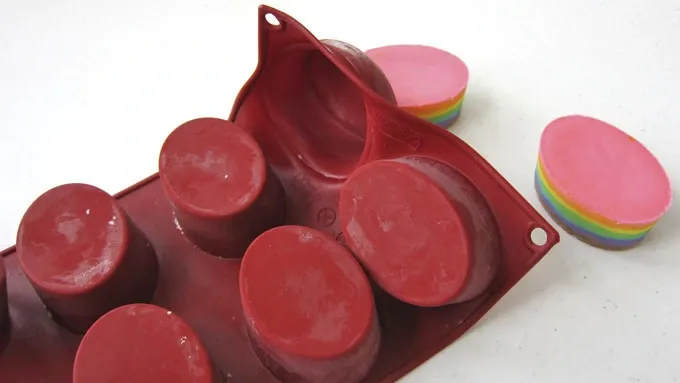
Step11Remove and un-mold the cheesecakes. Refrigerate until ready to serve.
![]()
-
Step12Before serving, set cheesecakes out at room temperature for 15 minutes to soften.
![]()
Nutrition
420
Calories
26g
Total Fat
5g
Protein
40g
Total Carbohydrate
29g
Sugars
Nutrition Facts
Serving Size: 1 Serving
- Calories
- 420
- Calories from Fat
- 230
- Total Fat
- 26g
- 40%
- Saturated Fat
- 15g
- 73%
- Trans Fat
- 1g
- Cholesterol
- 120mg
- 40%
- Sodium
- 310mg
- 13%
- Potassium
- 100mg
- 3%
- Total Carbohydrate
- 40g
- 13%
- Dietary Fiber
- 0g
- 0%
- Sugars
- 29g
- Protein
- 5g
% Daily Value*:
- Vitamin A
- 20%
- 20%
- Vitamin C
- 0%
- 0%
- Calcium
- 6%
- 6%
- Iron
- 4%
- 4%
Exchanges:
1 1/2 Starch; 0 Fruit; 1 Other Carbohydrate; 0 Skim Milk; 0 Low-Fat Milk; 0 Milk; 0 Vegetable; 0 Very Lean Meat; 0 Lean Meat; 0 High-Fat Meat; 5 Fat;Carbohydrate Choice
2 1/2
(function() {
document.addEventListener('DOMContentLoaded', function() {
var componentMetadata = JSON.parse('\x7b\x22componentName\x22\x3a\x22RelatedContent_86838426-dd26-481a-9735-69435bca607d\x22,\x22deferOptions\x22\x3a\x7b\x22deferComponent\x22\x3afalse,\x22deferType\x22\x3a\x22None\x22,\x22deferId\x22\x3a\x22r28adb9bd73cd4e6298b89241a2afd0ab\x22,\x22deferredContainerId\x22\x3a\x22\x2fmain\x2frdpRelatedContent1_NonDeferred\x22,\x22deferredContainerView\x22\x3anull\x7d,\x22viewName\x22\x3a\x22RelatedContent\x22\x7d');
var configuration = {"dataSourceId":"86838426-dd26-481a-9735-69435bca607d","isCurrentUserAnonymous":true,"isAnonymousUserWithFavorites":false,"relatedContentList":{"contentId":"0a52a635-9b66-420d-a256-24d84635a266","listSettings":{"pageSize":3,"startPage":1,"listType":1,"title":"Try These Next","useModalRegistration":false,"regAction":"","esrcCode":0,"favoriteButtonLabelFormat":"Add {0} to favorites","contentTypes":["Category"],"showImages":false,"imageSize":0,"showRatings":false,"allowFavoriting":false,"cssClassName":"relatedContentWithoutImages","favoriteButtonText":""},"items":[{"contentId":"4d25d929-1c4c-4d15-84d9-9038db12f240","contentType":"Category","title":"Easter","isFavorite":false,"linkUrl":"/parties-and-holidays/holiday/easter","numberOfRatings":"0","averageRating":"0","averageRatingStars":"0","smallImageUrl":"","mediumImageUrl":""},{"contentId":"6fe76eb3-016c-488a-beb6-09fdbc42bf4b","contentType":"Category","title":"Holiday Drinks Recipes, Dishes and Ideas from Tablespoon","isFavorite":false,"linkUrl":"/courses/drinks/holiday-drinks","numberOfRatings":"0","averageRating":"0","averageRatingStars":"0","smallImageUrl":"","mediumImageUrl":""},{"contentId":"55e56246-4cc8-4712-aec4-bae091922c76","contentType":"Category","title":"Sheet Pan","isFavorite":false,"linkUrl":"/courses/dinner/sheet-pan","numberOfRatings":"0","averageRating":"0","averageRatingStars":"0","smallImageUrl":"","mediumImageUrl":""}],"availableItems":[{"contentId":"4d25d929-1c4c-4d15-84d9-9038db12f240","contentType":"Category","title":"Easter","isFavorite":false,"linkUrl":"/parties-and-holidays/holiday/easter","numberOfRatings":"0","averageRating":"0","averageRatingStars":"0","smallImageUrl":"","mediumImageUrl":""},{"contentId":"6fe76eb3-016c-488a-beb6-09fdbc42bf4b","contentType":"Category","title":"Holiday Drinks Recipes, Dishes and Ideas from Tablespoon","isFavorite":false,"linkUrl":"/courses/drinks/holiday-drinks","numberOfRatings":"0","averageRating":"0","averageRatingStars":"0","smallImageUrl":"","mediumImageUrl":""},{"contentId":"55e56246-4cc8-4712-aec4-bae091922c76","contentType":"Category","title":"Sheet Pan","isFavorite":false,"linkUrl":"/courses/dinner/sheet-pan","numberOfRatings":"0","averageRating":"0","averageRatingStars":"0","smallImageUrl":"","mediumImageUrl":""}]}};
var moduleName = 'relatedContent';
var isVueModule = true;
GeneralMills.PandoSites.RegisterControlInstance(moduleName, configuration, componentMetadata, isVueModule)
});
})();
(function() {
document.addEventListener('DOMContentLoaded', function() {
var componentMetadata = JSON.parse('\x7b\x22componentName\x22\x3a\x22RelatedContent_9930dad2-817c-4363-b508-21f459b3c521\x22,\x22deferOptions\x22\x3a\x7b\x22deferComponent\x22\x3atrue,\x22deferType\x22\x3a\x22OnDemand\x22,\x22deferId\x22\x3a\x22r561f3025ae674d33bad8d65b2ef4ae6b\x22,\x22deferredContainerId\x22\x3a\x22\x2fmain\x2frdpRelatedContent1\x22,\x22deferredContainerView\x22\x3a\x22RecipeDetailRedesign\x22\x7d,\x22viewName\x22\x3a\x22RelatedContent\x22\x7d');
var configuration = {"dataSourceId":"9930dad2-817c-4363-b508-21f459b3c521","isCurrentUserAnonymous":true,"isAnonymousUserWithFavorites":false,"relatedContentList":{"contentId":"0a52a635-9b66-420d-a256-24d84635a266","listSettings":{"pageSize":6,"startPage":1,"listType":1,"title":"","useModalRegistration":false,"regAction":"","esrcCode":0,"favoriteButtonLabelFormat":"Add {0} to favorites","contentTypes":[],"showImages":true,"imageSize":1,"showRatings":false,"allowFavoriting":true,"cssClassName":"","favoriteButtonText":"Save"},"items":[{"contentId":"3e2d43d7-ec9b-46b9-b30c-a407bf2a5cfd","contentType":"Recipe","title":"Cheesecake Stuffed Christmas Tree Cupcakes","isFavorite":false,"linkUrl":"/recipes/cheesecake-stuffed-christmas-tree-cupcakes/3e2d43d7-ec9b-46b9-b30c-a407bf2a5cfd","numberOfRatings":"0","averageRating":"0","averageRatingStars":"0","smallImageUrl":"//mojo.generalmills.com/api/public/content/haE1hJ_n4U2D7z41QVnq4Q_webp_base.webp?v=70c4b328\u0026t=67e847e026fb43aa8d6e3f5ef39a4ef7","mediumImageUrl":"//mojo.generalmills.com/api/public/content/haE1hJ_n4U2D7z41QVnq4Q_webp_base.webp?v=70c4b328\u0026t=3653fe2f5ecd4a47a5a51c97e429947c"},{"contentId":"8ecb9373-6dfb-4c39-a7a2-b3cb9eed078f","contentType":"Recipe","title":"Thanksgiving Turkey Cake","isFavorite":false,"linkUrl":"/recipes/thanksgiving-turkey-cake/8ecb9373-6dfb-4c39-a7a2-b3cb9eed078f","numberOfRatings":"0","averageRating":"0","averageRatingStars":"0","smallImageUrl":"//mojo.generalmills.com/api/public/content/8FLbyhtU7E2cxvLGOgXjIQ_webp_base.webp?v=0fc9f7eb\u0026t=67e847e026fb43aa8d6e3f5ef39a4ef7","mediumImageUrl":"//mojo.generalmills.com/api/public/content/8FLbyhtU7E2cxvLGOgXjIQ_webp_base.webp?v=0fc9f7eb\u0026t=3653fe2f5ecd4a47a5a51c97e429947c"},{"contentId":"368d3309-eca2-4000-898e-5dddec8118ad","contentType":"Recipe","title":"Easter Rainbow Pancakes","isFavorite":false,"linkUrl":"/recipes/easter-rainbow-pancakes/368d3309-eca2-4000-898e-5dddec8118ad","numberOfRatings":"0","averageRating":"0","averageRatingStars":"0","smallImageUrl":"//mojo.generalmills.com/api/public/content/PaXcvHaip0qxHF_f-_eEug_webp_base.webp?v=8f194d93\u0026t=67e847e026fb43aa8d6e3f5ef39a4ef7","mediumImageUrl":"//mojo.generalmills.com/api/public/content/PaXcvHaip0qxHF_f-_eEug_webp_base.webp?v=8f194d93\u0026t=3653fe2f5ecd4a47a5a51c97e429947c"},{"contentId":"4282c4ad-8f3f-441e-a34e-2b1251fda676","contentType":"Recipe","title":"Brownie S’mores Cheesecake","isFavorite":false,"linkUrl":"/recipes/brownie-smores-cheesecake/4282c4ad-8f3f-441e-a34e-2b1251fda676","numberOfRatings":"0","averageRating":"0","averageRatingStars":"0","smallImageUrl":"//mojo.generalmills.com/api/public/content/Qu7G0zAQXUOcBFKprRB_sA_webp_base.webp?v=7681645e\u0026t=67e847e026fb43aa8d6e3f5ef39a4ef7","mediumImageUrl":"//mojo.generalmills.com/api/public/content/Qu7G0zAQXUOcBFKprRB_sA_webp_base.webp?v=7681645e\u0026t=3653fe2f5ecd4a47a5a51c97e429947c"},{"contentId":"2591d76d-77bc-413a-b9f5-3f49617dd79d","contentType":"Recipe","title":"White Russian Cheesecake Cookie Bars","isFavorite":false,"linkUrl":"/recipes/white-russian-cheesecake-cookie-bars/2591d76d-77bc-413a-b9f5-3f49617dd79d","numberOfRatings":"0","averageRating":"0","averageRatingStars":"0","smallImageUrl":"//mojo.generalmills.com/api/public/content/rJM5p44fjUCirbveghmAMA_webp_base.webp?v=3fd78042\u0026t=67e847e026fb43aa8d6e3f5ef39a4ef7","mediumImageUrl":"//mojo.generalmills.com/api/public/content/rJM5p44fjUCirbveghmAMA_webp_base.webp?v=3fd78042\u0026t=3653fe2f5ecd4a47a5a51c97e429947c"},{"contentId":"09c78228-6424-4a55-b4b3-0eda2536ac69","contentType":"Recipe","title":"Cream Cheese Pecan Cookies","isFavorite":false,"linkUrl":"/recipes/cream-cheese-pecan-cookies/09c78228-6424-4a55-b4b3-0eda2536ac69","numberOfRatings":"0","averageRating":"0","averageRatingStars":"0","smallImageUrl":"//mojo.generalmills.com/api/public/content/pHXe9cqIrkqv8PDkJKYu-A_webp_base.webp?v=e1cf0ab4\u0026t=67e847e026fb43aa8d6e3f5ef39a4ef7","mediumImageUrl":"//mojo.generalmills.com/api/public/content/pHXe9cqIrkqv8PDkJKYu-A_webp_base.webp?v=e1cf0ab4\u0026t=3653fe2f5ecd4a47a5a51c97e429947c"}],"availableItems":[{"contentId":"3e2d43d7-ec9b-46b9-b30c-a407bf2a5cfd","contentType":"Recipe","title":"Cheesecake Stuffed Christmas Tree Cupcakes","isFavorite":false,"linkUrl":"/recipes/cheesecake-stuffed-christmas-tree-cupcakes/3e2d43d7-ec9b-46b9-b30c-a407bf2a5cfd","numberOfRatings":"0","averageRating":"0","averageRatingStars":"0","smallImageUrl":"//mojo.generalmills.com/api/public/content/haE1hJ_n4U2D7z41QVnq4Q_webp_base.webp?v=70c4b328\u0026t=67e847e026fb43aa8d6e3f5ef39a4ef7","mediumImageUrl":"//mojo.generalmills.com/api/public/content/haE1hJ_n4U2D7z41QVnq4Q_webp_base.webp?v=70c4b328\u0026t=3653fe2f5ecd4a47a5a51c97e429947c"},{"contentId":"8ecb9373-6dfb-4c39-a7a2-b3cb9eed078f","contentType":"Recipe","title":"Thanksgiving Turkey Cake","isFavorite":false,"linkUrl":"/recipes/thanksgiving-turkey-cake/8ecb9373-6dfb-4c39-a7a2-b3cb9eed078f","numberOfRatings":"0","averageRating":"0","averageRatingStars":"0","smallImageUrl":"//mojo.generalmills.com/api/public/content/8FLbyhtU7E2cxvLGOgXjIQ_webp_base.webp?v=0fc9f7eb\u0026t=67e847e026fb43aa8d6e3f5ef39a4ef7","mediumImageUrl":"//mojo.generalmills.com/api/public/content/8FLbyhtU7E2cxvLGOgXjIQ_webp_base.webp?v=0fc9f7eb\u0026t=3653fe2f5ecd4a47a5a51c97e429947c"},{"contentId":"368d3309-eca2-4000-898e-5dddec8118ad","contentType":"Recipe","title":"Easter Rainbow Pancakes","isFavorite":false,"linkUrl":"/recipes/easter-rainbow-pancakes/368d3309-eca2-4000-898e-5dddec8118ad","numberOfRatings":"0","averageRating":"0","averageRatingStars":"0","smallImageUrl":"//mojo.generalmills.com/api/public/content/PaXcvHaip0qxHF_f-_eEug_webp_base.webp?v=8f194d93\u0026t=67e847e026fb43aa8d6e3f5ef39a4ef7","mediumImageUrl":"//mojo.generalmills.com/api/public/content/PaXcvHaip0qxHF_f-_eEug_webp_base.webp?v=8f194d93\u0026t=3653fe2f5ecd4a47a5a51c97e429947c"},{"contentId":"4282c4ad-8f3f-441e-a34e-2b1251fda676","contentType":"Recipe","title":"Brownie S’mores Cheesecake","isFavorite":false,"linkUrl":"/recipes/brownie-smores-cheesecake/4282c4ad-8f3f-441e-a34e-2b1251fda676","numberOfRatings":"0","averageRating":"0","averageRatingStars":"0","smallImageUrl":"//mojo.generalmills.com/api/public/content/Qu7G0zAQXUOcBFKprRB_sA_webp_base.webp?v=7681645e\u0026t=67e847e026fb43aa8d6e3f5ef39a4ef7","mediumImageUrl":"//mojo.generalmills.com/api/public/content/Qu7G0zAQXUOcBFKprRB_sA_webp_base.webp?v=7681645e\u0026t=3653fe2f5ecd4a47a5a51c97e429947c"},{"contentId":"2591d76d-77bc-413a-b9f5-3f49617dd79d","contentType":"Recipe","title":"White Russian Cheesecake Cookie Bars","isFavorite":false,"linkUrl":"/recipes/white-russian-cheesecake-cookie-bars/2591d76d-77bc-413a-b9f5-3f49617dd79d","numberOfRatings":"0","averageRating":"0","averageRatingStars":"0","smallImageUrl":"//mojo.generalmills.com/api/public/content/rJM5p44fjUCirbveghmAMA_webp_base.webp?v=3fd78042\u0026t=67e847e026fb43aa8d6e3f5ef39a4ef7","mediumImageUrl":"//mojo.generalmills.com/api/public/content/rJM5p44fjUCirbveghmAMA_webp_base.webp?v=3fd78042\u0026t=3653fe2f5ecd4a47a5a51c97e429947c"},{"contentId":"09c78228-6424-4a55-b4b3-0eda2536ac69","contentType":"Recipe","title":"Cream Cheese Pecan Cookies","isFavorite":false,"linkUrl":"/recipes/cream-cheese-pecan-cookies/09c78228-6424-4a55-b4b3-0eda2536ac69","numberOfRatings":"0","averageRating":"0","averageRatingStars":"0","smallImageUrl":"//mojo.generalmills.com/api/public/content/pHXe9cqIrkqv8PDkJKYu-A_webp_base.webp?v=e1cf0ab4\u0026t=67e847e026fb43aa8d6e3f5ef39a4ef7","mediumImageUrl":"//mojo.generalmills.com/api/public/content/pHXe9cqIrkqv8PDkJKYu-A_webp_base.webp?v=e1cf0ab4\u0026t=3653fe2f5ecd4a47a5a51c97e429947c"}]}};
var moduleName = 'relatedContent';
var isVueModule = true;
GeneralMills.PandoSites.RegisterControlInstance(moduleName, configuration, componentMetadata, isVueModule)
});
})();
© 2026 ®/TM General Mills All Rights Reserved