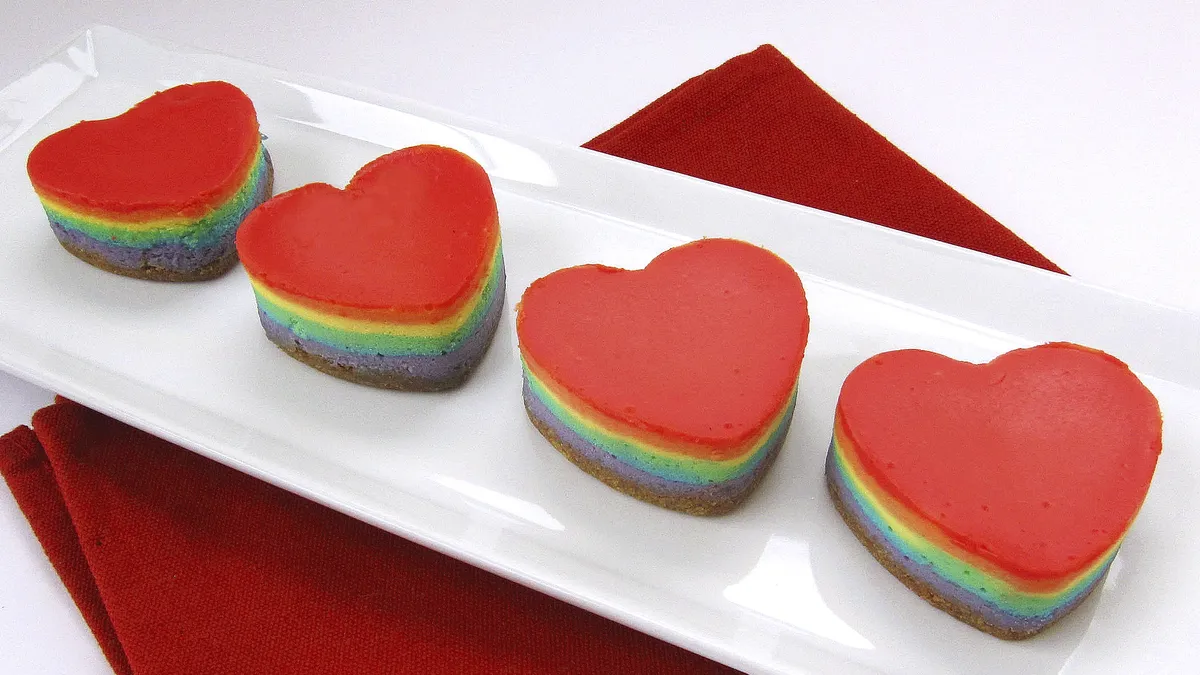
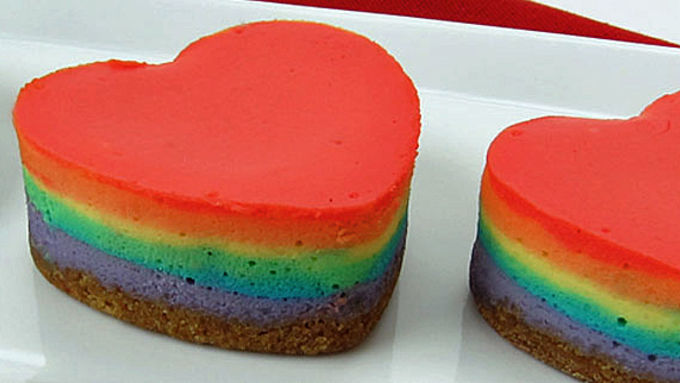
Rainbow heart-shaped cheesecakes make sweet Valentines Day treats or a perfect dessert for wedding showers and birthday parties.
More About This Recipe
- Valentine's Day comes during a gloomy and gray month, so why not brighten it up a bit by making and serving these rainbow cheesecake hearts. Each individual sized serving of rich creamy cheesecake has six colorful layers. You don't even have to dig your spoon into a cake to see all the wonderful colors, they show up beautifully around the sides of each heart. This Rainbow Heart-Shaped Cheesecake recipe is really fun to create, but takes a bit of patience and requires some heart shaped silicone molds or any shape mold you'd like to use. Just like any cheesecake you'll start with a graham cracker crust which is topped with individual layers of purple, blue, green, yellow, orange, and red cheesecake. When making the cheesecake filling you don't want a lot of air in this mixture, so I don't recommend using a hand mixer. Once baked, chilled and un-molded, these cakes can be served not only for Valentine's Day, but also for wedding or baby showers, birthday parties, or even tonight's dessert. Rainbow-licious!
Rainbow Cheesecake Hearts
- Prep Time 1 hr 30 min
- Total 8 hr 0 min
- Servings 9
- Ingredients 10
Ingredients
- 3/4 cup graham cracker crumbs
- 1 pinch cinnamon
- 3 tablespoons butter, melted
- 16 ounces cream cheese, softened
- 2/3 cup granulated sugar
- 1/3 cup heavy whipping cream
- 2 large eggs
- 1 teaspoon vanilla
- Red, yellow, blue, green food coloring
Supplies needed:
- 2 silicone heart molds each with 6 cavities
Instructions
-
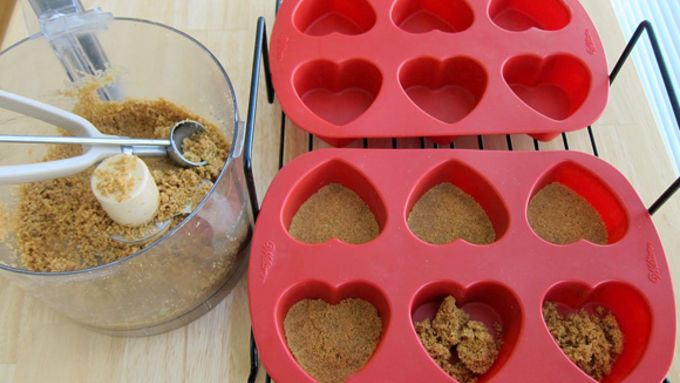
Step1Preheat oven to 325°F. Make the crust. Combine graham cracker crumbs, cinnamon, and melted butter, stirring until it looks like sand. Spoon out a heaping tablespoon of crumb mixture into 9 heart cavities in your molds. Press the crumbs down making an even crust. Bake crusts for 10-12 minutes until golden brown. Remove from oven and allow to cool.
![]()
-
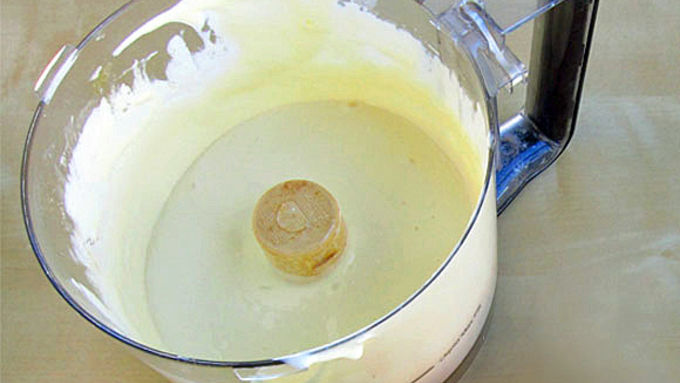
Step2Make cheesecake filling. Combine cream cheese, sugar, heavy whipping cream, eggs, and vanilla in the bowl of a food processor and pulse just until smooth. If you prefer, you can mix it by hand. First, mix the cream cheese and sugar together until well blended. Add whipping cream, eggs and vanilla and mix until smooth. Note: You dont want a lot of air in this mixture, so I dont recommend using a hand mixer.
![]()
-
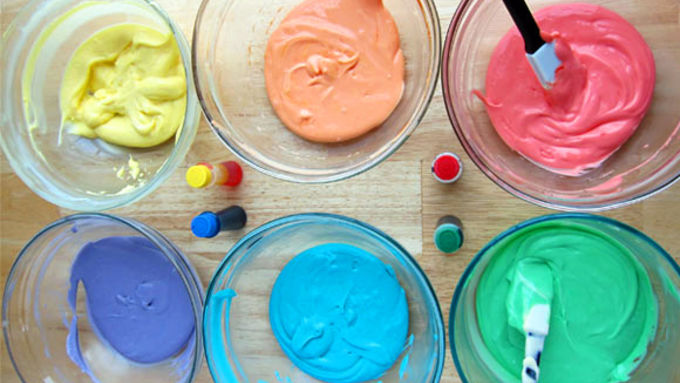
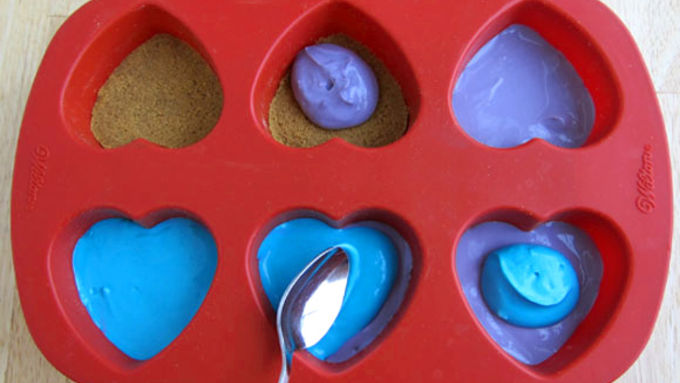
Step3Evenly divide cheesecake filling into six bowls, about a half a cup in each. Color one bowl with yellow food coloring then the others with orange, red, green, blue and purple. Start with one drop of coloring, then add more until you achieve the desired color. To get orange, use red and yellow, for purple, use red and blue.
![]()
-
Step4Equally divide the purple cheesecake filing among the 9 heart cavities, spooning about a tablespoon of the filling over each crust. Spread it out in a thin layer making sure it touches the sides of the mold completely. Wipe off any filling that smeared on the sides of the mold. Repeat this process with the blue, spreading it in an even layer over the purple. Repeat this process layering all the colors in the mold. Top the blue with green, then yellow, orange and finally red.
![]()
-
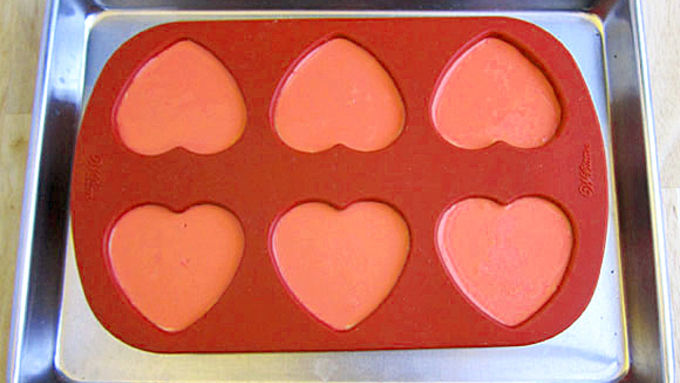
Step5To achieve the creamiest cheesecakes with the smoothest top surface, you will want to bake them in a water bath. It is not mandatory with this recipe, but highly recommended. To do so, set your heart molds in a roasting or baking pan. Set the pan in the oven, then carefully pour enough boiling water into the pan, being careful not to splash on the cheesecakes, until the water comes halfway up the sides of the heart mold.
![]()
-
Step6Bake your cheesecakes for 20-24 minutes until the top forms a smooth film and the center is still giggly but not wet.
-
Step7Allow your cheesecakes to cool for an hour then refrigerate for at least 3 hours then freeze for two hours. Your cheesecakes will be much easier to remove from the mold if frozen.
-
Step8Carefully turn the silicone mold upside down and set it over a baking sheet lined with parchment or wax paper. Gently tug at the mold pulling it away from the cheesecake, allowing the cheesecake to fall out. Immediately turn the cakes right side up. Your frozen cheesecakes will probably have beads of condensation on them. You can simply pat them dry with a paper towel. While the cheesecakes are frozen and are easy to move, set them on a serving platter or individual dessert plates. Keep refrigerated until about 30 minutes before serving. They will have a creamier texture if allowed to sit at room temperature for a while before eating.
![]()
Nutrition
No nutrition information available for this recipe
(function() {
document.addEventListener('DOMContentLoaded', function() {
var componentMetadata = JSON.parse('\x7b\x22componentName\x22\x3a\x22RelatedContent_86838426-dd26-481a-9735-69435bca607d\x22,\x22deferOptions\x22\x3a\x7b\x22deferComponent\x22\x3afalse,\x22deferType\x22\x3a\x22None\x22,\x22deferId\x22\x3a\x22rc924d0a5c36f4dcaa34ce8c45343b151\x22,\x22deferredContainerId\x22\x3a\x22\x2fmain\x2frdpRelatedContent1_NonDeferred\x22,\x22deferredContainerView\x22\x3anull\x7d,\x22viewName\x22\x3a\x22RelatedContent\x22\x7d');
var configuration = {"dataSourceId":"86838426-dd26-481a-9735-69435bca607d","isCurrentUserAnonymous":true,"isAnonymousUserWithFavorites":false,"relatedContentList":{"contentId":"8ccc3131-1e61-4793-835e-4390716d91a4","listSettings":{"pageSize":3,"startPage":1,"listType":1,"title":"Try These Next","useModalRegistration":false,"regAction":"","esrcCode":0,"favoriteButtonLabelFormat":"Add {0} to favorites","contentTypes":["Category"],"showImages":false,"imageSize":0,"showRatings":false,"allowFavoriting":false,"cssClassName":"relatedContentWithoutImages","favoriteButtonText":""},"items":[{"contentId":"a578c328-ac26-4970-b3d4-c45fb9231cb2","contentType":"Category","title":"Valentine\u0027s Day Recipes","isFavorite":false,"linkUrl":"/parties-and-holidays/holiday/valentines-day","numberOfRatings":"0","averageRating":"0","averageRatingStars":"0","smallImageUrl":"","mediumImageUrl":""},{"contentId":"3f0c6be3-ebb3-4a76-8429-f0fdeadffee1","contentType":"Category","title":"Cheesecake","isFavorite":false,"linkUrl":"/courses/dessert/cheesecake","numberOfRatings":"0","averageRating":"0","averageRatingStars":"0","smallImageUrl":"","mediumImageUrl":""},{"contentId":"8677f01b-3b1f-4761-b0d4-cf5305a681d6","contentType":"Category","title":"Cakes","isFavorite":false,"linkUrl":"/courses/dessert/cake","numberOfRatings":"0","averageRating":"0","averageRatingStars":"0","smallImageUrl":"","mediumImageUrl":""}],"availableItems":[{"contentId":"a578c328-ac26-4970-b3d4-c45fb9231cb2","contentType":"Category","title":"Valentine\u0027s Day Recipes","isFavorite":false,"linkUrl":"/parties-and-holidays/holiday/valentines-day","numberOfRatings":"0","averageRating":"0","averageRatingStars":"0","smallImageUrl":"","mediumImageUrl":""},{"contentId":"3f0c6be3-ebb3-4a76-8429-f0fdeadffee1","contentType":"Category","title":"Cheesecake","isFavorite":false,"linkUrl":"/courses/dessert/cheesecake","numberOfRatings":"0","averageRating":"0","averageRatingStars":"0","smallImageUrl":"","mediumImageUrl":""},{"contentId":"8677f01b-3b1f-4761-b0d4-cf5305a681d6","contentType":"Category","title":"Cakes","isFavorite":false,"linkUrl":"/courses/dessert/cake","numberOfRatings":"0","averageRating":"0","averageRatingStars":"0","smallImageUrl":"","mediumImageUrl":""}]}};
var moduleName = 'relatedContent';
var isVueModule = true;
GeneralMills.PandoSites.RegisterControlInstance(moduleName, configuration, componentMetadata, isVueModule)
});
})();
(function() {
document.addEventListener('DOMContentLoaded', function() {
var componentMetadata = JSON.parse('\x7b\x22componentName\x22\x3a\x22RelatedContent_9930dad2-817c-4363-b508-21f459b3c521\x22,\x22deferOptions\x22\x3a\x7b\x22deferComponent\x22\x3atrue,\x22deferType\x22\x3a\x22OnDemand\x22,\x22deferId\x22\x3a\x22rb223e00b91be42459479c5104205c9e3\x22,\x22deferredContainerId\x22\x3a\x22\x2fmain\x2frdpRelatedContent1\x22,\x22deferredContainerView\x22\x3a\x22RecipeDetailRedesign\x22\x7d,\x22viewName\x22\x3a\x22RelatedContent\x22\x7d');
var configuration = {"dataSourceId":"9930dad2-817c-4363-b508-21f459b3c521","isCurrentUserAnonymous":true,"isAnonymousUserWithFavorites":false,"relatedContentList":{"contentId":"8ccc3131-1e61-4793-835e-4390716d91a4","listSettings":{"pageSize":6,"startPage":1,"listType":1,"title":"","useModalRegistration":false,"regAction":"","esrcCode":0,"favoriteButtonLabelFormat":"Add {0} to favorites","contentTypes":[],"showImages":true,"imageSize":1,"showRatings":false,"allowFavoriting":true,"cssClassName":"","favoriteButtonText":"Save"},"items":[{"contentId":"2735a42f-4d79-4dcd-96e8-40d88c7bba08","contentType":"Recipe","title":"Basic Cheesecake","isFavorite":false,"linkUrl":"/recipes/basic-cheesecake/2735a42f-4d79-4dcd-96e8-40d88c7bba08","numberOfRatings":"0","averageRating":"0","averageRatingStars":"0","smallImageUrl":"//mojo.generalmills.com/api/public/content/wYaQHIlcQk6U6TSndRjjzA_webp_base.webp?v=582c7def\u0026t=67e847e026fb43aa8d6e3f5ef39a4ef7","mediumImageUrl":"//rms-media-prod.generalmills.com/69fdd10c-04c4-43e9-86c6-d62b83b0cd53.jpg"},{"contentId":"fd207b62-3505-4bd7-96cb-8ea8c44cfc80","contentType":"Recipe","title":"No-Bake Butterfinger™ Cheesecake","isFavorite":false,"linkUrl":"/recipes/no-bake-butterfinger-cheesecake/fd207b62-3505-4bd7-96cb-8ea8c44cfc80","numberOfRatings":"0","averageRating":"0","averageRatingStars":"0","smallImageUrl":"//mojo.generalmills.com/api/public/content/R0QLzUc4DEuttODYZlkL4w_webp_base.webp?v=2d9a927f\u0026t=67e847e026fb43aa8d6e3f5ef39a4ef7","mediumImageUrl":"//mojo.generalmills.com/api/public/content/R0QLzUc4DEuttODYZlkL4w_webp_base.webp?v=2d9a927f\u0026t=3653fe2f5ecd4a47a5a51c97e429947c"},{"contentId":"42c2b8ef-2863-43b6-b75e-c2f393aceae3","contentType":"Recipe","title":"Pistachio Cheesecake","isFavorite":false,"linkUrl":"/recipes/pistachio-cheesecake/42c2b8ef-2863-43b6-b75e-c2f393aceae3","numberOfRatings":"0","averageRating":"0","averageRatingStars":"0","smallImageUrl":"//mojo.generalmills.com/api/public/content/lLBFe50pokywfsgP13PMnQ_webp_base.webp?v=95be9031\u0026t=67e847e026fb43aa8d6e3f5ef39a4ef7","mediumImageUrl":"//mojo.generalmills.com/api/public/content/lLBFe50pokywfsgP13PMnQ_webp_base.webp?v=95be9031\u0026t=3653fe2f5ecd4a47a5a51c97e429947c"},{"contentId":"91063388-944d-4627-8a46-14616406aeee","contentType":"Recipe","title":"No-Bake Mini Pumpkin Cheesecakes","isFavorite":false,"linkUrl":"/recipes/no-bake-mini-pumpkin-cheesecakes/91063388-944d-4627-8a46-14616406aeee","numberOfRatings":"0","averageRating":"0","averageRatingStars":"0","smallImageUrl":"//mojo.generalmills.com/api/public/content/SyNVQunoxUO15QvCECWGag_webp_base.webp?v=889084ff\u0026t=67e847e026fb43aa8d6e3f5ef39a4ef7","mediumImageUrl":"//mojo.generalmills.com/api/public/content/SyNVQunoxUO15QvCECWGag_webp_base.webp?v=889084ff\u0026t=3653fe2f5ecd4a47a5a51c97e429947c"},{"contentId":"4282c4ad-8f3f-441e-a34e-2b1251fda676","contentType":"Recipe","title":"Brownie S’mores Cheesecake","isFavorite":false,"linkUrl":"/recipes/brownie-smores-cheesecake/4282c4ad-8f3f-441e-a34e-2b1251fda676","numberOfRatings":"0","averageRating":"0","averageRatingStars":"0","smallImageUrl":"//mojo.generalmills.com/api/public/content/Qu7G0zAQXUOcBFKprRB_sA_webp_base.webp?v=7681645e\u0026t=67e847e026fb43aa8d6e3f5ef39a4ef7","mediumImageUrl":"//mojo.generalmills.com/api/public/content/Qu7G0zAQXUOcBFKprRB_sA_webp_base.webp?v=7681645e\u0026t=3653fe2f5ecd4a47a5a51c97e429947c"},{"contentId":"bcbc27a4-07da-4069-9726-a1d56fbcaba0","contentType":"Recipe","title":"Pink Velvet Cheesecake Swirl Brownies","isFavorite":false,"linkUrl":"/recipes/pink-velvet-cheesecake-swirl-brownies/bcbc27a4-07da-4069-9726-a1d56fbcaba0","numberOfRatings":"0","averageRating":"0","averageRatingStars":"0","smallImageUrl":"//mojo.generalmills.com/api/public/content/bPFD7LFP6kmIeFd7b4yrng_webp_base.webp?v=36269ec2\u0026t=67e847e026fb43aa8d6e3f5ef39a4ef7","mediumImageUrl":"//mojo.generalmills.com/api/public/content/bPFD7LFP6kmIeFd7b4yrng_webp_base.webp?v=36269ec2\u0026t=3653fe2f5ecd4a47a5a51c97e429947c"}],"availableItems":[{"contentId":"2735a42f-4d79-4dcd-96e8-40d88c7bba08","contentType":"Recipe","title":"Basic Cheesecake","isFavorite":false,"linkUrl":"/recipes/basic-cheesecake/2735a42f-4d79-4dcd-96e8-40d88c7bba08","numberOfRatings":"0","averageRating":"0","averageRatingStars":"0","smallImageUrl":"//mojo.generalmills.com/api/public/content/wYaQHIlcQk6U6TSndRjjzA_webp_base.webp?v=582c7def\u0026t=67e847e026fb43aa8d6e3f5ef39a4ef7","mediumImageUrl":"//rms-media-prod.generalmills.com/69fdd10c-04c4-43e9-86c6-d62b83b0cd53.jpg"},{"contentId":"fd207b62-3505-4bd7-96cb-8ea8c44cfc80","contentType":"Recipe","title":"No-Bake Butterfinger™ Cheesecake","isFavorite":false,"linkUrl":"/recipes/no-bake-butterfinger-cheesecake/fd207b62-3505-4bd7-96cb-8ea8c44cfc80","numberOfRatings":"0","averageRating":"0","averageRatingStars":"0","smallImageUrl":"//mojo.generalmills.com/api/public/content/R0QLzUc4DEuttODYZlkL4w_webp_base.webp?v=2d9a927f\u0026t=67e847e026fb43aa8d6e3f5ef39a4ef7","mediumImageUrl":"//mojo.generalmills.com/api/public/content/R0QLzUc4DEuttODYZlkL4w_webp_base.webp?v=2d9a927f\u0026t=3653fe2f5ecd4a47a5a51c97e429947c"},{"contentId":"42c2b8ef-2863-43b6-b75e-c2f393aceae3","contentType":"Recipe","title":"Pistachio Cheesecake","isFavorite":false,"linkUrl":"/recipes/pistachio-cheesecake/42c2b8ef-2863-43b6-b75e-c2f393aceae3","numberOfRatings":"0","averageRating":"0","averageRatingStars":"0","smallImageUrl":"//mojo.generalmills.com/api/public/content/lLBFe50pokywfsgP13PMnQ_webp_base.webp?v=95be9031\u0026t=67e847e026fb43aa8d6e3f5ef39a4ef7","mediumImageUrl":"//mojo.generalmills.com/api/public/content/lLBFe50pokywfsgP13PMnQ_webp_base.webp?v=95be9031\u0026t=3653fe2f5ecd4a47a5a51c97e429947c"},{"contentId":"91063388-944d-4627-8a46-14616406aeee","contentType":"Recipe","title":"No-Bake Mini Pumpkin Cheesecakes","isFavorite":false,"linkUrl":"/recipes/no-bake-mini-pumpkin-cheesecakes/91063388-944d-4627-8a46-14616406aeee","numberOfRatings":"0","averageRating":"0","averageRatingStars":"0","smallImageUrl":"//mojo.generalmills.com/api/public/content/SyNVQunoxUO15QvCECWGag_webp_base.webp?v=889084ff\u0026t=67e847e026fb43aa8d6e3f5ef39a4ef7","mediumImageUrl":"//mojo.generalmills.com/api/public/content/SyNVQunoxUO15QvCECWGag_webp_base.webp?v=889084ff\u0026t=3653fe2f5ecd4a47a5a51c97e429947c"},{"contentId":"4282c4ad-8f3f-441e-a34e-2b1251fda676","contentType":"Recipe","title":"Brownie S’mores Cheesecake","isFavorite":false,"linkUrl":"/recipes/brownie-smores-cheesecake/4282c4ad-8f3f-441e-a34e-2b1251fda676","numberOfRatings":"0","averageRating":"0","averageRatingStars":"0","smallImageUrl":"//mojo.generalmills.com/api/public/content/Qu7G0zAQXUOcBFKprRB_sA_webp_base.webp?v=7681645e\u0026t=67e847e026fb43aa8d6e3f5ef39a4ef7","mediumImageUrl":"//mojo.generalmills.com/api/public/content/Qu7G0zAQXUOcBFKprRB_sA_webp_base.webp?v=7681645e\u0026t=3653fe2f5ecd4a47a5a51c97e429947c"},{"contentId":"bcbc27a4-07da-4069-9726-a1d56fbcaba0","contentType":"Recipe","title":"Pink Velvet Cheesecake Swirl Brownies","isFavorite":false,"linkUrl":"/recipes/pink-velvet-cheesecake-swirl-brownies/bcbc27a4-07da-4069-9726-a1d56fbcaba0","numberOfRatings":"0","averageRating":"0","averageRatingStars":"0","smallImageUrl":"//mojo.generalmills.com/api/public/content/bPFD7LFP6kmIeFd7b4yrng_webp_base.webp?v=36269ec2\u0026t=67e847e026fb43aa8d6e3f5ef39a4ef7","mediumImageUrl":"//mojo.generalmills.com/api/public/content/bPFD7LFP6kmIeFd7b4yrng_webp_base.webp?v=36269ec2\u0026t=3653fe2f5ecd4a47a5a51c97e429947c"}]}};
var moduleName = 'relatedContent';
var isVueModule = true;
GeneralMills.PandoSites.RegisterControlInstance(moduleName, configuration, componentMetadata, isVueModule)
});
})();
© 2025 ®/TM General Mills All Rights Reserved