(function() {
document.addEventListener('DOMContentLoaded', function() {
var componentMetadata = JSON.parse('\x7b\x22componentName\x22\x3a\x22ActionToolbar_54a65093-280d-4b2a-8a72-d13833164a15\x22,\x22deferOptions\x22\x3a\x7b\x22deferComponent\x22\x3afalse,\x22deferType\x22\x3a\x22None\x22,\x22deferId\x22\x3a\x22r172b6d9689854db789bddd2ed830ccfe\x22,\x22deferredContainerId\x22\x3a\x22\x2fmain\x2frdpRecipeDetailToolbar\x22,\x22deferredContainerView\x22\x3anull\x7d,\x22viewName\x22\x3a\x22ActionToolbar\x22\x7d');
var configuration = {"contentId":"64e3a977-0318-41d3-90ac-65697c7a56fe","toolbarSettings":{"id":"54a65093-280d-4b2a-8a72-d13833164a15","registrationUrl":"/GMI/CoreSites/BC/Home/register/reg-fp","regAction":"FAVORITE","eSourceCode":11275,"namePassedToEvents":"RDPToolbar_LOWER","buttons":[{"addFavoriteErrorMessage":"Sorry, something went wrong. Please save again.","removeFavoriteErrorMessage":"Error occurred while removing from favorites","registrationUrl":"/GMI/CoreSites/BC/Home/register/reg-fp","regAction":"FAVORITE","eSourceCode":11275,"isCurrentUserAnonymous":false,"isFavoriteItem":false,"id":"718b4e01-b2be-40cf-8f0c-bca3b01db0ed","allowedForAnonymousUsers":false,"type":"Favorite","displayName":"Save","toggleDisplayName":"Saved","namePassedToEvents":"Favorite","cssClassName":"atButtonFavorite","privacyOptOutMessage":"\u003cdiv class=\u0027privacyMessage\u0027\u003e\n\u003ch3\u003eThis feature is not available with your current cookie settings.\u003c/h3\u003e\n\u003cp\u003eYou can \u003ca href=\u0027#\u0027 data-show-preference-center=\u00271\u0027\u003eupdate your privacy settings\u003c/a\u003e to enable this content. Please enable “Functional Cookies” to use this feature.\u003c/p\u003e\n\u003c/div\u003e","showPrivacyOptOutMessage":false},{"nestedButtons":[{"providerName":"pinterest","providerNamePassedToEvents":"Pinterest","shareUrlFormat":"//pinterest.com/pin/create/link/?url={0}","id":"585d4198-c691-4eae-bb63-66cc1927e44a","allowedForAnonymousUsers":true,"type":"Social","displayName":"Save To Pinterest","toggleDisplayName":"","namePassedToEvents":"Pinterest","cssClassName":"atButtonPinterest","privacyOptOutMessage":"\u003cdiv class=\u0027privacyMessage\u0027\u003e\n\u003ch3\u003eThis feature is not available with your current cookie settings.\u003c/h3\u003e\n\u003cp\u003eYou can \u003ca href=\u0027#\u0027 data-show-preference-center=\u00271\u0027\u003eupdate your privacy settings\u003c/a\u003e to enable this content. Please enable “Functional Cookies” to use this feature.\u003c/p\u003e\n\u003c/div\u003e","showPrivacyOptOutMessage":false},{"templateId":"95752b5c-7e75-4367-bca7-fdd3abb0ebcb","dialogHeading":"Email Recipe","emailCode":"TBSP_ContentEmail","dialogSettings":{"cancelButtonText":"Cancel","copyToSenderLabel":"Send a Copy to Myself","emailAddressesLabel":"* Email Address(es)","emailInstructionText":"Separate email addresses with commas","fromText":"From:","privacyPolicyText":"\u003cp\u003e\u0026copy;2026 General Mills, Inc. All Rights Reserved. This information will only be used to send an email to your friend(s) and will not be saved. Please read our \u003ca rel=\u0022noopener noreferrer\u0022 rel=\u0022noopener noreferrer\u0022 href=\u0022http://www.generalmills.com/company/privacy-policies/privacy-policy-us\u0022 target=\u0022_blank\u0022 shape=\u0022rect\u0022\u003ePrivacy Policy\u003c/a\u003e.\u003c/p\u003e","requiredFieldText":"* Required","sendButtonText":"Send","senderEmailAddressLabel":"* Your Email Address","senderFirstNameLabel":"* Your First Name","sendToText":"Send To:"},"id":"fad236f8-3084-4a50-bc7d-283bc5511677","allowedForAnonymousUsers":true,"type":"Email","displayName":"Share via Email","toggleDisplayName":"","namePassedToEvents":"Email","cssClassName":"atButtonEmail","privacyOptOutMessage":"\u003cdiv class=\u0027privacyMessage\u0027\u003e\n\u003ch3\u003eThis feature is not available with your current cookie settings.\u003c/h3\u003e\n\u003cp\u003eYou can \u003ca href=\u0027#\u0027 data-show-preference-center=\u00271\u0027\u003eupdate your privacy settings\u003c/a\u003e to enable this content. Please enable “Functional Cookies” to use this feature.\u003c/p\u003e\n\u003c/div\u003e","showPrivacyOptOutMessage":false},{"providerName":"facebook","providerNamePassedToEvents":"Facebook","shareUrlFormat":"//facebook.com/sharer/sharer.php?u={0}","id":"fc7a5260-abb4-42be-958a-d172ba87442b","allowedForAnonymousUsers":true,"type":"Social","displayName":"Share on Facebook","toggleDisplayName":"","namePassedToEvents":"Facebook","cssClassName":"atButtonFacebook","privacyOptOutMessage":"\u003cdiv class=\u0027privacyMessage\u0027\u003e\n\u003ch3\u003eThis feature is not available with your current cookie settings.\u003c/h3\u003e\n\u003cp\u003eYou can \u003ca href=\u0027#\u0027 data-show-preference-center=\u00271\u0027\u003eupdate your privacy settings\u003c/a\u003e to enable this content. Please enable “Functional Cookies” to use this feature.\u003c/p\u003e\n\u003c/div\u003e","showPrivacyOptOutMessage":false},{"successMessage":"Copied.","errorMessage":"Press Ctrl+C and Enter to copy to clipboard","successMessageDuration":3000,"errorMessageDuration":10000,"id":"263303a9-5fe6-480d-910a-608f153d379a","allowedForAnonymousUsers":true,"type":"CopyLink","displayName":"Copy Link","toggleDisplayName":"","namePassedToEvents":"Copy","cssClassName":"atButtonCopyLink","privacyOptOutMessage":"\u003cdiv class=\u0027privacyMessage\u0027\u003e\n\u003ch3\u003eThis feature is not available with your current cookie settings.\u003c/h3\u003e\n\u003cp\u003eYou can \u003ca href=\u0027#\u0027 data-show-preference-center=\u00271\u0027\u003eupdate your privacy settings\u003c/a\u003e to enable this content. Please enable “Functional Cookies” to use this feature.\u003c/p\u003e\n\u003c/div\u003e","showPrivacyOptOutMessage":false}],"id":"46a2d62f-b80c-49bf-969f-5d28640dc94a","allowedForAnonymousUsers":true,"type":"Reveal","displayName":"Share","toggleDisplayName":"","namePassedToEvents":"Share","cssClassName":"atButtonReveal","privacyOptOutMessage":"\u003cdiv class=\u0027privacyMessage\u0027\u003e\n\u003ch3\u003eThis feature is not available with your current cookie settings.\u003c/h3\u003e\n\u003cp\u003eYou can \u003ca href=\u0027#\u0027 data-show-preference-center=\u00271\u0027\u003eupdate your privacy settings\u003c/a\u003e to enable this content. Please enable “Functional Cookies” to use this feature.\u003c/p\u003e\n\u003c/div\u003e","showPrivacyOptOutMessage":false},{"layoutParameter":"p%3d1","id":"ab4bf4fc-919a-4252-81ca-c39edb8eadf0","allowedForAnonymousUsers":true,"type":"Print","displayName":"Print","toggleDisplayName":"","namePassedToEvents":"Print","cssClassName":"atButtonPrint","privacyOptOutMessage":"\u003cdiv class=\u0027privacyMessage\u0027\u003e\n\u003ch3\u003eThis feature is not available with your current cookie settings.\u003c/h3\u003e\n\u003cp\u003eYou can \u003ca href=\u0027#\u0027 data-show-preference-center=\u00271\u0027\u003eupdate your privacy settings\u003c/a\u003e to enable this content. Please enable “Functional Cookies” to use this feature.\u003c/p\u003e\n\u003c/div\u003e","showPrivacyOptOutMessage":false},{"errorMessage":"","id":"0a1bab6c-f930-4359-b8b4-a72470a4d8ee","allowedForAnonymousUsers":true,"type":"WakeLock","displayName":"Keep Screen On","toggleDisplayName":"","namePassedToEvents":"Wakelock","cssClassName":"","privacyOptOutMessage":"\u003cdiv class=\u0027privacyMessage\u0027\u003e\n\u003ch3\u003eThis feature is not available with your current cookie settings.\u003c/h3\u003e\n\u003cp\u003eYou can \u003ca href=\u0027#\u0027 data-show-preference-center=\u00271\u0027\u003eupdate your privacy settings\u003c/a\u003e to enable this content. Please enable “Functional Cookies” to use this feature.\u003c/p\u003e\n\u003c/div\u003e","showPrivacyOptOutMessage":false}],"isSticky":true},"userSettings":{"isCurrentUserAnonymous":true,"isFavoriteItem":false,"isAnonymousUserWithFavorites":false},"pageAttributes":{"url":"https%3a%2f%2fwww.tablespoon.com%2frecipes%2fmix-tape-brownies%2f64e3a977-0318-41d3-90ac-65697c7a56fe","contentId":"64e3a977-0318-41d3-90ac-65697c7a56fe"},"recaptchaPublicKey":"6LfW_icUAAAAAL_CG700pddUxLNYIxgRJe3vOg2Z"};
var moduleName = 'actionToolbar';
var isVueModule = true;
GeneralMills.PandoSites.RegisterControlInstance(moduleName, configuration, componentMetadata, isVueModule)
});
})();
Ingredients
-
1
box Betty Crocker™ Fudge Brownie Mix
-
2/3
cup vegetable oil
-
1/4
cup water
-
2
eggs
-
1
box (24 oz) white vanilla fondant
-
Confectioner’s sugar for dusting
-
Black gel paste food coloring
-
1
tub (16 oz) Betty Crocker™ Rich & Creamy Vanilla Frosting
(function() {
document.addEventListener('DOMContentLoaded', function() {
var componentMetadata = JSON.parse('\x7b\x22componentName\x22\x3a\x22RecipeIngredients_a2352866-1a21-4a5d-9dd4-1744f7700fb5\x22,\x22deferOptions\x22\x3a\x7b\x22deferComponent\x22\x3afalse,\x22deferType\x22\x3a\x22None\x22,\x22deferId\x22\x3a\x22re235291b4bd848eba4daa4f6b02ec20a\x22,\x22deferredContainerId\x22\x3a\x22\x2fmain\x2frdpIngredients\x22,\x22deferredContainerView\x22\x3anull\x7d,\x22viewName\x22\x3a\x22RecipeIngredients\x22\x7d');
var configuration = {};
var moduleName = 'recipeIngredients';
var isVueModule = false;
GeneralMills.PandoSites.RegisterControlInstance(moduleName, configuration, componentMetadata, isVueModule)
});
})();
(function() {
document.addEventListener('DOMContentLoaded', function() {
var componentMetadata = JSON.parse('\x7b\x22componentName\x22\x3a\x22DoubleClick_745c15b5-a9ad-4519-81b8-8ce6135efb93\x22,\x22deferOptions\x22\x3a\x7b\x22deferComponent\x22\x3atrue,\x22deferType\x22\x3a\x22OnDemand\x22,\x22deferId\x22\x3a\x22r8de910c23e51410d8efb875c71f4ceef\x22,\x22deferredContainerId\x22\x3a\x22\x2fmain\x2frdpSecondaryAd\x22,\x22deferredContainerView\x22\x3a\x22DoubleClick\x22\x7d,\x22viewName\x22\x3a\x22DoubleClick\x22\x7d');
var configuration = {"adId":"OMP/tablespoon/recipes/300x250_bottom","minPageWidth":"1000","maxPageWidth":"9999","defaultMinPageWidth":"1000","defaultMaxPageWidth":"9999","size":"[[300,600],[300,250]]","refreshWhenViewed":false,"adContainerId":"c97f1357-b9e9-45d1-b97c-884755d0f29c","doubleClickAdContainerId":"8f4e83dc-22d5-442e-96fb-45168ae8c08e","adCaptionText":"Advertisement","networkCode":"/15704463/","relevantMetadata":[null,null,null],"privacyOptOut":false,"isThirdPartyProvider":true,"thirdPartyTag":"\u003cdiv align=\u0022center\u0022 data-freestar-ad=\u0022__300x600\u0022 id=\u0022a9a4ac1be14424ceab48eef5ba91ae00e\u0022 data-placement-name=\u0022tablespoon-com_right_rail_1\u0022\u003e\u003c/div\u003e","sovrnCssClass":"","responsive":true,"contentType":"Recipe","itemId":"64e3a977-0318-41d3-90ac-65697c7a56fe","continuesBelowText":"Recipe Continues Below"};
var moduleName = 'thirdPartyProvider';
var isVueModule = true;
GeneralMills.PandoSites.RegisterControlInstance(moduleName, configuration, componentMetadata, isVueModule)
});
})();
-
Grease a 9x13 inch baking pan and set aside. Prepare brownie batter according to the recipe with the vegetable oil, water and eggs. Pour batter into the prepared pan and bake according to the directions. Let cool completely. Divide each side of the pan in thirds to cut 9 rectangles, each about 3x4 inches, and set aside.
-
To make the fondant pieces, roll a ball of white fondant 1/8 inch thick between 2 pieces of wax paper or on a surface dusted with confectioner’s sugar. With a cookie cutter, knife or pizza roller, cut out 9 rectangles, each 2x3 inches, rolling out more fondant as needed. With a cookie cutter or knife, cut out smaller rectangles inside the fondant rectangles, 1x2 inches in size, just a bit off-center. Set aside the rectangles to stiffen on a tray lined with wax paper.
-
Take a ball of fondant, about 2-inches across. Place several good-sized drops of black food coloring on the fondant and knead very well. Add more food coloring as needed to achieve the desired color. Roll the black fondant between two pieces of wax paper (or on a surface dusted with confectioner’s sugar) until about 1/8-inch thick. Use a 1M decorating tip to cut out circles. If the circles stick in the tip, insert a skewer or back of a paint brush through the top of the tip to gently remove the circle. Cut out 18 circles.
-
Use the same skewer or paint brush to poke a hole in the center of the circles and wiggle to make the hole bigger. Press the other end of the decorating tip around the hole to make a star imprint. Set the circles aside on wax paper.
-
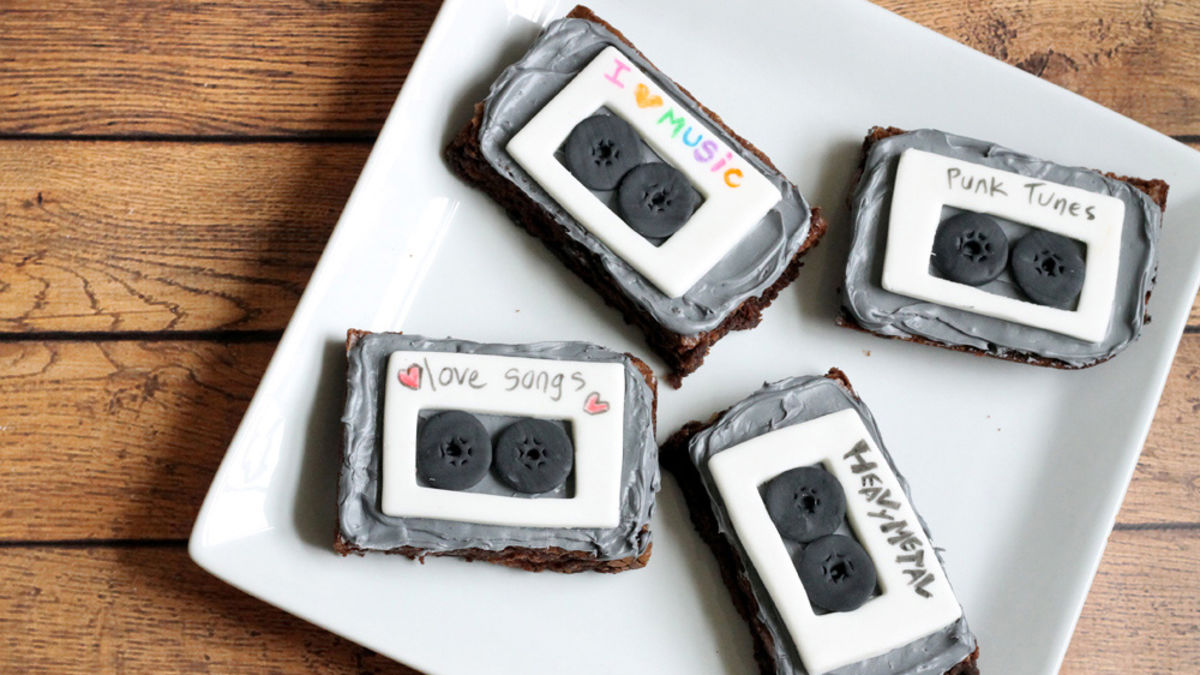
With food coloring pens, write the names of your mix tapes on the white rectangles.
-
Add a few drops of black food coloring to the frosting, stirring well, to tint the frosting gray. Spread the frosting evenly on top of each rectangle. Place the white rectangle on a frosted brownie. Then gently press the black circles inside the opening, assembling each to get the finished look as pictured.
(function() {
document.addEventListener('DOMContentLoaded', function() {
var componentMetadata = JSON.parse('\x7b\x22componentName\x22\x3a\x22RecipeSteps_a2352866-1a21-4a5d-9dd4-1744f7700fb5\x22,\x22deferOptions\x22\x3a\x7b\x22deferComponent\x22\x3atrue,\x22deferType\x22\x3a\x22OnDemand\x22,\x22deferId\x22\x3a\x22r5757cd95fefc4beabe2687edae5fcbf5\x22,\x22deferredContainerId\x22\x3a\x22\x2fmain\x2frdpSteps\x22,\x22deferredContainerView\x22\x3a\x22RecipeDetailRedesign\x22\x7d,\x22viewName\x22\x3a\x22RecipeSteps\x22\x7d');
var configuration = {"initAreImagesHidden":false,"hideImagesEventName":"HideStepShots","showImagesEventName":"ShowStepShots","hideImagesButtonText":"Hide Images","showImagesButtonText":"Show Images","hideImagesClass":"rdpHideStepImages"};
var moduleName = 'recipeStepShots';
var isVueModule = true;
GeneralMills.PandoSites.RegisterControlInstance(moduleName, configuration, componentMetadata, isVueModule)
});
})();
No nutrition information available for this recipe
(function() {
document.addEventListener('DOMContentLoaded', function() {
var componentMetadata = JSON.parse('\x7b\x22componentName\x22\x3a\x22RecipeNutritionNonPrintRedesign_a2352866-1a21-4a5d-9dd4-1744f7700fb5\x22,\x22deferOptions\x22\x3a\x7b\x22deferComponent\x22\x3atrue,\x22deferType\x22\x3a\x22Simple\x22,\x22deferId\x22\x3a\x22rc09af27f4131419f9f1a9e265f4631ed\x22,\x22deferredContainerId\x22\x3a\x22\x2fmain\x2frdpNutrition\x22,\x22deferredContainerView\x22\x3a\x22RecipeDetailRedesign\x22\x7d,\x22viewName\x22\x3a\x22RecipeNutritionNonPrintRedesign\x22\x7d');
var configuration = {"initIsExpanded":false,"expandEventName":"NutritionExpand","collapseEventName":"NutritionCollapse"};
var moduleName = 'recipeNutrition';
var isVueModule = true;
GeneralMills.PandoSites.RegisterControlInstance(moduleName, configuration, componentMetadata, isVueModule)
});
})();
Expert Tips
{{tipItemHeadingFormat.replace('{0}',props.index + 1)}}
(function() {
document.addEventListener('DOMContentLoaded', function() {
var componentMetadata = JSON.parse('\x7b\x22componentName\x22\x3a\x22RecipeTipsCarousel_a2352866-1a21-4a5d-9dd4-1744f7700fb5\x22,\x22deferOptions\x22\x3a\x7b\x22deferComponent\x22\x3atrue,\x22deferType\x22\x3a\x22Simple\x22,\x22deferId\x22\x3a\x22r6a22e4addd64403a8c1ec0fca889a095\x22,\x22deferredContainerId\x22\x3a\x22\x2fmain\x2frdpTips\x22,\x22deferredContainerView\x22\x3a\x22RecipeDetailRedesign\x22\x7d,\x22viewName\x22\x3a\x22RecipeTipsCarousel\x22\x7d');
var configuration = {"title":"Mix Tape Brownies","introduction":"Some music love for the old school mix tape, brownie style! ","servingSize":"1 Serving","image":{"small":{"media":"(min-width: 0px)","src":"https://mojo.generalmills.com/api/public/content/0D9KPFg5wkOzzwuAIqU9mg_webp_base.webp?v=7765a985\u0026t=e724eca7b3c24a8aaa6e089ed9e611fd"},"medium":{"media":"(min-width: 500px)","src":"https://rms-media-prod.generalmills.com/3bcd0cbf-8335-484a-9b80-fe9a721edf55.jpg"},"large":{"media":"(min-width: 767px)","src":"https://rms-media-prod.generalmills.com/3bcd0cbf-8335-484a-9b80-fe9a721edf55.jpg"},"alt":"Mix Tape Brownies"},"contributor":{"label":"by:","name":"The Decorated Cookie","profileUrl":"https://thedecoratedcookie.com/","displayDate":{"label":"Updated","date":"May 23, 2022"}},"ingredientGroups":[{"ingredients":[{"quantity":"1","description":"box Betty Crocker™ Fudge Brownie Mix"},{"quantity":"2/3","description":"cup vegetable oil"},{"quantity":"1/4","description":"cup water"},{"quantity":"2","description":"eggs"},{"quantity":"1","description":"box (24 oz) white vanilla fondant"},{"quantity":"","description":"Confectioner’s sugar for dusting"},{"quantity":"","description":"Black gel paste food coloring"},{"quantity":"1","description":"tub (16 oz) Betty Crocker™ Rich \u0026 Creamy Vanilla Frosting"}]}],"steps":[{"description":"Grease a 9x13 inch baking pan and set aside. Prepare brownie batter according to the recipe with the vegetable oil, water and eggs. Pour batter into the prepared pan and bake according to the directions. Let cool completely. Divide each side of the pan in thirds to cut 9 rectangles, each about 3x4 inches, and set aside."},{"description":"To make the fondant pieces, roll a ball of white fondant 1/8 inch thick between 2 pieces of wax paper or on a surface dusted with confectioner’s sugar. With a cookie cutter, knife or pizza roller, cut out 9 rectangles, each 2x3 inches, rolling out more fondant as needed. With a cookie cutter or knife, cut out smaller rectangles inside the fondant rectangles, 1x2 inches in size, just a bit off-center. Set aside the rectangles to stiffen on a tray lined with wax paper. "},{"description":"Take a ball of fondant, about 2-inches across. Place several good-sized drops of black food coloring on the fondant and knead very well. Add more food coloring as needed to achieve the desired color. Roll the black fondant between two pieces of wax paper (or on a surface dusted with confectioner’s sugar) until about 1/8-inch thick. Use a 1M decorating tip to cut out circles. If the circles stick in the tip, insert a skewer or back of a paint brush through the top of the tip to gently remove the circle. Cut out 18 circles. "},{"description":"Use the same skewer or paint brush to poke a hole in the center of the circles and wiggle to make the hole bigger. Press the other end of the decorating tip around the hole to make a star imprint. Set the circles aside on wax paper. "},{"description":"With food coloring pens, write the names of your mix tapes on the white rectangles. "},{"description":"Add a few drops of black food coloring to the frosting, stirring well, to tint the frosting gray. Spread the frosting evenly on top of each rectangle. Place the white rectangle on a frosted brownie. Then gently press the black circles inside the opening, assembling each to get the finished look as pictured."}],"tips":[{"title":"Additional equipment needed:","description":"Size 1M decorating tip, rectangle cookie cutters (optional).","category":"Presentation/Garnish","tipShots":[]},{"title":"","description":"If desired, you can choose any color of the rainbow to tint your frosting. ","category":"Serving Suggestions/Menu","tipShots":[]},{"title":"","description":"The fondant should be pliable and easy to work with without being sticky. If it’s sticky, let it rest for about 15 minutes uncovered to stiffen a bit, and dust your hands with confectioner’s sugar. ","category":"Techniques","tipShots":[]},{"title":"","description":"Just about as easy to make as brownies. But, oh, so much more fun!\u003cbr /\u003e\u003cbr /\u003eThe creator of a mix tape is a true music fan.\u003cbr /\u003e\u003cbr /\u003eI know, because it takes a lot of effort to make one:\u003cbr /\u003e\u003cbr /\u003eFind the song you love – or the one you think your love might love – by rewinding and fast forwarding to just the right spot. Hit record on the blank tape at just the right moment you start the song. Stop recording at just the right moment you stop the song. Carefully judge just the right amount of songs that will fit on each side of the tape so you don’t cut anything off in the middle. Create clever art for the case. Add the stickers. Jam a pencil in the hole and wind manually to make sure none of that tape is twisted, because if it snags on anything… Right? You know that agony? \u003cbr /\u003e\u003cbr /\u003eI recently found some of my old mix tapes. REM, They Might Be Giants, B52s, Fugazi, Violet Femmes, Squeeze, Cowboy Junkies... the memories flood back. Such is the beauty of the mix tape. Now, if I could only find a place to play them!\u003cbr /\u003e\u003cbr /\u003eIn this season of award shows, let’s show our love of music and kick it old school with some mix tape brownies. The fondant is used sparingly, so you still get the brownie and frosting deliciousness.\u003cbr /\u003e\u003cbr /\u003eAnd this design is simple enough for the novice cake decorator, so let’s dig in!\u003cbr /\u003e\u003cbr /\u003eGrease a 9x13-inch baking pan well. Prepare the brownie batter according to the package directions and pour into the prepared pan. Bake as directed and let the brownies cool completely.\u003cbr /\u003e\u003cbr /\u003eCut rectangles about 4x3 inches with a sharp knife – which means in the 9x13-inch pan, you’ll divide each side in thirds.\u003cbr /\u003e\u003cbr /\u003eThis means really big brownies, by the way. So for goodness sake, please share. (Note that you can frost the brownies before cutting them, but you have more control frosting them individually.)\u003cbr /\u003e\u003cbr /\u003eTo decorate the brownies, you’ll need a tub of Betty Crocker Rich \u0026 Creamy Vanilla Frosting, some food coloring pens, a box of white vanilla fondant, a size 1M decorating tip and black gel paste food coloring.\u003cbr /\u003e\u003cbr /\u003eYou can find the food coloring pens, fondant, decorating tip and food coloring at a craft store or online. Shown here are Americolor™ Gourmet Writers and Soft Gel Paste in Super Black, available online.\u003cbr /\u003e\u003cbr /\u003eWhile the brownies cook and cool, make your fondant pieces. Roll out a ball of fondant – I work with a ball about 3 inches in diameter at a time – about 1/8-inch thick on a surface dusted lightly with confectioner’s sugar, or between two pieces of wax paper.\u003cbr /\u003e\u003cbr /\u003eCut out nine 2x3-inch rectangles, rolling out more fondant as needed. I have a rectangle cutter this size but if you don’t, use a knife, dough scraper or pizza roller to cut out your rectangles.\u003cbr /\u003e\u003cbr /\u003eThe fondant should be pliable and easy to work with without being sticky. If it’s sticky, let it rest for about 15 minutes uncovered to stiffen a bit, and dust your hands with confectioner’s sugar.\u003cbr /\u003e\u003cbr /\u003eNext, cut out little rectangles inside the fondant rectangles, 1x2 inches in size, just a bit off-center. Again, I used a small rectangle cutter, but you can use a knife. If the fondant is too soft to cut with a knife, let it stiffen at room temperature until it’s easy to cut.\u003cbr /\u003e\u003cbr /\u003eSet aside the rectangles to stiffen on a tray lined with wax paper.\u003cbr /\u003e\u003cbr /\u003eMeanwhile, make the tape. Take a ball of fondant, about 2 inches across. Place several good-sized drops of black food coloring on the fondant and knead very well. Add more food coloring as needed.\u003cbr /\u003e\u003cbr /\u003eIf the food coloring and kneading cause the fondant to become sticky, let the fondant sit out awhile, and use confectioner’s sugar on your hands as needed. Warning: This will stain your hands a charming shade of black and red for a day or two! You might want to use plastic food-prep gloves.\u003cbr /\u003e\u003cbr /\u003eNow, roll out the black fondant just as you did the white fondant for the rectangles. Take the decorating tip and press it into the fondant to cut out circles.\u003cbr /\u003e\u003cbr /\u003eTo remove the circles from the decorating tip, insert a toothpick, skewer or paint brush through the top and gently push to remove it. I like using a paint brush because the end is more blunt. You’ll need 18 circles.\u003cbr /\u003e\u003cbr /\u003eHere’s the tricky part… at least it looks tricky. Take that paint brush or skewer or toothpick and poke a hole in the center of a circle. Wiggle it around a bit so you can see the hole clearly.\u003cbr /\u003e\u003cbr /\u003eThen, press the other end of the decorating tip around that hole you made to make a little star imprint. Voila! You have the wound-up tape. Now set these on the tray to stiffen a bit.\u003cbr /\u003e\u003cbr /\u003eNow here’s the fun part! Go back to those white rectangles and name your mix tapes. Write whatever you want on the fondant using the food coloring pens.\u003cbr /\u003e\u003cbr /\u003eTo color the frosting gray, add a few drops of black food coloring to the frosting and stir well. Add more drops as needed to get the gray color you wa...","category":"Editorial","tipShots":[]}],"kitchenTips":[{"title":"Additional equipment needed:","description":"Size 1M decorating tip, rectangle cookie cutters (optional).","category":"Presentation/Garnish","tipShots":[]},{"title":"","description":"If desired, you can choose any color of the rainbow to tint your frosting. ","category":"Serving Suggestions/Menu","tipShots":[]},{"title":"","description":"The fondant should be pliable and easy to work with without being sticky. If it’s sticky, let it rest for about 15 minutes uncovered to stiffen a bit, and dust your hands with confectioner’s sugar. ","category":"Techniques","tipShots":[]}],"additionalContent":[],"faq":[],"tipCategories":[{"categoryName":"Editorial","heading":"More About This Recipe","cssClass":"recipePartStory","expandOnInit":false,"expandText":"More +","collapseText":"Less -","expandEventName":"","collapseEventName":"","image":"","tips":[{"title":"","description":"Just about as easy to make as brownies. But, oh, so much more fun!\u003cbr /\u003e\u003cbr /\u003eThe creator of a mix tape is a true music fan.\u003cbr /\u003e\u003cbr /\u003eI know, because it takes a lot of effort to make one:\u003cbr /\u003e\u003cbr /\u003eFind the song you love – or the one you think your love might love – by rewinding and fast forwarding to just the right spot. Hit record on the blank tape at just the right moment you start the song. Stop recording at just the right moment you stop the song. Carefully judge just the right amount of songs that will fit on each side of the tape so you don’t cut anything off in the middle. Create clever art for the case. Add the stickers. Jam a pencil in the hole and wind manually to make sure none of that tape is twisted, because if it snags on anything… Right? You know that agony? \u003cbr /\u003e\u003cbr /\u003eI recently found some of my old mix tapes. REM, They Might Be Giants, B52s, Fugazi, Violet Femmes, Squeeze, Cowboy Junkies... the memories flood back. Such is the beauty of the mix tape. Now, if I could only find a place to play them!\u003cbr /\u003e\u003cbr /\u003eIn this season of award shows, let’s show our love of music and kick it old school with some mix tape brownies. The fondant is used sparingly, so you still get the brownie and frosting deliciousness.\u003cbr /\u003e\u003cbr /\u003eAnd this design is simple enough for the novice cake decorator, so let’s dig in!\u003cbr /\u003e\u003cbr /\u003eGrease a 9x13-inch baking pan well. Prepare the brownie batter according to the package directions and pour into the prepared pan. Bake as directed and let the brownies cool completely.\u003cbr /\u003e\u003cbr /\u003eCut rectangles about 4x3 inches with a sharp knife – which means in the 9x13-inch pan, you’ll divide each side in thirds.\u003cbr /\u003e\u003cbr /\u003eThis means really big brownies, by the way. So for goodness sake, please share. (Note that you can frost the brownies before cutting them, but you have more control frosting them individually.)\u003cbr /\u003e\u003cbr /\u003eTo decorate the brownies, you’ll need a tub of Betty Crocker Rich \u0026 Creamy Vanilla Frosting, some food coloring pens, a box of white vanilla fondant, a size 1M decorating tip and black gel paste food coloring.\u003cbr /\u003e\u003cbr /\u003eYou can find the food coloring pens, fondant, decorating tip and food coloring at a craft store or online. Shown here are Americolor™ Gourmet Writers and Soft Gel Paste in Super Black, available online.\u003cbr /\u003e\u003cbr /\u003eWhile the brownies cook and cool, make your fondant pieces. Roll out a ball of fondant – I work with a ball about 3 inches in diameter at a time – about 1/8-inch thick on a surface dusted lightly with confectioner’s sugar, or between two pieces of wax paper.\u003cbr /\u003e\u003cbr /\u003eCut out nine 2x3-inch rectangles, rolling out more fondant as needed. I have a rectangle cutter this size but if you don’t, use a knife, dough scraper or pizza roller to cut out your rectangles.\u003cbr /\u003e\u003cbr /\u003eThe fondant should be pliable and easy to work with without being sticky. If it’s sticky, let it rest for about 15 minutes uncovered to stiffen a bit, and dust your hands with confectioner’s sugar.\u003cbr /\u003e\u003cbr /\u003eNext, cut out little rectangles inside the fondant rectangles, 1x2 inches in size, just a bit off-center. Again, I used a small rectangle cutter, but you can use a knife. If the fondant is too soft to cut with a knife, let it stiffen at room temperature until it’s easy to cut.\u003cbr /\u003e\u003cbr /\u003eSet aside the rectangles to stiffen on a tray lined with wax paper.\u003cbr /\u003e\u003cbr /\u003eMeanwhile, make the tape. Take a ball of fondant, about 2 inches across. Place several good-sized drops of black food coloring on the fondant and knead very well. Add more food coloring as needed.\u003cbr /\u003e\u003cbr /\u003eIf the food coloring and kneading cause the fondant to become sticky, let the fondant sit out awhile, and use confectioner’s sugar on your hands as needed. Warning: This will stain your hands a charming shade of black and red for a day or two! You might want to use plastic food-prep gloves.\u003cbr /\u003e\u003cbr /\u003eNow, roll out the black fondant just as you did the white fondant for the rectangles. Take the decorating tip and press it into the fondant to cut out circles.\u003cbr /\u003e\u003cbr /\u003eTo remove the circles from the decorating tip, insert a toothpick, skewer or paint brush through the top and gently push to remove it. I like using a paint brush because the end is more blunt. You’ll need 18 circles.\u003cbr /\u003e\u003cbr /\u003eHere’s the tricky part… at least it looks tricky. Take that paint brush or skewer or toothpick and poke a hole in the center of a circle. Wiggle it around a bit so you can see the hole clearly.\u003cbr /\u003e\u003cbr /\u003eThen, press the other end of the decorating tip around that hole you made to make a little star imprint. Voila! You have the wound-up tape. Now set these on the tray to stiffen a bit.\u003cbr /\u003e\u003cbr /\u003eNow here’s the fun part! Go back to those white rectangles and name your mix tapes. Write whatever you want on the fondant using the food coloring pens.\u003cbr /\u003e\u003cbr /\u003eTo color the frosting gray, add a few drops of black food coloring to the frosting and stir well. Add more drops as needed to get the gray color you wa...","category":"Editorial","tipShots":[]}],"isExpandable":false}],"nutritionInfo":{"configuration":{"showAsTable":false,"noNutritionInformationAvailableMessage":"No nutrition information available for this recipe","poweredByText":"\u003cp\u003eNutrition information for this recipe is estimated using a leading nutrition calculation application, but is an estimate only. Actual nutrition values will vary based on the exact ingredients or brands you may use.\u003c/p\u003e\n\u003ca href=\u0022http://developer.edamam.com\u0022\u003ePowered By \u003cimg src=\u0022-/media/ABEEFB1BF16C40AEB5775A3BE02315EA.ashx\u0022 alt=\u0022Edamam\u0022 /\u003e\u003c/a\u003e","nutritionChartTitle":"Nutrition Facts","nutritionInformationLabel":"Nutrition","servingSizeText":"Serving Size:","dailyValuesDisclaimer":"*Percent Daily Values are based on a 2,000 calorie diet.","percentDailyValueText":"% Daily Value","percentDailyValueFooterTitleText":"% Daily Value*:","exchangeInformationTitleText":"Exchanges:","nutritionFactsExpandText":"More Nutrition","nutritionFactsCollapseText":"Less Nutrition"},"servingSize":"1 Serving","exchangeInfo":"Free","showPoweredBy":false,"showRecipeTotalTime":true,"showRecipePrepTime":true,"showCarbohydrateChoices":false},"trademarks":[],"labels":{"ingredientsHeader":"Ingredients","stepsHeader":"Instructions","stepsImageHideText":"Hide Images","stepsImageShowText":"Show Images","stepNumberText":"Step","faqHeader":"Frequently Asked Questions","tipsHeader":"Expert Tips","tipItemHeadingFormat":"tip {0}","postedBy":"by:","copyright":"© {yyyy} ®/TM General Mills All Rights Reserved","showDrawerText":"Show","hideDrawerText":"Hide","expandDescriptionText":"More +","collapseDescriptionText":"Less -","includeScrollIndicator":false},"primaryAttributes":[{"label":"Prep Time","values":[{"text":"60","label":"min"}]},{"label":"Total","values":[{"text":"2","label":"hr"},{"text":"0","label":"min"}]},{"label":"Servings","values":[{"text":"9"}]},{"label":"Ingredients","values":[{"text":"8"}]}],"secondaryAttributes":[],"badges":[],"backgroundImageUrl":"","breadcrumbs":{"links":[{"url":"/","label":"Home"},{"url":"/recipes","label":"Recipes"}],"currentPageName":"Mix Tape Brownies"}};
var moduleName = 'recipeTipsCarousel';
var isVueModule = true;
GeneralMills.PandoSites.RegisterControlInstance(moduleName, configuration, componentMetadata, isVueModule)
});
})();
(function() {
document.addEventListener('DOMContentLoaded', function() {
var componentMetadata = JSON.parse('\x7b\x22componentName\x22\x3a\x22DoubleClick_80e5634b-4b8b-4ab6-9d42-f87399323043\x22,\x22deferOptions\x22\x3a\x7b\x22deferComponent\x22\x3atrue,\x22deferType\x22\x3a\x22OnDemand\x22,\x22deferId\x22\x3a\x22rb7b5f8e18d4f456981da79fb0c554921\x22,\x22deferredContainerId\x22\x3a\x22\x2fmain\x2frdpSecondaryAdMobile\x22,\x22deferredContainerView\x22\x3a\x22DoubleClick\x22\x7d,\x22viewName\x22\x3a\x22DoubleClick\x22\x7d');
var configuration = {"adId":"OMP/m_tablespoon/recipes/300x250_bottom","minPageWidth":"299","maxPageWidth":"767","defaultMinPageWidth":"1000","defaultMaxPageWidth":"9999","size":"[[300,250], [300,600]]","refreshWhenViewed":false,"adContainerId":"56baf7ea-5469-45da-862a-56647b7c2dd3","doubleClickAdContainerId":"5a638d1b-8249-45b0-a80c-6811426e923a","adCaptionText":"Advertisement","networkCode":"/15704463/","relevantMetadata":[null,null,null],"privacyOptOut":false,"isThirdPartyProvider":true,"thirdPartyTag":"\u003cdiv align=\u0022center\u0022 data-freestar-ad=\u0022__300x250 __336x280\u0022 id=\u0022a8e4a4f7ce8c144f085b7d6ef92f1ad7c\u0022 data-placement-name=\u0022tablespoon-com_content_standard\u0022\u003e\u003c/div\u003e","sovrnCssClass":"","responsive":true,"contentType":"Recipe","itemId":"64e3a977-0318-41d3-90ac-65697c7a56fe","continuesBelowText":"Recipe Continues Below"};
var moduleName = 'thirdPartyProvider';
var isVueModule = true;
GeneralMills.PandoSites.RegisterControlInstance(moduleName, configuration, componentMetadata, isVueModule)
});
})();
(function() {
document.addEventListener('DOMContentLoaded', function() {
var componentMetadata = JSON.parse('\x7b\x22componentName\x22\x3a\x22RelatedContent_86838426-dd26-481a-9735-69435bca607d\x22,\x22deferOptions\x22\x3a\x7b\x22deferComponent\x22\x3afalse,\x22deferType\x22\x3a\x22None\x22,\x22deferId\x22\x3a\x22raef0c9e2135f4987ba50842f34b04fa9\x22,\x22deferredContainerId\x22\x3a\x22\x2fmain\x2frdpRelatedContent1_NonDeferred\x22,\x22deferredContainerView\x22\x3anull\x7d,\x22viewName\x22\x3a\x22RelatedContent\x22\x7d');
var configuration = {"dataSourceId":"86838426-dd26-481a-9735-69435bca607d","isCurrentUserAnonymous":true,"isAnonymousUserWithFavorites":false,"relatedContentList":{"contentId":"64e3a977-0318-41d3-90ac-65697c7a56fe","listSettings":{"pageSize":3,"startPage":1,"listType":1,"title":"Try These Next","useModalRegistration":false,"regAction":"","esrcCode":0,"favoriteButtonLabelFormat":"Add {0} to favorites","contentTypes":["Category"],"showImages":false,"imageSize":0,"showRatings":false,"allowFavoriting":false,"cssClassName":"relatedContentWithoutImages","favoriteButtonText":""},"items":[{"contentId":"32e81f7d-1693-42b3-89f3-645314f3f01d","contentType":"Category","title":"Hot Chocolate Recipes, Dishes and Ideas from Tablespoon","isFavorite":false,"linkUrl":"/courses/drinks/hot-chocolate","numberOfRatings":"0","averageRating":"0","averageRatingStars":"0","smallImageUrl":"","mediumImageUrl":""},{"contentId":"ac37eecf-6a88-49b9-8acf-266278f1d068","contentType":"Category","title":"Snack Mixes","isFavorite":false,"linkUrl":"/courses/snack/snack-mixes","numberOfRatings":"0","averageRating":"0","averageRatingStars":"0","smallImageUrl":"","mediumImageUrl":""},{"contentId":"3d34b38d-f93f-4a7a-b2d0-9ad44d1bc698","contentType":"Category","title":"Trifle","isFavorite":false,"linkUrl":"/courses/dessert/trifle","numberOfRatings":"0","averageRating":"0","averageRatingStars":"0","smallImageUrl":"","mediumImageUrl":""}],"availableItems":[{"contentId":"32e81f7d-1693-42b3-89f3-645314f3f01d","contentType":"Category","title":"Hot Chocolate Recipes, Dishes and Ideas from Tablespoon","isFavorite":false,"linkUrl":"/courses/drinks/hot-chocolate","numberOfRatings":"0","averageRating":"0","averageRatingStars":"0","smallImageUrl":"","mediumImageUrl":""},{"contentId":"ac37eecf-6a88-49b9-8acf-266278f1d068","contentType":"Category","title":"Snack Mixes","isFavorite":false,"linkUrl":"/courses/snack/snack-mixes","numberOfRatings":"0","averageRating":"0","averageRatingStars":"0","smallImageUrl":"","mediumImageUrl":""},{"contentId":"3d34b38d-f93f-4a7a-b2d0-9ad44d1bc698","contentType":"Category","title":"Trifle","isFavorite":false,"linkUrl":"/courses/dessert/trifle","numberOfRatings":"0","averageRating":"0","averageRatingStars":"0","smallImageUrl":"","mediumImageUrl":""}]}};
var moduleName = 'relatedContent';
var isVueModule = true;
GeneralMills.PandoSites.RegisterControlInstance(moduleName, configuration, componentMetadata, isVueModule)
});
})();
(function() {
document.addEventListener('DOMContentLoaded', function() {
var componentMetadata = JSON.parse('\x7b\x22componentName\x22\x3a\x22RelatedContent_9930dad2-817c-4363-b508-21f459b3c521\x22,\x22deferOptions\x22\x3a\x7b\x22deferComponent\x22\x3atrue,\x22deferType\x22\x3a\x22OnDemand\x22,\x22deferId\x22\x3a\x22r560b406b88074486a887daeb3c15eb53\x22,\x22deferredContainerId\x22\x3a\x22\x2fmain\x2frdpRelatedContent1\x22,\x22deferredContainerView\x22\x3a\x22RecipeDetailRedesign\x22\x7d,\x22viewName\x22\x3a\x22RelatedContent\x22\x7d');
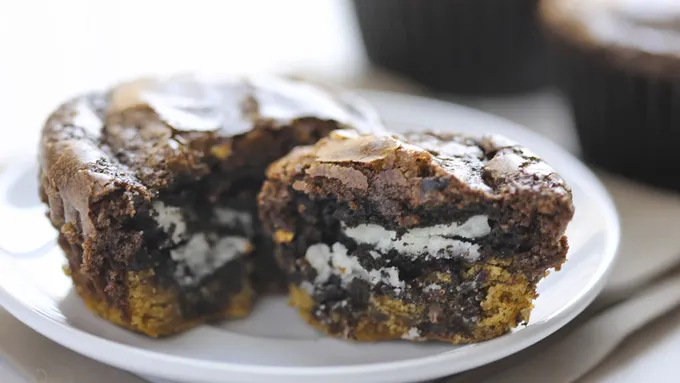
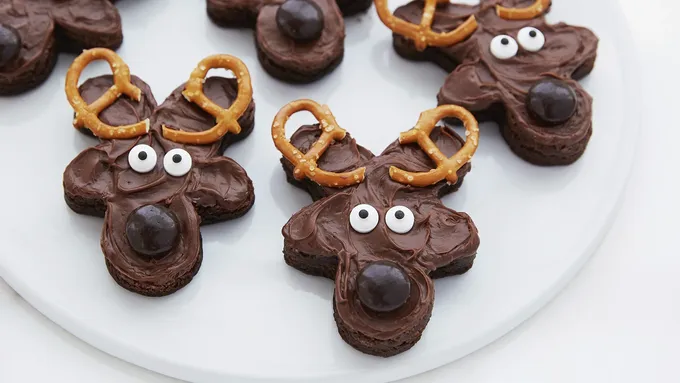
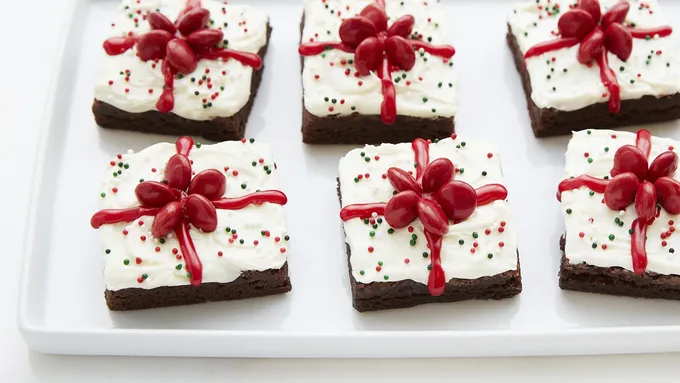
var configuration = {"dataSourceId":"9930dad2-817c-4363-b508-21f459b3c521","isCurrentUserAnonymous":true,"isAnonymousUserWithFavorites":false,"relatedContentList":{"contentId":"64e3a977-0318-41d3-90ac-65697c7a56fe","listSettings":{"pageSize":6,"startPage":1,"listType":1,"title":"","useModalRegistration":false,"regAction":"","esrcCode":0,"favoriteButtonLabelFormat":"Add {0} to favorites","contentTypes":[],"showImages":true,"imageSize":1,"showRatings":false,"allowFavoriting":true,"cssClassName":"","favoriteButtonText":"Save"},"items":[{"contentId":"3d4d01f7-72cc-434a-ac13-f2f19c3379aa","contentType":"Recipe","title":"Cookie Stuffed Brownie Cupcakes","isFavorite":false,"linkUrl":"/recipes/cookie-stuffed-brownie-cupcakes/3d4d01f7-72cc-434a-ac13-f2f19c3379aa","numberOfRatings":"0","averageRating":"0","averageRatingStars":"0","smallImageUrl":"//mojo.generalmills.com/api/public/content/bUeMBFt-2Ey519eG0D5inQ_webp_base.webp?v=76a7e571\u0026t=67e847e026fb43aa8d6e3f5ef39a4ef7","mediumImageUrl":"//mojo.generalmills.com/api/public/content/bUeMBFt-2Ey519eG0D5inQ_webp_base.webp?v=76a7e571\u0026t=3653fe2f5ecd4a47a5a51c97e429947c"},{"contentId":"72d029d5-9043-455c-8737-ca6b4c44bf02","contentType":"Recipe","title":"Easy Frosted Reindeer Brownies","isFavorite":false,"linkUrl":"/recipes/easy-frosted-reindeer-brownies/72d029d5-9043-455c-8737-ca6b4c44bf02","numberOfRatings":"0","averageRating":"0","averageRatingStars":"0","smallImageUrl":"//mojo.generalmills.com/api/public/content/Nk4yiBhDZUSEcXafuRCf_g_webp_base.webp?v=2086013d\u0026t=67e847e026fb43aa8d6e3f5ef39a4ef7","mediumImageUrl":"//mojo.generalmills.com/api/public/content/Nk4yiBhDZUSEcXafuRCf_g_webp_base.webp?v=2086013d\u0026t=3653fe2f5ecd4a47a5a51c97e429947c"},{"contentId":"ab1ed032-d332-48a7-a4fd-7e6a66ae4654","contentType":"Recipe","title":"Easy Christmas Present Brownies","isFavorite":false,"linkUrl":"/recipes/easy-christmas-present-brownies/ab1ed032-d332-48a7-a4fd-7e6a66ae4654","numberOfRatings":"0","averageRating":"0","averageRatingStars":"0","smallImageUrl":"//mojo.generalmills.com/api/public/content/fTKDoiIocUif2hKHHtTAIg_webp_base.webp?v=0d54b835\u0026t=67e847e026fb43aa8d6e3f5ef39a4ef7","mediumImageUrl":"//mojo.generalmills.com/api/public/content/fTKDoiIocUif2hKHHtTAIg_webp_base.webp?v=0d54b835\u0026t=3653fe2f5ecd4a47a5a51c97e429947c"},{"contentId":"f6885970-ff07-4eec-bbd8-b0f4a64273a3","contentType":"Recipe","title":"Mini Peanut Butter Brownie Bites","isFavorite":false,"linkUrl":"/recipes/mini-peanut-butter-brownie-bites/f6885970-ff07-4eec-bbd8-b0f4a64273a3","numberOfRatings":"0","averageRating":"0","averageRatingStars":"0","smallImageUrl":"//mojo.generalmills.com/api/public/content/3n1BXU8I4EKl0GglRwYkLQ_webp_base.webp?v=9b4a9202\u0026t=67e847e026fb43aa8d6e3f5ef39a4ef7","mediumImageUrl":"//mojo.generalmills.com/api/public/content/3n1BXU8I4EKl0GglRwYkLQ_webp_base.webp?v=9b4a9202\u0026t=3653fe2f5ecd4a47a5a51c97e429947c"},{"contentId":"e2796763-5c52-4250-98ec-4eb838fa4c2e","contentType":"Recipe","title":"Fudgy Fireworks Brownies","isFavorite":false,"linkUrl":"/recipes/fudgy-fireworks-brownies/e2796763-5c52-4250-98ec-4eb838fa4c2e","numberOfRatings":"0","averageRating":"0","averageRatingStars":"0","smallImageUrl":"//mojo.generalmills.com/api/public/content/ulPLtTaxokSajhAkftJ00w_webp_base.webp?v=d02dd83b\u0026t=67e847e026fb43aa8d6e3f5ef39a4ef7","mediumImageUrl":"//mojo.generalmills.com/api/public/content/ulPLtTaxokSajhAkftJ00w_webp_base.webp?v=d02dd83b\u0026t=3653fe2f5ecd4a47a5a51c97e429947c"},{"contentId":"a7e7395d-7521-494e-8407-6c04128ecb9b","contentType":"Recipe","title":"Salted Caramel Pretzel Brownies","isFavorite":false,"linkUrl":"/recipes/salted-caramel-pretzel-brownies/a7e7395d-7521-494e-8407-6c04128ecb9b","numberOfRatings":"0","averageRating":"0","averageRatingStars":"0","smallImageUrl":"//mojo.generalmills.com/api/public/content/T3hWgBUa9EaCcQOu0Cb8Ww_webp_base.webp?v=2a3e07be\u0026t=67e847e026fb43aa8d6e3f5ef39a4ef7","mediumImageUrl":"//mojo.generalmills.com/api/public/content/T3hWgBUa9EaCcQOu0Cb8Ww_webp_base.webp?v=2a3e07be\u0026t=3653fe2f5ecd4a47a5a51c97e429947c"}],"availableItems":[{"contentId":"3d4d01f7-72cc-434a-ac13-f2f19c3379aa","contentType":"Recipe","title":"Cookie Stuffed Brownie Cupcakes","isFavorite":false,"linkUrl":"/recipes/cookie-stuffed-brownie-cupcakes/3d4d01f7-72cc-434a-ac13-f2f19c3379aa","numberOfRatings":"0","averageRating":"0","averageRatingStars":"0","smallImageUrl":"//mojo.generalmills.com/api/public/content/bUeMBFt-2Ey519eG0D5inQ_webp_base.webp?v=76a7e571\u0026t=67e847e026fb43aa8d6e3f5ef39a4ef7","mediumImageUrl":"//mojo.generalmills.com/api/public/content/bUeMBFt-2Ey519eG0D5inQ_webp_base.webp?v=76a7e571\u0026t=3653fe2f5ecd4a47a5a51c97e429947c"},{"contentId":"72d029d5-9043-455c-8737-ca6b4c44bf02","contentType":"Recipe","title":"Easy Frosted Reindeer Brownies","isFavorite":false,"linkUrl":"/recipes/easy-frosted-reindeer-brownies/72d029d5-9043-455c-8737-ca6b4c44bf02","numberOfRatings":"0","averageRating":"0","averageRatingStars":"0","smallImageUrl":"//mojo.generalmills.com/api/public/content/Nk4yiBhDZUSEcXafuRCf_g_webp_base.webp?v=2086013d\u0026t=67e847e026fb43aa8d6e3f5ef39a4ef7","mediumImageUrl":"//mojo.generalmills.com/api/public/content/Nk4yiBhDZUSEcXafuRCf_g_webp_base.webp?v=2086013d\u0026t=3653fe2f5ecd4a47a5a51c97e429947c"},{"contentId":"ab1ed032-d332-48a7-a4fd-7e6a66ae4654","contentType":"Recipe","title":"Easy Christmas Present Brownies","isFavorite":false,"linkUrl":"/recipes/easy-christmas-present-brownies/ab1ed032-d332-48a7-a4fd-7e6a66ae4654","numberOfRatings":"0","averageRating":"0","averageRatingStars":"0","smallImageUrl":"//mojo.generalmills.com/api/public/content/fTKDoiIocUif2hKHHtTAIg_webp_base.webp?v=0d54b835\u0026t=67e847e026fb43aa8d6e3f5ef39a4ef7","mediumImageUrl":"//mojo.generalmills.com/api/public/content/fTKDoiIocUif2hKHHtTAIg_webp_base.webp?v=0d54b835\u0026t=3653fe2f5ecd4a47a5a51c97e429947c"},{"contentId":"f6885970-ff07-4eec-bbd8-b0f4a64273a3","contentType":"Recipe","title":"Mini Peanut Butter Brownie Bites","isFavorite":false,"linkUrl":"/recipes/mini-peanut-butter-brownie-bites/f6885970-ff07-4eec-bbd8-b0f4a64273a3","numberOfRatings":"0","averageRating":"0","averageRatingStars":"0","smallImageUrl":"//mojo.generalmills.com/api/public/content/3n1BXU8I4EKl0GglRwYkLQ_webp_base.webp?v=9b4a9202\u0026t=67e847e026fb43aa8d6e3f5ef39a4ef7","mediumImageUrl":"//mojo.generalmills.com/api/public/content/3n1BXU8I4EKl0GglRwYkLQ_webp_base.webp?v=9b4a9202\u0026t=3653fe2f5ecd4a47a5a51c97e429947c"},{"contentId":"e2796763-5c52-4250-98ec-4eb838fa4c2e","contentType":"Recipe","title":"Fudgy Fireworks Brownies","isFavorite":false,"linkUrl":"/recipes/fudgy-fireworks-brownies/e2796763-5c52-4250-98ec-4eb838fa4c2e","numberOfRatings":"0","averageRating":"0","averageRatingStars":"0","smallImageUrl":"//mojo.generalmills.com/api/public/content/ulPLtTaxokSajhAkftJ00w_webp_base.webp?v=d02dd83b\u0026t=67e847e026fb43aa8d6e3f5ef39a4ef7","mediumImageUrl":"//mojo.generalmills.com/api/public/content/ulPLtTaxokSajhAkftJ00w_webp_base.webp?v=d02dd83b\u0026t=3653fe2f5ecd4a47a5a51c97e429947c"},{"contentId":"a7e7395d-7521-494e-8407-6c04128ecb9b","contentType":"Recipe","title":"Salted Caramel Pretzel Brownies","isFavorite":false,"linkUrl":"/recipes/salted-caramel-pretzel-brownies/a7e7395d-7521-494e-8407-6c04128ecb9b","numberOfRatings":"0","averageRating":"0","averageRatingStars":"0","smallImageUrl":"//mojo.generalmills.com/api/public/content/T3hWgBUa9EaCcQOu0Cb8Ww_webp_base.webp?v=2a3e07be\u0026t=67e847e026fb43aa8d6e3f5ef39a4ef7","mediumImageUrl":"//mojo.generalmills.com/api/public/content/T3hWgBUa9EaCcQOu0Cb8Ww_webp_base.webp?v=2a3e07be\u0026t=3653fe2f5ecd4a47a5a51c97e429947c"}]}};
var moduleName = 'relatedContent';
var isVueModule = true;
GeneralMills.PandoSites.RegisterControlInstance(moduleName, configuration, componentMetadata, isVueModule)
});
})();
© 2026 ®/TM General Mills All Rights Reserved
(function() {
document.addEventListener('DOMContentLoaded', function() {
var componentMetadata = JSON.parse('\x7b\x22componentName\x22\x3a\x22DoubleClick_34589d2e-66d8-4e9a-9c4f-fb0e3ab39458\x22,\x22deferOptions\x22\x3a\x7b\x22deferComponent\x22\x3atrue,\x22deferType\x22\x3a\x22OnDemand\x22,\x22deferId\x22\x3a\x22r9f9492f9b6c8455d8de839e693f75abf\x22,\x22deferredContainerId\x22\x3a\x22\x2fmain\x2frdpTernaryAd\x22,\x22deferredContainerView\x22\x3a\x22DoubleClick\x22\x7d,\x22viewName\x22\x3a\x22DoubleClick\x22\x7d');
var configuration = {"adId":"OMP/tablespoon/recipes/300x250_bottom2","minPageWidth":"1000","maxPageWidth":"9999","defaultMinPageWidth":"1000","defaultMaxPageWidth":"9999","size":"[[300,600],[300,250]]","refreshWhenViewed":false,"adContainerId":"3bb2483d-25b8-400a-bf60-0bdb903ba800","doubleClickAdContainerId":"05bdfc9c-ba3f-4f4a-9471-a8927d2fa990","adCaptionText":"Advertisement","networkCode":"/15704463/","relevantMetadata":[null,null,null],"privacyOptOut":false,"isThirdPartyProvider":true,"thirdPartyTag":"\u003cdiv align=\u0022center\u0022 data-freestar-ad=\u0022__300x600\u0022 id=\u0022accd64f2376034e83bbc80901ef2ef2f8\u0022 data-placement-name=\u0022tablespoon-com_right_rail_1\u0022\u003e\u003c/div\u003e","sovrnCssClass":"","responsive":true,"contentType":"Recipe","itemId":"64e3a977-0318-41d3-90ac-65697c7a56fe","continuesBelowText":"Recipe Continues Below"};
var moduleName = 'thirdPartyProvider';
var isVueModule = true;
GeneralMills.PandoSites.RegisterControlInstance(moduleName, configuration, componentMetadata, isVueModule)
});
})();