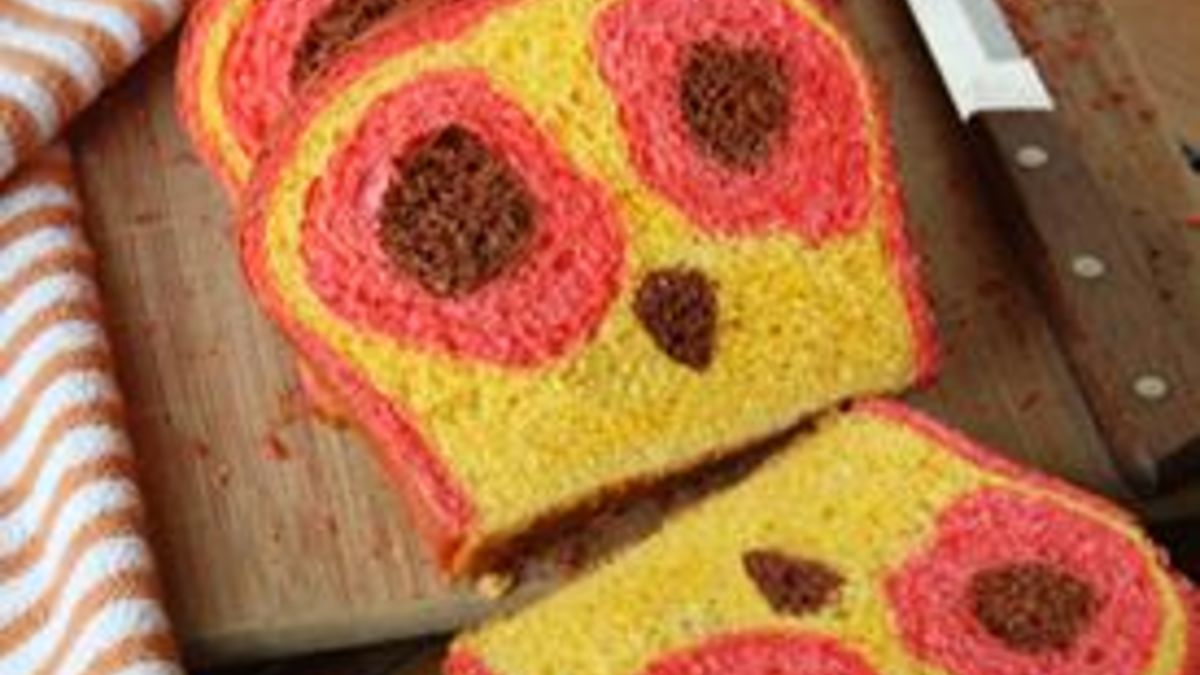
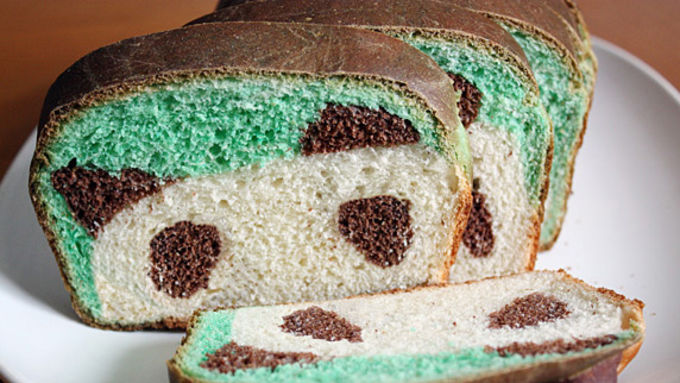
Owl Face Reveal Bread
Girl vs Dough
Updated Apr 18, 2017
A delicious sandwich loaf with a surprise owl face inside... what a HOOT!
More About This Recipe
- You may recall that it is now September. And by September, I mean fall. And by fall, I mean time for apple pies, chai lattes, football games, jumping in the leaves and baking things like this oh-so-adorable Owl Face Reveal Bread. Because what could be better on a cool fall day than baking a fresh loaf of sandwich bread with a surprise owl face inside, amiright? This bread is a throwback to yesteryear when we may or may not have put a panda’s face inside a sandwich loaf, rendering many an “ooh!” and “ahh!” and other coo-like baby noises (or maybe I’m the only one that does that to my bread, I don’t know). A basic white sandwich bread is great, sure, but where’s the fun in that? So roll up your sleeves, get your game face on and make this unique (and may I also say, delicious) recipe. Your friends and family will think it’s a HOOT! (bah dum bum.) First, prepare the dough. I went off the same recipe I used for the panda bread – with a few minor changes – which results in an enriched white bread with a nice crumb and soft crust. It also rises impeccably well and can take a lot of handling which, as you’ll find out, is pretty helpful. When the dough is fully kneaded, it should be smooth and elastic and feel almost like slightly more malleable Play-Doh. A bit tougher than normal bread dough should be, but perfect for a recipe like this that requires a lot of shaping. I used gel-based food coloring, but regular liquid food coloring works well, to dye one of the larger dough pieces red, the other yellow and the small piece brown. You can either knead in the coloring by hand, use a stand mixer to help you (cleaning out the bowl between colors, obvs) or as I did, both. It might take some elbow grease to get the coloring incorporated fully, but it’ll get there!
- Before I go any further, I will say this: Getting the measurements right on how much dough to use for each piece is a bit of an art form. I kind of eyeballed it as I went through. Luckily, this dough is pretty forgiving so if you mess up, you can always deconstruct what you’ve done and redo it with little damage. After it's baked, it will look like a normal bread, right? But when you slice into it… OWL FACE! Of course, practice makes perfect, and the more you try your hand at this loaf the better the reveal will be. Happy baking!
Owl Face Reveal Bread
- Prep Time 30 min
- Total 3 hr 30 min
- Servings 1
- Ingredients 7
Ingredients
- 1 cup milk plus 1 egg yolk (totaling 1 cup together)
- 3 cups Gold Medal™ unbleached all-purpose flour
- 2 1/2 tablespoons granulated sugar
- 2 1/4 teaspoons (1 packet) active dry yeast
- 1 1/2 tablespoons unsalted butter, softened
- 2 teaspoons salt
- Red, brown and yellow food coloring
Instructions
-
Step1In a small, microwave-safe bowl, whisk milk and egg yolk together and microwave 30 seconds. Set aside.
-
Step2In a large bowl or bowl of a stand mixer, whisk together flour, sugar and yeast.
-
Step3Add milk mixture, butter and salt and stir to combine. Using dough hook and stand mixer or by hand on a lightly floured surface, knead dough until it comes together and is smooth and elastic, about 5 minutes with stand mixer and 10 minutes by hand.
-
Step4Divide dough into three pieces: two of equal size, one about 1/4 the size of the other two pieces.
-
Step5Add red food coloring to one larger piece, yellow to the other larger piece and brown to the small piece. Knead in food coloring either by hand or in stand mixer (clean out bowl thoroughly between colors). Place dough pieces in three separate lightly greased bowls, cover with plastic wrap and let rise until doubled, about 1 1/2 to 2 hours.
![]()
-
Step6Punch down risen dough and turn out onto a lightly floured surface. Cut off a small piece of yellow dough and stretch it to form the base of the dough (it should be about 7 inches long, 2-3 inches wide). Roll out two more equal pieces of yellow dough into 7-inch logs to form the rest of the base. Place both logs parallel to each other on top of base, using a little bit of water on your fingers to help the dough adhere.
-
Step7Cut off a small piece of brown dough and roll it into a 7-inch log. Pinch one end to form the log into a long triangle and place it upside down between the two yellow logs, using water to adhere if necessary (the dough should almost look like a hot dog and bun at this point).*
![]()
-
Step8Cut off another small piece of yellow dough and roll it out to a thin rectangle that will completely cover top and sides of dough (but not the edges).
![]()
-
Step9Use three more small pieces of yellow dough to roll into 7-inch logs and place them parallel to each other and about 1 inch apart on top of the dough, using water to adhere if necessary.
![]()
-
Step10Cut off a little less than half the red dough and cut that piece in half. Roll out each piece to a thin rectangle, about 7 inches long and 4 inches wide. Divide remaining brown dough in half and roll each piece into a 7-inch log. Place one brown log in the center of each red rectangle, lengthwise. Roll up red dough around brown dough to form a log.
![]()
-
Step11Place each red log between small yellow logs on top of dough, using water to adhere if necessary.
![]()
-
Step12Use remaining piece of yellow dough to roll out into a thin rectangle that will completely cover top and sides of dough (but not the edges).
![]()
-
Step13Use remaining red dough to roll out into a thin rectangle that will completely cover entire dough, including edges, using water to adhere if necessary.
![]()
-
Step14Place entire dough in a lightly greased 9-by-5-inch loaf pan. Cover with lightly greased plastic wrap or a tea towel and let rise until doubled, about 1 to 1 1/2 hours.
![]()
-
Step15Meanwhile, preheat oven to 375°F. When dough is risen, uncover and bake 30 minutes or until golden brown and a thermometer inserted in the bottom center registers 190°F.
![]()
-
Step16Remove dough from oven and loaf pan and allow to cool completely on cooling rack before slicing to reveal your cute owl face.


Nutrition
No nutrition information available for this recipe
(function() {
document.addEventListener('DOMContentLoaded', function() {
var componentMetadata = JSON.parse('\x7b\x22componentName\x22\x3a\x22RelatedContent_86838426-dd26-481a-9735-69435bca607d\x22,\x22deferOptions\x22\x3a\x7b\x22deferComponent\x22\x3afalse,\x22deferType\x22\x3a\x22None\x22,\x22deferId\x22\x3a\x22r7996f28915d84f58bf7ee401d240d78b\x22,\x22deferredContainerId\x22\x3a\x22\x2fmain\x2frdpRelatedContent1_NonDeferred\x22,\x22deferredContainerView\x22\x3anull\x7d,\x22viewName\x22\x3a\x22RelatedContent\x22\x7d');
var configuration = {"dataSourceId":"86838426-dd26-481a-9735-69435bca607d","isCurrentUserAnonymous":true,"isAnonymousUserWithFavorites":false,"relatedContentList":{"contentId":"319e6f51-6bc5-447d-aeed-110930423f54","listSettings":{"pageSize":3,"startPage":1,"listType":1,"title":"Try These Next","useModalRegistration":false,"regAction":"","esrcCode":0,"favoriteButtonLabelFormat":"Add {0} to favorites","contentTypes":["Category"],"showImages":false,"imageSize":0,"showRatings":false,"allowFavoriting":false,"cssClassName":"relatedContentWithoutImages","favoriteButtonText":""},"items":[{"contentId":"f5d7ba6d-a251-4060-84b1-d4d41920dcdf","contentType":"Category","title":"Mexican Recipes, Dishes and Ideas from Tablespoon","isFavorite":false,"linkUrl":"/courses/dinner/world-cuisine/mexican","numberOfRatings":"0","averageRating":"0","averageRatingStars":"0","smallImageUrl":"https://rms-media-prod.generalmills.com/b3732bfd-f9d1-4ace-931e-8dcd7ffedc32.jpg","mediumImageUrl":"https://rms-media-prod.generalmills.com/34cb136a-d327-48df-ba07-867b90353b34.jpg"},{"contentId":"6fe76eb3-016c-488a-beb6-09fdbc42bf4b","contentType":"Category","title":"Holiday Drinks Recipes, Dishes and Ideas from Tablespoon","isFavorite":false,"linkUrl":"/courses/drinks/holiday-drinks","numberOfRatings":"0","averageRating":"0","averageRatingStars":"0","smallImageUrl":"","mediumImageUrl":""},{"contentId":"52a8596f-ab24-4b88-98d9-b6a40daa0b9e","contentType":"Category","title":"Apple Cider Recipes, Dishes and Ideas from Tablespoon","isFavorite":false,"linkUrl":"/courses/drinks/apple-cider","numberOfRatings":"0","averageRating":"0","averageRatingStars":"0","smallImageUrl":"","mediumImageUrl":""}],"availableItems":[{"contentId":"f5d7ba6d-a251-4060-84b1-d4d41920dcdf","contentType":"Category","title":"Mexican Recipes, Dishes and Ideas from Tablespoon","isFavorite":false,"linkUrl":"/courses/dinner/world-cuisine/mexican","numberOfRatings":"0","averageRating":"0","averageRatingStars":"0","smallImageUrl":"https://rms-media-prod.generalmills.com/b3732bfd-f9d1-4ace-931e-8dcd7ffedc32.jpg","mediumImageUrl":"https://rms-media-prod.generalmills.com/34cb136a-d327-48df-ba07-867b90353b34.jpg"},{"contentId":"6fe76eb3-016c-488a-beb6-09fdbc42bf4b","contentType":"Category","title":"Holiday Drinks Recipes, Dishes and Ideas from Tablespoon","isFavorite":false,"linkUrl":"/courses/drinks/holiday-drinks","numberOfRatings":"0","averageRating":"0","averageRatingStars":"0","smallImageUrl":"","mediumImageUrl":""},{"contentId":"52a8596f-ab24-4b88-98d9-b6a40daa0b9e","contentType":"Category","title":"Apple Cider Recipes, Dishes and Ideas from Tablespoon","isFavorite":false,"linkUrl":"/courses/drinks/apple-cider","numberOfRatings":"0","averageRating":"0","averageRatingStars":"0","smallImageUrl":"","mediumImageUrl":""}]}};
var moduleName = 'relatedContent';
var isVueModule = true;
GeneralMills.PandoSites.RegisterControlInstance(moduleName, configuration, componentMetadata, isVueModule)
});
})();
(function() {
document.addEventListener('DOMContentLoaded', function() {
var componentMetadata = JSON.parse('\x7b\x22componentName\x22\x3a\x22RelatedContent_9930dad2-817c-4363-b508-21f459b3c521\x22,\x22deferOptions\x22\x3a\x7b\x22deferComponent\x22\x3atrue,\x22deferType\x22\x3a\x22OnDemand\x22,\x22deferId\x22\x3a\x22r9f8443e216364c4487f9f011e43df29b\x22,\x22deferredContainerId\x22\x3a\x22\x2fmain\x2frdpRelatedContent1\x22,\x22deferredContainerView\x22\x3a\x22RecipeDetailRedesign\x22\x7d,\x22viewName\x22\x3a\x22RelatedContent\x22\x7d');
var configuration = {"dataSourceId":"9930dad2-817c-4363-b508-21f459b3c521","isCurrentUserAnonymous":true,"isAnonymousUserWithFavorites":false,"relatedContentList":{"contentId":"319e6f51-6bc5-447d-aeed-110930423f54","listSettings":{"pageSize":6,"startPage":1,"listType":1,"title":"","useModalRegistration":false,"regAction":"","esrcCode":0,"favoriteButtonLabelFormat":"Add {0} to favorites","contentTypes":[],"showImages":true,"imageSize":1,"showRatings":false,"allowFavoriting":true,"cssClassName":"","favoriteButtonText":"Save"},"items":[{"contentId":"c37ee173-0805-45fa-91b2-7090842fcea4","contentType":"Recipe","title":"Rainbow Swirl Bread","isFavorite":false,"linkUrl":"/recipes/rainbow-swirl-bread/c37ee173-0805-45fa-91b2-7090842fcea4","numberOfRatings":"0","averageRating":"0","averageRatingStars":"0","smallImageUrl":"//mojo.generalmills.com/api/public/content/4e6g9FvKfES3QhZS2YceUg_webp_base.webp?v=9f92e715\u0026t=67e847e026fb43aa8d6e3f5ef39a4ef7","mediumImageUrl":"//mojo.generalmills.com/api/public/content/4e6g9FvKfES3QhZS2YceUg_webp_base.webp?v=9f92e715\u0026t=3653fe2f5ecd4a47a5a51c97e429947c"},{"contentId":"b29e4b74-008e-4a4b-b9a3-946aa56922a5","contentType":"Recipe","title":"Cinnamon-Sugar Quick Bread","isFavorite":false,"linkUrl":"/recipes/cinnamon-sugar-quick-bread/b29e4b74-008e-4a4b-b9a3-946aa56922a5","numberOfRatings":"0","averageRating":"0","averageRatingStars":"0","smallImageUrl":"//mojo.generalmills.com/api/public/content/IpWB9qAhl0Ck51vQMNoo-g_webp_base.webp?v=79a653f0\u0026t=67e847e026fb43aa8d6e3f5ef39a4ef7","mediumImageUrl":"//mojo.generalmills.com/api/public/content/IpWB9qAhl0Ck51vQMNoo-g_webp_base.webp?v=79a653f0\u0026t=3653fe2f5ecd4a47a5a51c97e429947c"},{"contentId":"0e20609d-2438-4a1d-8eaf-09abef28d4b5","contentType":"Recipe","title":"Sunflower Seed Bread","isFavorite":false,"linkUrl":"/recipes/sunflower-seed-bread/0e20609d-2438-4a1d-8eaf-09abef28d4b5","numberOfRatings":"0","averageRating":"0","averageRatingStars":"0","smallImageUrl":"//mojo.generalmills.com/api/public/content/9OFkx_A-JEWsYhNkzdBr_g_webp_base.webp?v=a92014df\u0026t=67e847e026fb43aa8d6e3f5ef39a4ef7","mediumImageUrl":"//mojo.generalmills.com/api/public/content/9OFkx_A-JEWsYhNkzdBr_g_webp_base.webp?v=a92014df\u0026t=3653fe2f5ecd4a47a5a51c97e429947c"},{"contentId":"94fb2589-104c-4bb8-8b7f-260f6004cf7e","contentType":"Recipe","title":"Panda Bread","isFavorite":false,"linkUrl":"/recipes/panda-bread/94fb2589-104c-4bb8-8b7f-260f6004cf7e","numberOfRatings":"0","averageRating":"0","averageRatingStars":"0","smallImageUrl":"//mojo.generalmills.com/api/public/content/-Eogjf0HvESyw9BqWkaKtg_webp_base.webp?v=7e4d4385\u0026t=67e847e026fb43aa8d6e3f5ef39a4ef7","mediumImageUrl":"//rms-media-prod.generalmills.com/e7f43ec0-da6c-4901-8aa5-8d95c8053f7a.jpg"},{"contentId":"16e81246-0975-4100-8154-5104f24cc743","contentType":"Recipe","title":"Copycat Trader Joe’s™ Pancake Bread","isFavorite":false,"linkUrl":"/recipes/copycat-trader-joes-pancake-bread/16e81246-0975-4100-8154-5104f24cc743","numberOfRatings":"0","averageRating":"0","averageRatingStars":"0","smallImageUrl":"//mojo.generalmills.com/api/public/content/QbW8ZABYTEqhYJBxBJid3g_webp_base.webp?v=2db0c8c3\u0026t=67e847e026fb43aa8d6e3f5ef39a4ef7","mediumImageUrl":"//mojo.generalmills.com/api/public/content/QbW8ZABYTEqhYJBxBJid3g_webp_base.webp?v=2db0c8c3\u0026t=3653fe2f5ecd4a47a5a51c97e429947c"},{"contentId":"064ea253-e372-4139-9b84-10e29e2345a1","contentType":"Recipe","title":"Sundried Tomato Basil Bread","isFavorite":false,"linkUrl":"/recipes/sundried-tomato-basil-bread/064ea253-e372-4139-9b84-10e29e2345a1","numberOfRatings":"0","averageRating":"0","averageRatingStars":"0","smallImageUrl":"//mojo.generalmills.com/api/public/content/-TpBhbf-WUarlW8IIikY7g_webp_base.webp?v=38d58aae\u0026t=67e847e026fb43aa8d6e3f5ef39a4ef7","mediumImageUrl":"//mojo.generalmills.com/api/public/content/-TpBhbf-WUarlW8IIikY7g_webp_base.webp?v=38d58aae\u0026t=3653fe2f5ecd4a47a5a51c97e429947c"}],"availableItems":[{"contentId":"c37ee173-0805-45fa-91b2-7090842fcea4","contentType":"Recipe","title":"Rainbow Swirl Bread","isFavorite":false,"linkUrl":"/recipes/rainbow-swirl-bread/c37ee173-0805-45fa-91b2-7090842fcea4","numberOfRatings":"0","averageRating":"0","averageRatingStars":"0","smallImageUrl":"//mojo.generalmills.com/api/public/content/4e6g9FvKfES3QhZS2YceUg_webp_base.webp?v=9f92e715\u0026t=67e847e026fb43aa8d6e3f5ef39a4ef7","mediumImageUrl":"//mojo.generalmills.com/api/public/content/4e6g9FvKfES3QhZS2YceUg_webp_base.webp?v=9f92e715\u0026t=3653fe2f5ecd4a47a5a51c97e429947c"},{"contentId":"b29e4b74-008e-4a4b-b9a3-946aa56922a5","contentType":"Recipe","title":"Cinnamon-Sugar Quick Bread","isFavorite":false,"linkUrl":"/recipes/cinnamon-sugar-quick-bread/b29e4b74-008e-4a4b-b9a3-946aa56922a5","numberOfRatings":"0","averageRating":"0","averageRatingStars":"0","smallImageUrl":"//mojo.generalmills.com/api/public/content/IpWB9qAhl0Ck51vQMNoo-g_webp_base.webp?v=79a653f0\u0026t=67e847e026fb43aa8d6e3f5ef39a4ef7","mediumImageUrl":"//mojo.generalmills.com/api/public/content/IpWB9qAhl0Ck51vQMNoo-g_webp_base.webp?v=79a653f0\u0026t=3653fe2f5ecd4a47a5a51c97e429947c"},{"contentId":"0e20609d-2438-4a1d-8eaf-09abef28d4b5","contentType":"Recipe","title":"Sunflower Seed Bread","isFavorite":false,"linkUrl":"/recipes/sunflower-seed-bread/0e20609d-2438-4a1d-8eaf-09abef28d4b5","numberOfRatings":"0","averageRating":"0","averageRatingStars":"0","smallImageUrl":"//mojo.generalmills.com/api/public/content/9OFkx_A-JEWsYhNkzdBr_g_webp_base.webp?v=a92014df\u0026t=67e847e026fb43aa8d6e3f5ef39a4ef7","mediumImageUrl":"//mojo.generalmills.com/api/public/content/9OFkx_A-JEWsYhNkzdBr_g_webp_base.webp?v=a92014df\u0026t=3653fe2f5ecd4a47a5a51c97e429947c"},{"contentId":"94fb2589-104c-4bb8-8b7f-260f6004cf7e","contentType":"Recipe","title":"Panda Bread","isFavorite":false,"linkUrl":"/recipes/panda-bread/94fb2589-104c-4bb8-8b7f-260f6004cf7e","numberOfRatings":"0","averageRating":"0","averageRatingStars":"0","smallImageUrl":"//mojo.generalmills.com/api/public/content/-Eogjf0HvESyw9BqWkaKtg_webp_base.webp?v=7e4d4385\u0026t=67e847e026fb43aa8d6e3f5ef39a4ef7","mediumImageUrl":"//rms-media-prod.generalmills.com/e7f43ec0-da6c-4901-8aa5-8d95c8053f7a.jpg"},{"contentId":"16e81246-0975-4100-8154-5104f24cc743","contentType":"Recipe","title":"Copycat Trader Joe’s™ Pancake Bread","isFavorite":false,"linkUrl":"/recipes/copycat-trader-joes-pancake-bread/16e81246-0975-4100-8154-5104f24cc743","numberOfRatings":"0","averageRating":"0","averageRatingStars":"0","smallImageUrl":"//mojo.generalmills.com/api/public/content/QbW8ZABYTEqhYJBxBJid3g_webp_base.webp?v=2db0c8c3\u0026t=67e847e026fb43aa8d6e3f5ef39a4ef7","mediumImageUrl":"//mojo.generalmills.com/api/public/content/QbW8ZABYTEqhYJBxBJid3g_webp_base.webp?v=2db0c8c3\u0026t=3653fe2f5ecd4a47a5a51c97e429947c"},{"contentId":"064ea253-e372-4139-9b84-10e29e2345a1","contentType":"Recipe","title":"Sundried Tomato Basil Bread","isFavorite":false,"linkUrl":"/recipes/sundried-tomato-basil-bread/064ea253-e372-4139-9b84-10e29e2345a1","numberOfRatings":"0","averageRating":"0","averageRatingStars":"0","smallImageUrl":"//mojo.generalmills.com/api/public/content/-TpBhbf-WUarlW8IIikY7g_webp_base.webp?v=38d58aae\u0026t=67e847e026fb43aa8d6e3f5ef39a4ef7","mediumImageUrl":"//mojo.generalmills.com/api/public/content/-TpBhbf-WUarlW8IIikY7g_webp_base.webp?v=38d58aae\u0026t=3653fe2f5ecd4a47a5a51c97e429947c"}]}};
var moduleName = 'relatedContent';
var isVueModule = true;
GeneralMills.PandoSites.RegisterControlInstance(moduleName, configuration, componentMetadata, isVueModule)
});
})();
© 2026 ®/TM General Mills All Rights Reserved