(function() {
document.addEventListener('DOMContentLoaded', function() {
var componentMetadata = JSON.parse('\x7b\x22componentName\x22\x3a\x22ActionToolbar_54a65093-280d-4b2a-8a72-d13833164a15\x22,\x22deferOptions\x22\x3a\x7b\x22deferComponent\x22\x3afalse,\x22deferType\x22\x3a\x22None\x22,\x22deferId\x22\x3a\x22rb2bb859d3ffc4788bad7ac53cbfa36cc\x22,\x22deferredContainerId\x22\x3a\x22\x2fmain\x2frdpRecipeDetailToolbar\x22,\x22deferredContainerView\x22\x3anull\x7d,\x22viewName\x22\x3a\x22ActionToolbar\x22\x7d');
var configuration = {"contentId":"c4fb41dd-5996-47af-9fee-2860b51965a4","toolbarSettings":{"id":"54a65093-280d-4b2a-8a72-d13833164a15","registrationUrl":"/GMI/CoreSites/BC/Home/register/reg-fp","regAction":"FAVORITE","eSourceCode":11275,"namePassedToEvents":"RDPToolbar_LOWER","buttons":[{"addFavoriteErrorMessage":"Sorry, something went wrong. Please save again.","removeFavoriteErrorMessage":"Error occurred while removing from favorites","registrationUrl":"/GMI/CoreSites/BC/Home/register/reg-fp","regAction":"FAVORITE","eSourceCode":11275,"isCurrentUserAnonymous":false,"isFavoriteItem":false,"id":"718b4e01-b2be-40cf-8f0c-bca3b01db0ed","allowedForAnonymousUsers":false,"type":"Favorite","displayName":"Save","toggleDisplayName":"Saved","namePassedToEvents":"Favorite","cssClassName":"atButtonFavorite","privacyOptOutMessage":"\u003cdiv class=\u0027privacyMessage\u0027\u003e\n\u003ch3\u003eThis feature is not available with your current cookie settings.\u003c/h3\u003e\n\u003cp\u003eYou can \u003ca href=\u0027#\u0027 data-show-preference-center=\u00271\u0027\u003eupdate your privacy settings\u003c/a\u003e to enable this content. Please enable “Functional Cookies” to use this feature.\u003c/p\u003e\n\u003c/div\u003e","showPrivacyOptOutMessage":false},{"nestedButtons":[{"providerName":"pinterest","providerNamePassedToEvents":"Pinterest","shareUrlFormat":"//pinterest.com/pin/create/link/?url={0}","id":"585d4198-c691-4eae-bb63-66cc1927e44a","allowedForAnonymousUsers":true,"type":"Social","displayName":"Save To Pinterest","toggleDisplayName":"","namePassedToEvents":"Pinterest","cssClassName":"atButtonPinterest","privacyOptOutMessage":"\u003cdiv class=\u0027privacyMessage\u0027\u003e\n\u003ch3\u003eThis feature is not available with your current cookie settings.\u003c/h3\u003e\n\u003cp\u003eYou can \u003ca href=\u0027#\u0027 data-show-preference-center=\u00271\u0027\u003eupdate your privacy settings\u003c/a\u003e to enable this content. Please enable “Functional Cookies” to use this feature.\u003c/p\u003e\n\u003c/div\u003e","showPrivacyOptOutMessage":false},{"templateId":"95752b5c-7e75-4367-bca7-fdd3abb0ebcb","dialogHeading":"Email Recipe","emailCode":"TBSP_ContentEmail","dialogSettings":{"cancelButtonText":"Cancel","copyToSenderLabel":"Send a Copy to Myself","emailAddressesLabel":"* Email Address(es)","emailInstructionText":"Separate email addresses with commas","fromText":"From:","privacyPolicyText":"\u003cp\u003e\u0026copy;2026 General Mills, Inc. All Rights Reserved. This information will only be used to send an email to your friend(s) and will not be saved. Please read our \u003ca rel=\u0022noopener noreferrer\u0022 rel=\u0022noopener noreferrer\u0022 href=\u0022http://www.generalmills.com/company/privacy-policies/privacy-policy-us\u0022 target=\u0022_blank\u0022 shape=\u0022rect\u0022\u003ePrivacy Policy\u003c/a\u003e.\u003c/p\u003e","requiredFieldText":"* Required","sendButtonText":"Send","senderEmailAddressLabel":"* Your Email Address","senderFirstNameLabel":"* Your First Name","sendToText":"Send To:"},"id":"fad236f8-3084-4a50-bc7d-283bc5511677","allowedForAnonymousUsers":true,"type":"Email","displayName":"Share via Email","toggleDisplayName":"","namePassedToEvents":"Email","cssClassName":"atButtonEmail","privacyOptOutMessage":"\u003cdiv class=\u0027privacyMessage\u0027\u003e\n\u003ch3\u003eThis feature is not available with your current cookie settings.\u003c/h3\u003e\n\u003cp\u003eYou can \u003ca href=\u0027#\u0027 data-show-preference-center=\u00271\u0027\u003eupdate your privacy settings\u003c/a\u003e to enable this content. Please enable “Functional Cookies” to use this feature.\u003c/p\u003e\n\u003c/div\u003e","showPrivacyOptOutMessage":false},{"providerName":"facebook","providerNamePassedToEvents":"Facebook","shareUrlFormat":"//facebook.com/sharer/sharer.php?u={0}","id":"fc7a5260-abb4-42be-958a-d172ba87442b","allowedForAnonymousUsers":true,"type":"Social","displayName":"Share on Facebook","toggleDisplayName":"","namePassedToEvents":"Facebook","cssClassName":"atButtonFacebook","privacyOptOutMessage":"\u003cdiv class=\u0027privacyMessage\u0027\u003e\n\u003ch3\u003eThis feature is not available with your current cookie settings.\u003c/h3\u003e\n\u003cp\u003eYou can \u003ca href=\u0027#\u0027 data-show-preference-center=\u00271\u0027\u003eupdate your privacy settings\u003c/a\u003e to enable this content. Please enable “Functional Cookies” to use this feature.\u003c/p\u003e\n\u003c/div\u003e","showPrivacyOptOutMessage":false},{"successMessage":"Copied.","errorMessage":"Press Ctrl+C and Enter to copy to clipboard","successMessageDuration":3000,"errorMessageDuration":10000,"id":"263303a9-5fe6-480d-910a-608f153d379a","allowedForAnonymousUsers":true,"type":"CopyLink","displayName":"Copy Link","toggleDisplayName":"","namePassedToEvents":"Copy","cssClassName":"atButtonCopyLink","privacyOptOutMessage":"\u003cdiv class=\u0027privacyMessage\u0027\u003e\n\u003ch3\u003eThis feature is not available with your current cookie settings.\u003c/h3\u003e\n\u003cp\u003eYou can \u003ca href=\u0027#\u0027 data-show-preference-center=\u00271\u0027\u003eupdate your privacy settings\u003c/a\u003e to enable this content. Please enable “Functional Cookies” to use this feature.\u003c/p\u003e\n\u003c/div\u003e","showPrivacyOptOutMessage":false}],"id":"46a2d62f-b80c-49bf-969f-5d28640dc94a","allowedForAnonymousUsers":true,"type":"Reveal","displayName":"Share","toggleDisplayName":"","namePassedToEvents":"Share","cssClassName":"atButtonReveal","privacyOptOutMessage":"\u003cdiv class=\u0027privacyMessage\u0027\u003e\n\u003ch3\u003eThis feature is not available with your current cookie settings.\u003c/h3\u003e\n\u003cp\u003eYou can \u003ca href=\u0027#\u0027 data-show-preference-center=\u00271\u0027\u003eupdate your privacy settings\u003c/a\u003e to enable this content. Please enable “Functional Cookies” to use this feature.\u003c/p\u003e\n\u003c/div\u003e","showPrivacyOptOutMessage":false},{"layoutParameter":"p%3d1","id":"ab4bf4fc-919a-4252-81ca-c39edb8eadf0","allowedForAnonymousUsers":true,"type":"Print","displayName":"Print","toggleDisplayName":"","namePassedToEvents":"Print","cssClassName":"atButtonPrint","privacyOptOutMessage":"\u003cdiv class=\u0027privacyMessage\u0027\u003e\n\u003ch3\u003eThis feature is not available with your current cookie settings.\u003c/h3\u003e\n\u003cp\u003eYou can \u003ca href=\u0027#\u0027 data-show-preference-center=\u00271\u0027\u003eupdate your privacy settings\u003c/a\u003e to enable this content. Please enable “Functional Cookies” to use this feature.\u003c/p\u003e\n\u003c/div\u003e","showPrivacyOptOutMessage":false},{"errorMessage":"","id":"0a1bab6c-f930-4359-b8b4-a72470a4d8ee","allowedForAnonymousUsers":true,"type":"WakeLock","displayName":"Keep Screen On","toggleDisplayName":"","namePassedToEvents":"Wakelock","cssClassName":"","privacyOptOutMessage":"\u003cdiv class=\u0027privacyMessage\u0027\u003e\n\u003ch3\u003eThis feature is not available with your current cookie settings.\u003c/h3\u003e\n\u003cp\u003eYou can \u003ca href=\u0027#\u0027 data-show-preference-center=\u00271\u0027\u003eupdate your privacy settings\u003c/a\u003e to enable this content. Please enable “Functional Cookies” to use this feature.\u003c/p\u003e\n\u003c/div\u003e","showPrivacyOptOutMessage":false}],"isSticky":true},"userSettings":{"isCurrentUserAnonymous":true,"isFavoriteItem":false,"isAnonymousUserWithFavorites":false},"pageAttributes":{"url":"https%3a%2f%2fwww.tablespoon.com%2frecipes%2fhomemade-marshmallow-chicks%2fc4fb41dd-5996-47af-9fee-2860b51965a4","contentId":"c4fb41dd-5996-47af-9fee-2860b51965a4"},"recaptchaPublicKey":"6LfW_icUAAAAAL_CG700pddUxLNYIxgRJe3vOg2Z"};
var moduleName = 'actionToolbar';
var isVueModule = true;
GeneralMills.PandoSites.RegisterControlInstance(moduleName, configuration, componentMetadata, isVueModule)
});
})();
Ingredients
-
2
cups yellow sugar*
-
Butter to grease tin foil
-
1
cup water, divided
-
3
packages powdered gelatin
-
1 1/2
cups white granulated sugar
-
1
cup light corn syrup
-
Pinch of salt
-
1
teaspoon vanilla
-
96
candy eyes
-
48
golden orange diamond shaped sprinkles
-
Betty Crocker™ Cookie Icing white icing
(function() {
document.addEventListener('DOMContentLoaded', function() {
var componentMetadata = JSON.parse('\x7b\x22componentName\x22\x3a\x22RecipeIngredients_a2352866-1a21-4a5d-9dd4-1744f7700fb5\x22,\x22deferOptions\x22\x3a\x7b\x22deferComponent\x22\x3afalse,\x22deferType\x22\x3a\x22None\x22,\x22deferId\x22\x3a\x22re46e8d38daa049ad99fbdcdd2ff03fb4\x22,\x22deferredContainerId\x22\x3a\x22\x2fmain\x2frdpIngredients\x22,\x22deferredContainerView\x22\x3anull\x7d,\x22viewName\x22\x3a\x22RecipeIngredients\x22\x7d');
var configuration = {};
var moduleName = 'recipeIngredients';
var isVueModule = false;
GeneralMills.PandoSites.RegisterControlInstance(moduleName, configuration, componentMetadata, isVueModule)
});
})();
(function() {
document.addEventListener('DOMContentLoaded', function() {
var componentMetadata = JSON.parse('\x7b\x22componentName\x22\x3a\x22DoubleClick_745c15b5-a9ad-4519-81b8-8ce6135efb93\x22,\x22deferOptions\x22\x3a\x7b\x22deferComponent\x22\x3atrue,\x22deferType\x22\x3a\x22OnDemand\x22,\x22deferId\x22\x3a\x22r0e0bb6ae253a48d995da255aacdbadd3\x22,\x22deferredContainerId\x22\x3a\x22\x2fmain\x2frdpSecondaryAd\x22,\x22deferredContainerView\x22\x3a\x22DoubleClick\x22\x7d,\x22viewName\x22\x3a\x22DoubleClick\x22\x7d');
var configuration = {"adId":"OMP/tablespoon/recipes/300x250_bottom","minPageWidth":"1000","maxPageWidth":"9999","defaultMinPageWidth":"1000","defaultMaxPageWidth":"9999","size":"[[300,600],[300,250]]","refreshWhenViewed":false,"adContainerId":"4fc030f2-1bf0-4eee-b88a-5d9b558c32f4","doubleClickAdContainerId":"92317316-fbf9-4ee5-9e2d-9d791f5901cf","adCaptionText":"Advertisement","networkCode":"/15704463/","relevantMetadata":[null,null],"privacyOptOut":false,"isThirdPartyProvider":true,"thirdPartyTag":"\u003cdiv align=\u0022center\u0022 data-freestar-ad=\u0022__300x600\u0022 id=\u0022ade57e77b25914db288b8da6191a0d975\u0022 data-placement-name=\u0022tablespoon-com_right_rail_1\u0022\u003e\u003c/div\u003e","sovrnCssClass":"","responsive":true,"contentType":"Recipe","itemId":"c4fb41dd-5996-47af-9fee-2860b51965a4","continuesBelowText":"Recipe Continues Below"};
var moduleName = 'thirdPartyProvider';
var isVueModule = true;
GeneralMills.PandoSites.RegisterControlInstance(moduleName, configuration, componentMetadata, isVueModule)
});
})();
-
Line a 10-inch by 15-inch baking pan with non-stick or regular tin foil. Butter tin foil well. Sprinkle on half of the yellow sugar, covering the bottom and sides.
-
Pour 1/2 cup of the water into the bowl of a stand mixer. Stir in gelatin. Let bloom (gelatin will soak into the water and soften).
-
Pour remaining water, sugar, corn syrup, and pinch of salt into a saucepan. Turn heat on medium, put lid on pot, and heat for four minutes. Remove lid, attach candy thermometer to pan, boil without stirring until syrup reaches 240°F.
-
Turn mixer on low speed. Very carefully drizzle boiling syrup into the mixer bowl. (Caution: This syrup can burn if it comes in contact with skin.)
-
Once syrup is mixed into the gelatin, increase mixer speed to medium for a minute or two. Then increase speed to high and mix until bright white, light and fluffy, and fairly cool. This will take between 10-15 minutes.
-
Add vanilla and mix until combined.
-
Pour marshmallow into sugar coated baking pan. Spread evenly.
-
Sprinkle yellow sugar over top of marshmallow.
-
Allow to cool for at least an hour.
-
Butter the inside and outside of a 1 1/2-inch by 2 1/2-inch metal egg-shaped cookie cutter. Cut out 48 marshmallow eggs. Roll edges of cut eggs in more yellow sugar.
-
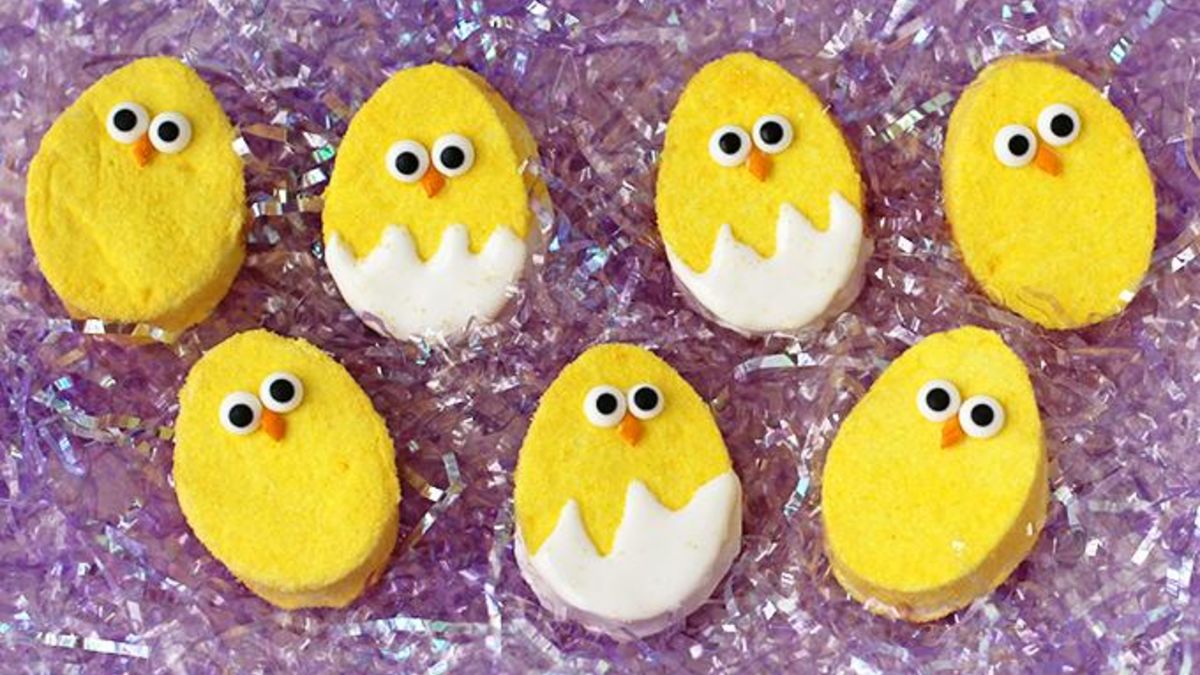
To each egg, attach 2 candy eyes and one golden orange diamond shaped sprinkle (beak) using cookie icing.
-
If desired, you may use cookie icing to make the chicks look like they are popping out of a cracked egg shell.
-
Store in an airtight container for up to a few weeks.
(function() {
document.addEventListener('DOMContentLoaded', function() {
var componentMetadata = JSON.parse('\x7b\x22componentName\x22\x3a\x22RecipeSteps_a2352866-1a21-4a5d-9dd4-1744f7700fb5\x22,\x22deferOptions\x22\x3a\x7b\x22deferComponent\x22\x3atrue,\x22deferType\x22\x3a\x22OnDemand\x22,\x22deferId\x22\x3a\x22rb4ccee0353784267901cec102d6c6361\x22,\x22deferredContainerId\x22\x3a\x22\x2fmain\x2frdpSteps\x22,\x22deferredContainerView\x22\x3a\x22RecipeDetailRedesign\x22\x7d,\x22viewName\x22\x3a\x22RecipeSteps\x22\x7d');
var configuration = {"initAreImagesHidden":false,"hideImagesEventName":"HideStepShots","showImagesEventName":"ShowStepShots","hideImagesButtonText":"Hide Images","showImagesButtonText":"Show Images","hideImagesClass":"rdpHideStepImages"};
var moduleName = 'recipeStepShots';
var isVueModule = true;
GeneralMills.PandoSites.RegisterControlInstance(moduleName, configuration, componentMetadata, isVueModule)
});
})();
No nutrition information available for this recipe
(function() {
document.addEventListener('DOMContentLoaded', function() {
var componentMetadata = JSON.parse('\x7b\x22componentName\x22\x3a\x22RecipeNutritionNonPrintRedesign_a2352866-1a21-4a5d-9dd4-1744f7700fb5\x22,\x22deferOptions\x22\x3a\x7b\x22deferComponent\x22\x3atrue,\x22deferType\x22\x3a\x22Simple\x22,\x22deferId\x22\x3a\x22r49f923a666394d2199219ec0991052c0\x22,\x22deferredContainerId\x22\x3a\x22\x2fmain\x2frdpNutrition\x22,\x22deferredContainerView\x22\x3a\x22RecipeDetailRedesign\x22\x7d,\x22viewName\x22\x3a\x22RecipeNutritionNonPrintRedesign\x22\x7d');
var configuration = {"initIsExpanded":false,"expandEventName":"NutritionExpand","collapseEventName":"NutritionCollapse"};
var moduleName = 'recipeNutrition';
var isVueModule = true;
GeneralMills.PandoSites.RegisterControlInstance(moduleName, configuration, componentMetadata, isVueModule)
});
})();
Expert Tips
{{tipItemHeadingFormat.replace('{0}',props.index + 1)}}
(function() {
document.addEventListener('DOMContentLoaded', function() {
var componentMetadata = JSON.parse('\x7b\x22componentName\x22\x3a\x22RecipeTipsCarousel_a2352866-1a21-4a5d-9dd4-1744f7700fb5\x22,\x22deferOptions\x22\x3a\x7b\x22deferComponent\x22\x3atrue,\x22deferType\x22\x3a\x22Simple\x22,\x22deferId\x22\x3a\x22r09970a4315ef421b9f9b7fd221fa6ff0\x22,\x22deferredContainerId\x22\x3a\x22\x2fmain\x2frdpTips\x22,\x22deferredContainerView\x22\x3a\x22RecipeDetailRedesign\x22\x7d,\x22viewName\x22\x3a\x22RecipeTipsCarousel\x22\x7d');
var configuration = {"title":"Homemade Marshmallow Chicks","introduction":"Adorable Easter marshmallow chicks that can be made at home.","servingSize":"1 Serving","image":{"small":{"media":"(min-width: 0px)","src":"https://rms-media-prod.generalmills.com/ad54d029-21ac-44da-9457-d5c053d5d3f2.jpg"},"medium":{"media":"(min-width: 500px)","src":"https://rms-media-prod.generalmills.com/acf7d0c2-4645-489b-b27e-9ebf1c85679e.jpg"},"large":{"media":"(min-width: 767px)","src":"https://rms-media-prod.generalmills.com/acf7d0c2-4645-489b-b27e-9ebf1c85679e.jpg"},"alt":"Homemade Marshmallow Chicks"},"contributor":{"label":"by:","name":"Hungry Happenings","profileUrl":"/contributors/hungry-happenings","displayDate":{"label":"Updated","date":"Oct 28, 2014"}},"ingredientGroups":[{"ingredients":[{"quantity":"2","description":"cups yellow sugar*"},{"quantity":"","description":"Butter to grease tin foil"},{"quantity":"1","description":"cup water, divided"},{"quantity":"3","description":"packages powdered gelatin"},{"quantity":"1 1/2","description":"cups white granulated sugar"},{"quantity":"1","description":"cup light corn syrup"},{"quantity":"","description":"Pinch of salt"},{"quantity":"1","description":"teaspoon vanilla"},{"quantity":"96","description":"candy eyes"},{"quantity":"48","description":"golden orange diamond shaped sprinkles"},{"quantity":"","description":"Betty Crocker™ Cookie Icing white icing"}]}],"steps":[{"description":"Line a 10-inch by 15-inch baking pan with non-stick or regular tin foil. Butter tin foil well. Sprinkle on half of the yellow sugar, covering the bottom and sides."},{"description":"Pour 1/2 cup of the water into the bowl of a stand mixer. Stir in gelatin. Let bloom (gelatin will soak into the water and soften)."},{"description":"Pour remaining water, sugar, corn syrup, and pinch of salt into a saucepan. Turn heat on medium, put lid on pot, and heat for four minutes. Remove lid, attach candy thermometer to pan, boil without stirring until syrup reaches 240°F."},{"description":"Turn mixer on low speed. Very carefully drizzle boiling syrup into the mixer bowl. (Caution: This syrup can burn if it comes in contact with skin.)"},{"description":"Once syrup is mixed into the gelatin, increase mixer speed to medium for a minute or two. Then increase speed to high and mix until bright white, light and fluffy, and fairly cool. This will take between 10-15 minutes."},{"description":"Add vanilla and mix until combined."},{"description":"Pour marshmallow into sugar coated baking pan. Spread evenly."},{"description":"Sprinkle yellow sugar over top of marshmallow."},{"description":"Allow to cool for at least an hour."},{"description":"Butter the inside and outside of a 1 1/2-inch by 2 1/2-inch metal egg-shaped cookie cutter. Cut out 48 marshmallow eggs. Roll edges of cut eggs in more yellow sugar."},{"description":"To each egg, attach 2 candy eyes and one golden orange diamond shaped sprinkle (beak) using cookie icing."},{"description":"If desired, you may use cookie icing to make the chicks look like they are popping out of a cracked egg shell."},{"description":"Store in an airtight container for up to a few weeks."}],"tips":[{"title":"","description":"*If you can\u0027t find yellow colored sugar, you can make your own. Pour 2 cups white sugar in a zip-top bag, add a few squirts of yellow food coloring, and shake until sugar turns yellow.","category":"Substitution","tipShots":[]},{"title":"","description":"Delicious and easy to make, marshmallow chicks you can make at home are a fun and creative way to make an Easter basket extra special. \u003cbr /\u003e\u003cbr /\u003eMy Easter basket was always filled with jellybeans, a chocolate bunny, and marshmallow chicks. As an adult I still can\u0027t make it through the season without buying a package of sugar coated marshmallows. Recently I discovered that I could easily make my own marshmallows at home and decorate them in festive ways for any holiday. Homemade marshmallows have a wonderfully light and fluffy texture that melts in your mouth and a lovely vanilla flavor. If you prefer, you can even use flavored oils and extracts to make lemon, banana, orange, cherry or even cola-flavored marshmallows.\u003cbr /\u003e\u003cbr /\u003eIn order to make the perfect homemade marshmallows you must have a few specific kitchen tools. A candy thermometer is essential, as you need to monitor the temperature of boiling sugar syrup and pull it off the stove at just the right time. The other piece of equipment is a stand mixer. I\u0027ve burned out motors in hand held mixers making marshmallows, so unless yours is exceptionally powerful, I recommend a stand mixer with a nice big bowl.\u003cbr /\u003e\u003cbr /\u003eIf you have those two things, then making marshmallows is really quite easy, and decorating them for Easter is so much fun!\u003cbr /\u003e\u003cbr /\u003eTo start, you want to line a 10-inch by 15-inch baking sheet with non-stick or regular tin foil. Butter the foil well and sprinkle it liberally with yellow decorating sugar. If you can\u0027t find yellow sugar, you can make your own. Just pour white granulated sugar in a large zip-top bag, add a few squirts of yellow food coloring, and shake until the sugar turns yellow.\u003cbr /\u003e\u003cbr /\u003eTo make the marshmallows you need to bloom some gelatin. That simply means sprinkling it over some cold water and letting it soften for about 5 minutes. I usually just bloom my gelatin in the bowl of my stand mixer.\u003cbr /\u003e\u003cbr /\u003eNext up, boil the sugar syrup. Start by giving your sugar, corn syrup, water and salt a little gentle stir, then put the lid on the pot, bring it to a boil, remove the lid and just wait until it reaches 240ºF. You don\u0027t have to sit over a hot pot and stir. It\u0027s great!\u003cbr /\u003e\u003cbr /\u003eOnce the syrup has reached that temperature, carefully pour it into the bloomed gelatin. Turn your mixer on low, and slowly drizzle the syrup into the bowl. I usually wear oven mitts just in case any of that boiling sugar syrup spatters out of the mixer.\u003cbr /\u003e\u003cbr /\u003eNow all you have to do is turn the mixer up to medium for a minute or two then up to high and walk away for a while. About 10-15 minutes later your marshmallow will be bright white and light and fluffy. You can add some flavoring now. The recipe calls for vanilla, but you can get creative and use any extract or flavored oil you\u0027d like. If you use flavored oils, add about a 1/4 of a teaspoon, and then taste it. Add more if needed. The marshmallow is ready when it has cooled to barely warm.\u003cbr /\u003e\u003cbr /\u003ePour the marshmallow onto the sugar coated baking pan. I find it very helpful to butter both sides of a rubber spatula or a plastic bench scraper to do this job.\u003cbr /\u003e\u003cbr /\u003eSpread it out as well as you can. I actually put on a pair of food handling gloves, buttered them well, and then used my hands to flatten the marshmallow in the pan.\u003cbr /\u003e\u003cbr /\u003eSprinkle lots of yellow sugar over the top of the marshmallow and walk away.\u003cbr /\u003e\u003cbr /\u003eAbout an hour later your marshmallows will be ready to cut using a buttered metal egg cutter. The sides of the marshmallow eggs will be sticky, so roll them in some yellow sugar.\u003cbr /\u003e\u003cbr /\u003eIf you\u0027re using a 1 1/2-inch by 2 1/2-inch cutter like I did, you\u0027ll get 48 marshmallows out of a batch, plus lots of scraps to snack on. \u003cbr /\u003e\u003cbr /\u003eNow comes the fun part; you get to decorate those yellow eggs to look like adorable chicks! If you want to keep things simple, attach two candy eyes and one golden orange diamond shaped sprinkle to each egg using Betty Crocker Cookie Icing. For a more detailed look, pipe on a cracked egg using more icing.\u003cbr /\u003e\u003cbr /\u003eIf you want, you can put the marshmallow chicks on lollipop sticks, just make sure you do it while the icing is still wet, or better yet, before you ice them. If you wait and try to add the stick once the icing has hardened you\u0027ll get cracked eggs.\u003cbr /\u003e\u003cbr /\u003eI piled my Marshmallow Chick Pops up on a plate and sold them at a bake sale. They were a huge hit.\u003cbr /\u003e\u003cbr /\u003eAnd they’ll be a huge hit with your friends and family when they discover adorable, delicious marshmallow chicks in their Easter baskets!","category":"Editorial","tipShots":[]}],"kitchenTips":[{"title":"","description":"*If you can\u0027t find yellow colored sugar, you can make your own. Pour 2 cups white sugar in a zip-top bag, add a few squirts of yellow food coloring, and shake until sugar turns yellow.","category":"Substitution","tipShots":[]}],"additionalContent":[],"faq":[],"tipCategories":[{"categoryName":"Editorial","heading":"More About This Recipe","cssClass":"recipePartStory","expandOnInit":false,"expandText":"More +","collapseText":"Less -","expandEventName":"","collapseEventName":"","image":"","tips":[{"title":"","description":"Delicious and easy to make, marshmallow chicks you can make at home are a fun and creative way to make an Easter basket extra special. \u003cbr /\u003e\u003cbr /\u003eMy Easter basket was always filled with jellybeans, a chocolate bunny, and marshmallow chicks. As an adult I still can\u0027t make it through the season without buying a package of sugar coated marshmallows. Recently I discovered that I could easily make my own marshmallows at home and decorate them in festive ways for any holiday. Homemade marshmallows have a wonderfully light and fluffy texture that melts in your mouth and a lovely vanilla flavor. If you prefer, you can even use flavored oils and extracts to make lemon, banana, orange, cherry or even cola-flavored marshmallows.\u003cbr /\u003e\u003cbr /\u003eIn order to make the perfect homemade marshmallows you must have a few specific kitchen tools. A candy thermometer is essential, as you need to monitor the temperature of boiling sugar syrup and pull it off the stove at just the right time. The other piece of equipment is a stand mixer. I\u0027ve burned out motors in hand held mixers making marshmallows, so unless yours is exceptionally powerful, I recommend a stand mixer with a nice big bowl.\u003cbr /\u003e\u003cbr /\u003eIf you have those two things, then making marshmallows is really quite easy, and decorating them for Easter is so much fun!\u003cbr /\u003e\u003cbr /\u003eTo start, you want to line a 10-inch by 15-inch baking sheet with non-stick or regular tin foil. Butter the foil well and sprinkle it liberally with yellow decorating sugar. If you can\u0027t find yellow sugar, you can make your own. Just pour white granulated sugar in a large zip-top bag, add a few squirts of yellow food coloring, and shake until the sugar turns yellow.\u003cbr /\u003e\u003cbr /\u003eTo make the marshmallows you need to bloom some gelatin. That simply means sprinkling it over some cold water and letting it soften for about 5 minutes. I usually just bloom my gelatin in the bowl of my stand mixer.\u003cbr /\u003e\u003cbr /\u003eNext up, boil the sugar syrup. Start by giving your sugar, corn syrup, water and salt a little gentle stir, then put the lid on the pot, bring it to a boil, remove the lid and just wait until it reaches 240ºF. You don\u0027t have to sit over a hot pot and stir. It\u0027s great!\u003cbr /\u003e\u003cbr /\u003eOnce the syrup has reached that temperature, carefully pour it into the bloomed gelatin. Turn your mixer on low, and slowly drizzle the syrup into the bowl. I usually wear oven mitts just in case any of that boiling sugar syrup spatters out of the mixer.\u003cbr /\u003e\u003cbr /\u003eNow all you have to do is turn the mixer up to medium for a minute or two then up to high and walk away for a while. About 10-15 minutes later your marshmallow will be bright white and light and fluffy. You can add some flavoring now. The recipe calls for vanilla, but you can get creative and use any extract or flavored oil you\u0027d like. If you use flavored oils, add about a 1/4 of a teaspoon, and then taste it. Add more if needed. The marshmallow is ready when it has cooled to barely warm.\u003cbr /\u003e\u003cbr /\u003ePour the marshmallow onto the sugar coated baking pan. I find it very helpful to butter both sides of a rubber spatula or a plastic bench scraper to do this job.\u003cbr /\u003e\u003cbr /\u003eSpread it out as well as you can. I actually put on a pair of food handling gloves, buttered them well, and then used my hands to flatten the marshmallow in the pan.\u003cbr /\u003e\u003cbr /\u003eSprinkle lots of yellow sugar over the top of the marshmallow and walk away.\u003cbr /\u003e\u003cbr /\u003eAbout an hour later your marshmallows will be ready to cut using a buttered metal egg cutter. The sides of the marshmallow eggs will be sticky, so roll them in some yellow sugar.\u003cbr /\u003e\u003cbr /\u003eIf you\u0027re using a 1 1/2-inch by 2 1/2-inch cutter like I did, you\u0027ll get 48 marshmallows out of a batch, plus lots of scraps to snack on. \u003cbr /\u003e\u003cbr /\u003eNow comes the fun part; you get to decorate those yellow eggs to look like adorable chicks! If you want to keep things simple, attach two candy eyes and one golden orange diamond shaped sprinkle to each egg using Betty Crocker Cookie Icing. For a more detailed look, pipe on a cracked egg using more icing.\u003cbr /\u003e\u003cbr /\u003eIf you want, you can put the marshmallow chicks on lollipop sticks, just make sure you do it while the icing is still wet, or better yet, before you ice them. If you wait and try to add the stick once the icing has hardened you\u0027ll get cracked eggs.\u003cbr /\u003e\u003cbr /\u003eI piled my Marshmallow Chick Pops up on a plate and sold them at a bake sale. They were a huge hit.\u003cbr /\u003e\u003cbr /\u003eAnd they’ll be a huge hit with your friends and family when they discover adorable, delicious marshmallow chicks in their Easter baskets!","category":"Editorial","tipShots":[]}],"isExpandable":false}],"nutritionInfo":{"configuration":{"showAsTable":false,"noNutritionInformationAvailableMessage":"No nutrition information available for this recipe","poweredByText":"\u003cp\u003eNutrition information for this recipe is estimated using a leading nutrition calculation application, but is an estimate only. Actual nutrition values will vary based on the exact ingredients or brands you may use.\u003c/p\u003e\n\u003ca href=\u0022http://developer.edamam.com\u0022\u003ePowered By \u003cimg src=\u0022-/media/ABEEFB1BF16C40AEB5775A3BE02315EA.ashx\u0022 alt=\u0022Edamam\u0022 /\u003e\u003c/a\u003e","nutritionChartTitle":"Nutrition Facts","nutritionInformationLabel":"Nutrition","servingSizeText":"Serving Size:","dailyValuesDisclaimer":"*Percent Daily Values are based on a 2,000 calorie diet.","percentDailyValueText":"% Daily Value","percentDailyValueFooterTitleText":"% Daily Value*:","exchangeInformationTitleText":"Exchanges:","nutritionFactsExpandText":"More Nutrition","nutritionFactsCollapseText":"Less Nutrition"},"servingSize":"1 Serving","exchangeInfo":"Free","showPoweredBy":false,"showRecipeTotalTime":true,"showRecipePrepTime":true,"showCarbohydrateChoices":false},"trademarks":[],"labels":{"ingredientsHeader":"Ingredients","stepsHeader":"Instructions","stepsImageHideText":"Hide Images","stepsImageShowText":"Show Images","stepNumberText":"Step","faqHeader":"Frequently Asked Questions","tipsHeader":"Expert Tips","tipItemHeadingFormat":"tip {0}","postedBy":"by:","copyright":"© {yyyy} ®/TM General Mills All Rights Reserved","showDrawerText":"Show","hideDrawerText":"Hide","expandDescriptionText":"More +","collapseDescriptionText":"Less -","includeScrollIndicator":false},"primaryAttributes":[{"label":"Prep Time","values":[{"text":"45","label":"min"}]},{"label":"Total","values":[{"text":"2","label":"hr"},{"text":"0","label":"min"}]},{"label":"Servings","values":[{"text":"48"}]},{"label":"Ingredients","values":[{"text":"11"}]}],"secondaryAttributes":[],"badges":[],"backgroundImageUrl":"","breadcrumbs":{"links":[{"url":"/","label":"Home"},{"url":"/recipes","label":"Recipes"}],"currentPageName":"Homemade Marshmallow Chicks"}};
var moduleName = 'recipeTipsCarousel';
var isVueModule = true;
GeneralMills.PandoSites.RegisterControlInstance(moduleName, configuration, componentMetadata, isVueModule)
});
})();
(function() {
document.addEventListener('DOMContentLoaded', function() {
var componentMetadata = JSON.parse('\x7b\x22componentName\x22\x3a\x22DoubleClick_80e5634b-4b8b-4ab6-9d42-f87399323043\x22,\x22deferOptions\x22\x3a\x7b\x22deferComponent\x22\x3atrue,\x22deferType\x22\x3a\x22OnDemand\x22,\x22deferId\x22\x3a\x22r223f36f567e74a96b8069eb1eabaf126\x22,\x22deferredContainerId\x22\x3a\x22\x2fmain\x2frdpSecondaryAdMobile\x22,\x22deferredContainerView\x22\x3a\x22DoubleClick\x22\x7d,\x22viewName\x22\x3a\x22DoubleClick\x22\x7d');
var configuration = {"adId":"OMP/m_tablespoon/recipes/300x250_bottom","minPageWidth":"299","maxPageWidth":"767","defaultMinPageWidth":"1000","defaultMaxPageWidth":"9999","size":"[[300,250], [300,600]]","refreshWhenViewed":false,"adContainerId":"00b1f901-e02e-4de0-9acc-de890dcccdfc","doubleClickAdContainerId":"5a3e89a0-6271-46a9-aeeb-4e9ded086e80","adCaptionText":"Advertisement","networkCode":"/15704463/","relevantMetadata":[null,null],"privacyOptOut":false,"isThirdPartyProvider":true,"thirdPartyTag":"\u003cdiv align=\u0022center\u0022 data-freestar-ad=\u0022__300x250 __336x280\u0022 id=\u0022a4d9c0af1d3404b159a9bc5d66f923a8c\u0022 data-placement-name=\u0022tablespoon-com_content_standard\u0022\u003e\u003c/div\u003e","sovrnCssClass":"","responsive":true,"contentType":"Recipe","itemId":"c4fb41dd-5996-47af-9fee-2860b51965a4","continuesBelowText":"Recipe Continues Below"};
var moduleName = 'thirdPartyProvider';
var isVueModule = true;
GeneralMills.PandoSites.RegisterControlInstance(moduleName, configuration, componentMetadata, isVueModule)
});
})();
(function() {
document.addEventListener('DOMContentLoaded', function() {
var componentMetadata = JSON.parse('\x7b\x22componentName\x22\x3a\x22RelatedContent_86838426-dd26-481a-9735-69435bca607d\x22,\x22deferOptions\x22\x3a\x7b\x22deferComponent\x22\x3afalse,\x22deferType\x22\x3a\x22None\x22,\x22deferId\x22\x3a\x22rc2685380fac04c07a42cee0a667d78ce\x22,\x22deferredContainerId\x22\x3a\x22\x2fmain\x2frdpRelatedContent1_NonDeferred\x22,\x22deferredContainerView\x22\x3anull\x7d,\x22viewName\x22\x3a\x22RelatedContent\x22\x7d');
var configuration = {"dataSourceId":"86838426-dd26-481a-9735-69435bca607d","isCurrentUserAnonymous":true,"isAnonymousUserWithFavorites":false,"relatedContentList":{"contentId":"c4fb41dd-5996-47af-9fee-2860b51965a4","listSettings":{"pageSize":3,"startPage":1,"listType":1,"title":"Try These Next","useModalRegistration":false,"regAction":"","esrcCode":0,"favoriteButtonLabelFormat":"Add {0} to favorites","contentTypes":["Category"],"showImages":false,"imageSize":0,"showRatings":false,"allowFavoriting":false,"cssClassName":"relatedContentWithoutImages","favoriteButtonText":""},"items":[{"contentId":"4d25d929-1c4c-4d15-84d9-9038db12f240","contentType":"Category","title":"Easter","isFavorite":false,"linkUrl":"/parties-and-holidays/holiday/easter","numberOfRatings":"0","averageRating":"0","averageRatingStars":"0","smallImageUrl":"","mediumImageUrl":""},{"contentId":"6fe76eb3-016c-488a-beb6-09fdbc42bf4b","contentType":"Category","title":"Holiday Drinks Recipes, Dishes and Ideas from Tablespoon","isFavorite":false,"linkUrl":"/courses/drinks/holiday-drinks","numberOfRatings":"0","averageRating":"0","averageRatingStars":"0","smallImageUrl":"","mediumImageUrl":""},{"contentId":"3d34b38d-f93f-4a7a-b2d0-9ad44d1bc698","contentType":"Category","title":"Trifle","isFavorite":false,"linkUrl":"/courses/dessert/trifle","numberOfRatings":"0","averageRating":"0","averageRatingStars":"0","smallImageUrl":"","mediumImageUrl":""}],"availableItems":[{"contentId":"4d25d929-1c4c-4d15-84d9-9038db12f240","contentType":"Category","title":"Easter","isFavorite":false,"linkUrl":"/parties-and-holidays/holiday/easter","numberOfRatings":"0","averageRating":"0","averageRatingStars":"0","smallImageUrl":"","mediumImageUrl":""},{"contentId":"6fe76eb3-016c-488a-beb6-09fdbc42bf4b","contentType":"Category","title":"Holiday Drinks Recipes, Dishes and Ideas from Tablespoon","isFavorite":false,"linkUrl":"/courses/drinks/holiday-drinks","numberOfRatings":"0","averageRating":"0","averageRatingStars":"0","smallImageUrl":"","mediumImageUrl":""},{"contentId":"3d34b38d-f93f-4a7a-b2d0-9ad44d1bc698","contentType":"Category","title":"Trifle","isFavorite":false,"linkUrl":"/courses/dessert/trifle","numberOfRatings":"0","averageRating":"0","averageRatingStars":"0","smallImageUrl":"","mediumImageUrl":""}]}};
var moduleName = 'relatedContent';
var isVueModule = true;
GeneralMills.PandoSites.RegisterControlInstance(moduleName, configuration, componentMetadata, isVueModule)
});
})();
(function() {
document.addEventListener('DOMContentLoaded', function() {
var componentMetadata = JSON.parse('\x7b\x22componentName\x22\x3a\x22RelatedContent_9930dad2-817c-4363-b508-21f459b3c521\x22,\x22deferOptions\x22\x3a\x7b\x22deferComponent\x22\x3atrue,\x22deferType\x22\x3a\x22OnDemand\x22,\x22deferId\x22\x3a\x22r6333c2a3ce9b4287965f02fec45533a0\x22,\x22deferredContainerId\x22\x3a\x22\x2fmain\x2frdpRelatedContent1\x22,\x22deferredContainerView\x22\x3a\x22RecipeDetailRedesign\x22\x7d,\x22viewName\x22\x3a\x22RelatedContent\x22\x7d');
var configuration = {"dataSourceId":"9930dad2-817c-4363-b508-21f459b3c521","isCurrentUserAnonymous":true,"isAnonymousUserWithFavorites":false,"relatedContentList":{"contentId":"c4fb41dd-5996-47af-9fee-2860b51965a4","listSettings":{"pageSize":6,"startPage":1,"listType":1,"title":"","useModalRegistration":false,"regAction":"","esrcCode":0,"favoriteButtonLabelFormat":"Add {0} to favorites","contentTypes":[],"showImages":true,"imageSize":1,"showRatings":false,"allowFavoriting":true,"cssClassName":"","favoriteButtonText":"Save"},"items":[{"contentId":"89ea73be-9256-418d-a6bf-bc1b419ca172","contentType":"Recipe","title":"Homemade Snickerdoodle Marshmallows","isFavorite":false,"linkUrl":"/recipes/homemade-snickerdoodle-marshmallows/89ea73be-9256-418d-a6bf-bc1b419ca172","numberOfRatings":"0","averageRating":"0","averageRatingStars":"0","smallImageUrl":"//mojo.generalmills.com/api/public/content/nUt1698tbkSYxlJfJY8sdg_webp_base.webp?v=72607326\u0026t=67e847e026fb43aa8d6e3f5ef39a4ef7","mediumImageUrl":"//mojo.generalmills.com/api/public/content/nUt1698tbkSYxlJfJY8sdg_webp_base.webp?v=72607326\u0026t=3653fe2f5ecd4a47a5a51c97e429947c"},{"contentId":"d2e1dfc1-9156-4127-b839-6a4776939019","contentType":"Recipe","title":"Minty Mallow Bonbons","isFavorite":false,"linkUrl":"/recipes/minty-mallow-bonbons/d2e1dfc1-9156-4127-b839-6a4776939019","numberOfRatings":"0","averageRating":"0","averageRatingStars":"0","smallImageUrl":"//mojo.generalmills.com/api/public/content/WYqTtQ3U9EqWflkYIc9boQ_webp_base.webp?v=e8ef196f\u0026t=67e847e026fb43aa8d6e3f5ef39a4ef7","mediumImageUrl":"//mojo.generalmills.com/api/public/content/WYqTtQ3U9EqWflkYIc9boQ_webp_base.webp?v=e8ef196f\u0026t=3653fe2f5ecd4a47a5a51c97e429947c"},{"contentId":"67b117d6-edd6-4ebe-baa2-f7bbe9eb8d90","contentType":"Recipe","title":"4th of July Marshmallow Pops","isFavorite":false,"linkUrl":"/recipes/4th-of-july-marshmallow-pops/67b117d6-edd6-4ebe-baa2-f7bbe9eb8d90","numberOfRatings":"0","averageRating":"0","averageRatingStars":"0","smallImageUrl":"//mojo.generalmills.com/api/public/content/XsNp1fCaVku1aXzZeZCgDw_webp_base.webp?v=9265abf8\u0026t=67e847e026fb43aa8d6e3f5ef39a4ef7","mediumImageUrl":"//mojo.generalmills.com/api/public/content/XsNp1fCaVku1aXzZeZCgDw_webp_base.webp?v=9265abf8\u0026t=3653fe2f5ecd4a47a5a51c97e429947c"},{"contentId":"3409efcd-0a06-4fe8-bd6d-cbe11b7c0349","contentType":"Recipe","title":"Christmas S’mores","isFavorite":false,"linkUrl":"/recipes/christmas-smores/3409efcd-0a06-4fe8-bd6d-cbe11b7c0349","numberOfRatings":"0","averageRating":"0","averageRatingStars":"0","smallImageUrl":"//mojo.generalmills.com/api/public/content/pMpnz3XNUEucGleF9x8r7g_webp_base.webp?v=041ca407\u0026t=67e847e026fb43aa8d6e3f5ef39a4ef7","mediumImageUrl":"//mojo.generalmills.com/api/public/content/pMpnz3XNUEucGleF9x8r7g_webp_base.webp?v=041ca407\u0026t=3653fe2f5ecd4a47a5a51c97e429947c"},{"contentId":"4101d987-b91d-478d-8200-a9cccedd6d7c","contentType":"Recipe","title":"Homemade Gumdrops","isFavorite":false,"linkUrl":"/recipes/homemade-gumdrops/4101d987-b91d-478d-8200-a9cccedd6d7c","numberOfRatings":"0","averageRating":"0","averageRatingStars":"0","smallImageUrl":"//mojo.generalmills.com/api/public/content/12h_1E7drUe80hlAtt7vFw_webp_base.webp?v=33318a0d\u0026t=67e847e026fb43aa8d6e3f5ef39a4ef7","mediumImageUrl":"//mojo.generalmills.com/api/public/content/12h_1E7drUe80hlAtt7vFw_webp_base.webp?v=33318a0d\u0026t=3653fe2f5ecd4a47a5a51c97e429947c"},{"contentId":"c2bdcb93-1ac3-472a-b116-6a855320452c","contentType":"Recipe","title":"Holiday Snowflake Candies","isFavorite":false,"linkUrl":"/recipes/holiday-snowflake-candies/c2bdcb93-1ac3-472a-b116-6a855320452c","numberOfRatings":"0","averageRating":"0","averageRatingStars":"0","smallImageUrl":"//mojo.generalmills.com/api/public/content/TA2C_g67j0-5J_z2Dbb_-g_webp_base.webp?v=f05bb7ea\u0026t=67e847e026fb43aa8d6e3f5ef39a4ef7","mediumImageUrl":"//mojo.generalmills.com/api/public/content/TA2C_g67j0-5J_z2Dbb_-g_webp_base.webp?v=f05bb7ea\u0026t=3653fe2f5ecd4a47a5a51c97e429947c"}],"availableItems":[{"contentId":"89ea73be-9256-418d-a6bf-bc1b419ca172","contentType":"Recipe","title":"Homemade Snickerdoodle Marshmallows","isFavorite":false,"linkUrl":"/recipes/homemade-snickerdoodle-marshmallows/89ea73be-9256-418d-a6bf-bc1b419ca172","numberOfRatings":"0","averageRating":"0","averageRatingStars":"0","smallImageUrl":"//mojo.generalmills.com/api/public/content/nUt1698tbkSYxlJfJY8sdg_webp_base.webp?v=72607326\u0026t=67e847e026fb43aa8d6e3f5ef39a4ef7","mediumImageUrl":"//mojo.generalmills.com/api/public/content/nUt1698tbkSYxlJfJY8sdg_webp_base.webp?v=72607326\u0026t=3653fe2f5ecd4a47a5a51c97e429947c"},{"contentId":"d2e1dfc1-9156-4127-b839-6a4776939019","contentType":"Recipe","title":"Minty Mallow Bonbons","isFavorite":false,"linkUrl":"/recipes/minty-mallow-bonbons/d2e1dfc1-9156-4127-b839-6a4776939019","numberOfRatings":"0","averageRating":"0","averageRatingStars":"0","smallImageUrl":"//mojo.generalmills.com/api/public/content/WYqTtQ3U9EqWflkYIc9boQ_webp_base.webp?v=e8ef196f\u0026t=67e847e026fb43aa8d6e3f5ef39a4ef7","mediumImageUrl":"//mojo.generalmills.com/api/public/content/WYqTtQ3U9EqWflkYIc9boQ_webp_base.webp?v=e8ef196f\u0026t=3653fe2f5ecd4a47a5a51c97e429947c"},{"contentId":"67b117d6-edd6-4ebe-baa2-f7bbe9eb8d90","contentType":"Recipe","title":"4th of July Marshmallow Pops","isFavorite":false,"linkUrl":"/recipes/4th-of-july-marshmallow-pops/67b117d6-edd6-4ebe-baa2-f7bbe9eb8d90","numberOfRatings":"0","averageRating":"0","averageRatingStars":"0","smallImageUrl":"//mojo.generalmills.com/api/public/content/XsNp1fCaVku1aXzZeZCgDw_webp_base.webp?v=9265abf8\u0026t=67e847e026fb43aa8d6e3f5ef39a4ef7","mediumImageUrl":"//mojo.generalmills.com/api/public/content/XsNp1fCaVku1aXzZeZCgDw_webp_base.webp?v=9265abf8\u0026t=3653fe2f5ecd4a47a5a51c97e429947c"},{"contentId":"3409efcd-0a06-4fe8-bd6d-cbe11b7c0349","contentType":"Recipe","title":"Christmas S’mores","isFavorite":false,"linkUrl":"/recipes/christmas-smores/3409efcd-0a06-4fe8-bd6d-cbe11b7c0349","numberOfRatings":"0","averageRating":"0","averageRatingStars":"0","smallImageUrl":"//mojo.generalmills.com/api/public/content/pMpnz3XNUEucGleF9x8r7g_webp_base.webp?v=041ca407\u0026t=67e847e026fb43aa8d6e3f5ef39a4ef7","mediumImageUrl":"//mojo.generalmills.com/api/public/content/pMpnz3XNUEucGleF9x8r7g_webp_base.webp?v=041ca407\u0026t=3653fe2f5ecd4a47a5a51c97e429947c"},{"contentId":"4101d987-b91d-478d-8200-a9cccedd6d7c","contentType":"Recipe","title":"Homemade Gumdrops","isFavorite":false,"linkUrl":"/recipes/homemade-gumdrops/4101d987-b91d-478d-8200-a9cccedd6d7c","numberOfRatings":"0","averageRating":"0","averageRatingStars":"0","smallImageUrl":"//mojo.generalmills.com/api/public/content/12h_1E7drUe80hlAtt7vFw_webp_base.webp?v=33318a0d\u0026t=67e847e026fb43aa8d6e3f5ef39a4ef7","mediumImageUrl":"//mojo.generalmills.com/api/public/content/12h_1E7drUe80hlAtt7vFw_webp_base.webp?v=33318a0d\u0026t=3653fe2f5ecd4a47a5a51c97e429947c"},{"contentId":"c2bdcb93-1ac3-472a-b116-6a855320452c","contentType":"Recipe","title":"Holiday Snowflake Candies","isFavorite":false,"linkUrl":"/recipes/holiday-snowflake-candies/c2bdcb93-1ac3-472a-b116-6a855320452c","numberOfRatings":"0","averageRating":"0","averageRatingStars":"0","smallImageUrl":"//mojo.generalmills.com/api/public/content/TA2C_g67j0-5J_z2Dbb_-g_webp_base.webp?v=f05bb7ea\u0026t=67e847e026fb43aa8d6e3f5ef39a4ef7","mediumImageUrl":"//mojo.generalmills.com/api/public/content/TA2C_g67j0-5J_z2Dbb_-g_webp_base.webp?v=f05bb7ea\u0026t=3653fe2f5ecd4a47a5a51c97e429947c"}]}};
var moduleName = 'relatedContent';
var isVueModule = true;
GeneralMills.PandoSites.RegisterControlInstance(moduleName, configuration, componentMetadata, isVueModule)
});
})();
© 2026 ®/TM General Mills All Rights Reserved
(function() {
document.addEventListener('DOMContentLoaded', function() {
var componentMetadata = JSON.parse('\x7b\x22componentName\x22\x3a\x22DoubleClick_34589d2e-66d8-4e9a-9c4f-fb0e3ab39458\x22,\x22deferOptions\x22\x3a\x7b\x22deferComponent\x22\x3atrue,\x22deferType\x22\x3a\x22OnDemand\x22,\x22deferId\x22\x3a\x22r2078e5bdb3ed4c7d95448494cca94656\x22,\x22deferredContainerId\x22\x3a\x22\x2fmain\x2frdpTernaryAd\x22,\x22deferredContainerView\x22\x3a\x22DoubleClick\x22\x7d,\x22viewName\x22\x3a\x22DoubleClick\x22\x7d');
var configuration = {"adId":"OMP/tablespoon/recipes/300x250_bottom2","minPageWidth":"1000","maxPageWidth":"9999","defaultMinPageWidth":"1000","defaultMaxPageWidth":"9999","size":"[[300,600],[300,250]]","refreshWhenViewed":false,"adContainerId":"9dc1658c-5c94-471d-8eaa-1d1159160570","doubleClickAdContainerId":"ee7fc1a0-d762-42ab-abdf-e9946dcba1bf","adCaptionText":"Advertisement","networkCode":"/15704463/","relevantMetadata":[null,null],"privacyOptOut":false,"isThirdPartyProvider":true,"thirdPartyTag":"\u003cdiv align=\u0022center\u0022 data-freestar-ad=\u0022__300x600\u0022 id=\u0022a5bc7e2a5ae6a494aa156af1738652d7b\u0022 data-placement-name=\u0022tablespoon-com_right_rail_1\u0022\u003e\u003c/div\u003e","sovrnCssClass":"","responsive":true,"contentType":"Recipe","itemId":"c4fb41dd-5996-47af-9fee-2860b51965a4","continuesBelowText":"Recipe Continues Below"};
var moduleName = 'thirdPartyProvider';
var isVueModule = true;
GeneralMills.PandoSites.RegisterControlInstance(moduleName, configuration, componentMetadata, isVueModule)
});
})();
