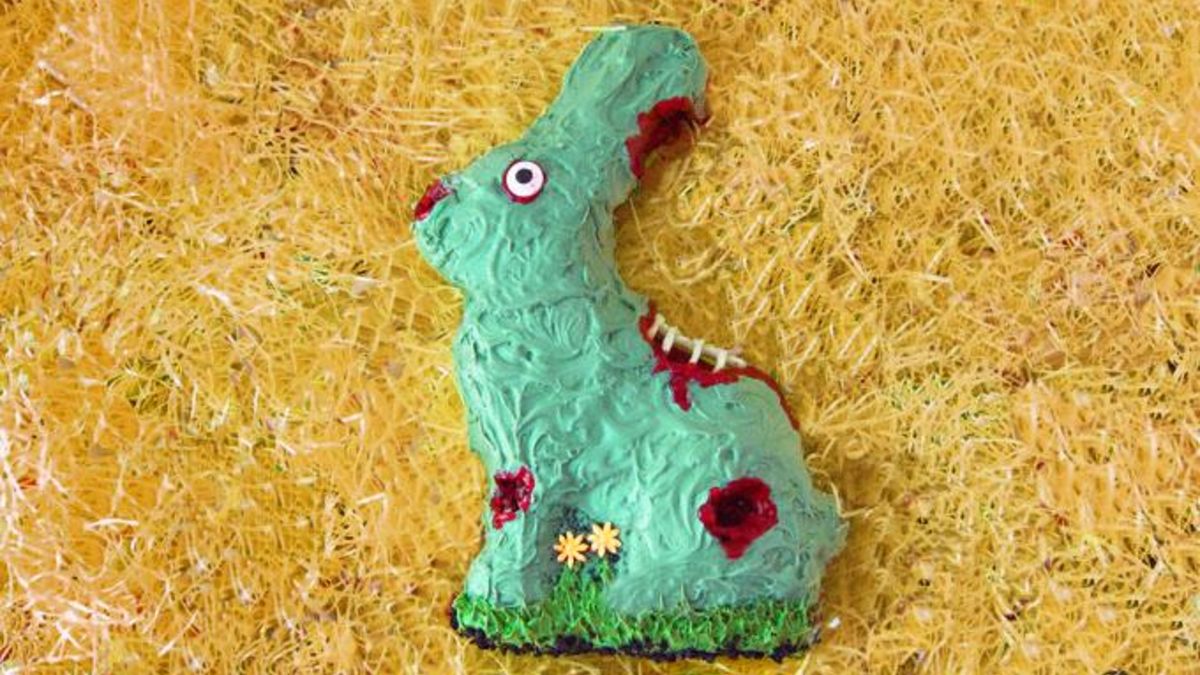
Zombify an Easter Bunny Cake for your zombie lovin' friends and family.
More About This Recipe
-
GRAAAAGH! Turn those chocolate Easter bunnies into a ZOMBUNNY!
Zombies have invaded Easter! Not only have they shuffled and moaned their way into pop culture through movies, television shows, novels, and comic books, they're on store shelves alongside jelly beans and marshmallow chicks. So for all of our 'Hopping Dead' fans, this special cake is just for you!
Last Easter when I saw that ThinkGeek was selling a chocolate Easter Bunny that had been zombified, I wasn't shocked. I wasn't even surprised that they sold out in a matter of hours. I personally know many people who would totally get a kick out of biting into a zombunny.
So, if you are one of those people that are fascinated by the undead, you'll love making and serving this cake, whether at Easter (or even Halloween).
This is the first cake I've ever carved and I really enjoyed the process, but I also realize it's not for everyone. The great thing about this cake is that it would look pretty good in the shape of a chocolate rabbit – so carve, or don't carve. It's up to you. Just have fun!
Start by baking a Betty Crocker Red Velvet Cake in a 9x13-inch pan.
Pop the baked cake in the freezer for two hours or so. This will make cutting and carving so much easier.
While the bunny is chillin', draw a chocolate rabbit or find a coloring page online and print it large enough to fit the cake. I blew up the image of a coloring page so it printed on two pages, then cut out around it. I wanted my bunny to be as large as possible, so I made the ears as a separate piece. While you're at it, cut a large cake board (a piece of cardboard that is coated with wax) into the same bunny shape.
Lay the bunny pattern on the frozen cake and cut around it.
If you're daring, carve the details out of the cake. Start by rounding off the edges.
Continue carving to get all the detail of the bunny. Use the scraps of cake to build up the thigh area. Just pinch off scrap pieces and press them onto the cake.
Carefully set the bunny cake on the bunny-shaped cardboard. Now you want to elevate the bunny. Set a few jars or bowls under it and put the whole thing on a parchment or wax paper-lined baking sheet.
Color a tub of Betty Crocker Hershey's Cookies and Cream frosting a zombie color. I made mine a bluish green using drops of Betty Crocker Gel Colors. I added a lot of green, a smaller amount of blue, and a few drops of red. Just mix until you get a color you like.
Heat the frosting in the microwave until melted. It took about 30 seconds in my microwave. I stirred it after 20 seconds, and then heated it again.
Pour the melted frosting over the cake. This is why the cake needs to be elevated – so the frosting can drip off the cake. You'll probably need to scoop up some of the frosting to fill in the holes.
Use your fingers or a spoon to swirl the frosting to look like fur. Let the frosting dry for about 10 minutes.
Now the fun part – Turn your bunny into a zombie! Scoop out a bite hole in the ear and a few more in the body, including one in the spine.
Pipe some Betty Crocker Red Gel for blood around the holes. Attach a candy eye using more red gel.
Add some rib bones coming out of the back of the bunny. I made my bones out of white modeling chocolate. I just rolled some into long thin logs, and created a spine and a few rib bones from them. In order to get the rib bones to stick to the spine, I created indentations for the rib bones to sit inside.
I brushed the indentation with some water and gently pressed the rib bones onto the spine. Then I picked up the entire thing and set it on the back of the bunny. I was able to get a realistic curve to the entire thing by simply pressing the ends of the bone into the frosting around the hole I had created. If you use fondant instead of modeling chocolate, you may have to wait until the bones dry a bit before adding it to the cake, as fondant is softer and will just bend out of shape.
If you've carved the cake and have room for grass, scoop up the icing that dripped off the cake, color it a more vibrant green and spread it on the cake under the rabbit's feet. Use a knife or spatula to create the look of grass in the frosting. Add the cookie crumbs from the tub of Cookies and Cream Frosting for some dirt, and make a few flowers out of modeling chocolate or fondant.
You can get as gross and gory as you want, or just do a few simple things to zombify your bunny cake.
I won’t be bringing this to Easter dinner as my family would be too grossed out, but I will give it to a friend who is a huge zombie fan. I'm sure you wouldn't have read this far unless you plan to make it, so go and have some fun!
Happy Easter!
Zombie Easter Bunny Cake
- Prep Time 2 hr 30 min
- Total 5 hr 0 min
- Servings 12
- Ingredients 7
Ingredients
- 1 box Betty Crocker™ Delights Super Moist™ Red Velvet Cake Mix
- Eggs, oil, and water to make cake mix
- 1 tub (16 oz) Betty Crocker™ Rich & Creamy Vanilla Frosting
- 1 box Betty Crocker™ gel food color (green, blue, and red)
- 1 tube Betty Crocker™ red decorating gel
- 1 jumbo candy eye
- White modeling chocolate or fondant
Instructions
-
Step1Cut a traditional-shaped chocolate bunny template out of paper and the same out of a cake board (coated cardboard.)
-
Step2Line a 9x13-inch pan with non-stick aluminum foil. Bake cake according to package instructions.
-
Step3Freeze cake for 2 hours.
-
Step4Remove cake from pan. Set paper template over cake and cut out around it.
-
Step5If desired, carve the cake showing the details of the bunny, adding cake scraps to build up the thickness of the thigh area.
-
Step6Set carved bunny cake on the cardboard bunny cut-out. Elevate the cake over a parchment paper or wax paper-lined baking sheet by setting it on top of some jars or bowls.
-
Step7Color Cookies 'n Cream Frosting using Betty Crocker™ green, blue and red gel colors, making a greenish blue zombie color.
-
Step8Heat frosting in microwave until melted and smooth, about 30 seconds.
-
Step9Pour frosting over cake, filling in areas as needed to completely cover the cake.
-
Step10Swirl the frosting to look like rabbit fur. Let frosting dry for 10 minutes.
-
Step11Scoop holes out of the cake to look like bites have been taken out of the bunny.
-
Step12Pipe red decorating gel around the edges of the holes for the blood.
-
Step13Attach a candy eye using red decorating gel.
-
Step14Shape spine and rib bones out of white modeling chocolate or fondant. Attach to spine of bunny.
-
Step15If desired, scoop up any remaining icing, color it a more vibrant green, and spread it on the cake under the rabbit's feet. Use a knife or spatula to make it look like grass. Add some modeling chocolate flowers.
Nutrition
No nutrition information available for this recipe
(function() {
document.addEventListener('DOMContentLoaded', function() {
var componentMetadata = JSON.parse('\x7b\x22componentName\x22\x3a\x22RelatedContent_86838426-dd26-481a-9735-69435bca607d\x22,\x22deferOptions\x22\x3a\x7b\x22deferComponent\x22\x3afalse,\x22deferType\x22\x3a\x22None\x22,\x22deferId\x22\x3a\x22r29a2e7061de2475cb485b0538c36628d\x22,\x22deferredContainerId\x22\x3a\x22\x2fmain\x2frdpRelatedContent1_NonDeferred\x22,\x22deferredContainerView\x22\x3anull\x7d,\x22viewName\x22\x3a\x22RelatedContent\x22\x7d');
var configuration = {"dataSourceId":"86838426-dd26-481a-9735-69435bca607d","isCurrentUserAnonymous":true,"isAnonymousUserWithFavorites":false,"relatedContentList":{"contentId":"e2f48633-d9e8-4717-bc29-cfec029513ab","listSettings":{"pageSize":3,"startPage":1,"listType":1,"title":"Try These Next","useModalRegistration":false,"regAction":"","esrcCode":0,"favoriteButtonLabelFormat":"Add {0} to favorites","contentTypes":["Category"],"showImages":false,"imageSize":0,"showRatings":false,"allowFavoriting":false,"cssClassName":"relatedContentWithoutImages","favoriteButtonText":""},"items":[{"contentId":"4d25d929-1c4c-4d15-84d9-9038db12f240","contentType":"Category","title":"Easter","isFavorite":false,"linkUrl":"/parties-and-holidays/holiday/easter","numberOfRatings":"0","averageRating":"0","averageRatingStars":"0","smallImageUrl":"","mediumImageUrl":""},{"contentId":"4c5432b8-09b3-4431-934e-1515b3d2f852","contentType":"Category","title":"Halloween","isFavorite":false,"linkUrl":"/parties-and-holidays/holiday/halloween","numberOfRatings":"0","averageRating":"0","averageRatingStars":"0","smallImageUrl":"","mediumImageUrl":""},{"contentId":"6fe76eb3-016c-488a-beb6-09fdbc42bf4b","contentType":"Category","title":"Holiday Drinks Recipes, Dishes and Ideas from Tablespoon","isFavorite":false,"linkUrl":"/courses/drinks/holiday-drinks","numberOfRatings":"0","averageRating":"0","averageRatingStars":"0","smallImageUrl":"","mediumImageUrl":""}],"availableItems":[{"contentId":"4d25d929-1c4c-4d15-84d9-9038db12f240","contentType":"Category","title":"Easter","isFavorite":false,"linkUrl":"/parties-and-holidays/holiday/easter","numberOfRatings":"0","averageRating":"0","averageRatingStars":"0","smallImageUrl":"","mediumImageUrl":""},{"contentId":"4c5432b8-09b3-4431-934e-1515b3d2f852","contentType":"Category","title":"Halloween","isFavorite":false,"linkUrl":"/parties-and-holidays/holiday/halloween","numberOfRatings":"0","averageRating":"0","averageRatingStars":"0","smallImageUrl":"","mediumImageUrl":""},{"contentId":"6fe76eb3-016c-488a-beb6-09fdbc42bf4b","contentType":"Category","title":"Holiday Drinks Recipes, Dishes and Ideas from Tablespoon","isFavorite":false,"linkUrl":"/courses/drinks/holiday-drinks","numberOfRatings":"0","averageRating":"0","averageRatingStars":"0","smallImageUrl":"","mediumImageUrl":""}]}};
var moduleName = 'relatedContent';
var isVueModule = true;
GeneralMills.PandoSites.RegisterControlInstance(moduleName, configuration, componentMetadata, isVueModule)
});
})();
(function() {
document.addEventListener('DOMContentLoaded', function() {
var componentMetadata = JSON.parse('\x7b\x22componentName\x22\x3a\x22RelatedContent_9930dad2-817c-4363-b508-21f459b3c521\x22,\x22deferOptions\x22\x3a\x7b\x22deferComponent\x22\x3atrue,\x22deferType\x22\x3a\x22OnDemand\x22,\x22deferId\x22\x3a\x22r7f0f663afcaa41a2ad7f77d88e6f7454\x22,\x22deferredContainerId\x22\x3a\x22\x2fmain\x2frdpRelatedContent1\x22,\x22deferredContainerView\x22\x3a\x22RecipeDetailRedesign\x22\x7d,\x22viewName\x22\x3a\x22RelatedContent\x22\x7d');
var configuration = {"dataSourceId":"9930dad2-817c-4363-b508-21f459b3c521","isCurrentUserAnonymous":true,"isAnonymousUserWithFavorites":false,"relatedContentList":{"contentId":"e2f48633-d9e8-4717-bc29-cfec029513ab","listSettings":{"pageSize":6,"startPage":1,"listType":1,"title":"","useModalRegistration":false,"regAction":"","esrcCode":0,"favoriteButtonLabelFormat":"Add {0} to favorites","contentTypes":[],"showImages":true,"imageSize":1,"showRatings":false,"allowFavoriting":true,"cssClassName":"","favoriteButtonText":"Save"},"items":[{"contentId":"8ecb9373-6dfb-4c39-a7a2-b3cb9eed078f","contentType":"Recipe","title":"Thanksgiving Turkey Cake","isFavorite":false,"linkUrl":"/recipes/thanksgiving-turkey-cake/8ecb9373-6dfb-4c39-a7a2-b3cb9eed078f","numberOfRatings":"0","averageRating":"0","averageRatingStars":"0","smallImageUrl":"//mojo.generalmills.com/api/public/content/8FLbyhtU7E2cxvLGOgXjIQ_webp_base.webp?v=0fc9f7eb\u0026t=67e847e026fb43aa8d6e3f5ef39a4ef7","mediumImageUrl":"//mojo.generalmills.com/api/public/content/8FLbyhtU7E2cxvLGOgXjIQ_webp_base.webp?v=0fc9f7eb\u0026t=3653fe2f5ecd4a47a5a51c97e429947c"},{"contentId":"5ec84216-a834-4de8-b3d7-006caacf9311","contentType":"Recipe","title":"Kitty Litter Cake","isFavorite":false,"linkUrl":"/recipes/kitty-litter-cake/5ec84216-a834-4de8-b3d7-006caacf9311","numberOfRatings":"0","averageRating":"0","averageRatingStars":"0","smallImageUrl":"//mojo.generalmills.com/api/public/content/IC9Tl_2HrkqmO7N6wmZ4KQ_webp_base.webp?v=2cd2bb31\u0026t=67e847e026fb43aa8d6e3f5ef39a4ef7","mediumImageUrl":"//mojo.generalmills.com/api/public/content/IC9Tl_2HrkqmO7N6wmZ4KQ_webp_base.webp?v=2cd2bb31\u0026t=3653fe2f5ecd4a47a5a51c97e429947c"},{"contentId":"3e15f6ee-f1cd-402f-823b-32f0dba7cbc4","contentType":"Recipe","title":"Bunny Carrot Cake","isFavorite":false,"linkUrl":"/recipes/bunny-carrot-cake/3e15f6ee-f1cd-402f-823b-32f0dba7cbc4","numberOfRatings":"0","averageRating":"0","averageRatingStars":"0","smallImageUrl":"//mojo.generalmills.com/api/public/content/GfPAHCkVSEu711fFX3TkBQ_webp_base.webp?v=442d3a0a\u0026t=67e847e026fb43aa8d6e3f5ef39a4ef7","mediumImageUrl":"//mojo.generalmills.com/api/public/content/GfPAHCkVSEu711fFX3TkBQ_webp_base.webp?v=442d3a0a\u0026t=3653fe2f5ecd4a47a5a51c97e429947c"},{"contentId":"93964357-a190-4927-a3ea-8b9d9ceb463f","contentType":"Recipe","title":"Pumpkin Dump Cake","isFavorite":false,"linkUrl":"/recipes/pumpkin-dump-cake/93964357-a190-4927-a3ea-8b9d9ceb463f","numberOfRatings":"0","averageRating":"0","averageRatingStars":"0","smallImageUrl":"//mojo.generalmills.com/api/public/content/qmulmiexLES0jzMbbJzFYA_webp_base.webp?v=0d57fc8e\u0026t=67e847e026fb43aa8d6e3f5ef39a4ef7","mediumImageUrl":"//mojo.generalmills.com/api/public/content/qmulmiexLES0jzMbbJzFYA_webp_base.webp?v=0d57fc8e\u0026t=3653fe2f5ecd4a47a5a51c97e429947c"},{"contentId":"7472f05b-5f62-4129-9c42-a9c9a699df28","contentType":"Recipe","title":"Gingerbread Poke Cake","isFavorite":false,"linkUrl":"/recipes/gingerbread-poke-cake/7472f05b-5f62-4129-9c42-a9c9a699df28","numberOfRatings":"0","averageRating":"0","averageRatingStars":"0","smallImageUrl":"//mojo.generalmills.com/api/public/content/FmI5_EFSWEGAO9S6XGHwig_webp_base.webp?v=87cf74b0\u0026t=67e847e026fb43aa8d6e3f5ef39a4ef7","mediumImageUrl":"//mojo.generalmills.com/api/public/content/FmI5_EFSWEGAO9S6XGHwig_webp_base.webp?v=87cf74b0\u0026t=3653fe2f5ecd4a47a5a51c97e429947c"},{"contentId":"03ff625a-be8e-4de7-8364-7f9670ec46e2","contentType":"Recipe","title":"Chocolate Covered Pumpkin Cake Pops","isFavorite":false,"linkUrl":"/recipes/chocolate-covered-pumpkin-cake-pops/03ff625a-be8e-4de7-8364-7f9670ec46e2","numberOfRatings":"0","averageRating":"0","averageRatingStars":"0","smallImageUrl":"//mojo.generalmills.com/api/public/content/EDkPQja2QEeF_vzHvhA5lw_webp_base.webp?v=13f4b921\u0026t=67e847e026fb43aa8d6e3f5ef39a4ef7","mediumImageUrl":"//mojo.generalmills.com/api/public/content/EDkPQja2QEeF_vzHvhA5lw_webp_base.webp?v=13f4b921\u0026t=3653fe2f5ecd4a47a5a51c97e429947c"}],"availableItems":[{"contentId":"8ecb9373-6dfb-4c39-a7a2-b3cb9eed078f","contentType":"Recipe","title":"Thanksgiving Turkey Cake","isFavorite":false,"linkUrl":"/recipes/thanksgiving-turkey-cake/8ecb9373-6dfb-4c39-a7a2-b3cb9eed078f","numberOfRatings":"0","averageRating":"0","averageRatingStars":"0","smallImageUrl":"//mojo.generalmills.com/api/public/content/8FLbyhtU7E2cxvLGOgXjIQ_webp_base.webp?v=0fc9f7eb\u0026t=67e847e026fb43aa8d6e3f5ef39a4ef7","mediumImageUrl":"//mojo.generalmills.com/api/public/content/8FLbyhtU7E2cxvLGOgXjIQ_webp_base.webp?v=0fc9f7eb\u0026t=3653fe2f5ecd4a47a5a51c97e429947c"},{"contentId":"5ec84216-a834-4de8-b3d7-006caacf9311","contentType":"Recipe","title":"Kitty Litter Cake","isFavorite":false,"linkUrl":"/recipes/kitty-litter-cake/5ec84216-a834-4de8-b3d7-006caacf9311","numberOfRatings":"0","averageRating":"0","averageRatingStars":"0","smallImageUrl":"//mojo.generalmills.com/api/public/content/IC9Tl_2HrkqmO7N6wmZ4KQ_webp_base.webp?v=2cd2bb31\u0026t=67e847e026fb43aa8d6e3f5ef39a4ef7","mediumImageUrl":"//mojo.generalmills.com/api/public/content/IC9Tl_2HrkqmO7N6wmZ4KQ_webp_base.webp?v=2cd2bb31\u0026t=3653fe2f5ecd4a47a5a51c97e429947c"},{"contentId":"3e15f6ee-f1cd-402f-823b-32f0dba7cbc4","contentType":"Recipe","title":"Bunny Carrot Cake","isFavorite":false,"linkUrl":"/recipes/bunny-carrot-cake/3e15f6ee-f1cd-402f-823b-32f0dba7cbc4","numberOfRatings":"0","averageRating":"0","averageRatingStars":"0","smallImageUrl":"//mojo.generalmills.com/api/public/content/GfPAHCkVSEu711fFX3TkBQ_webp_base.webp?v=442d3a0a\u0026t=67e847e026fb43aa8d6e3f5ef39a4ef7","mediumImageUrl":"//mojo.generalmills.com/api/public/content/GfPAHCkVSEu711fFX3TkBQ_webp_base.webp?v=442d3a0a\u0026t=3653fe2f5ecd4a47a5a51c97e429947c"},{"contentId":"93964357-a190-4927-a3ea-8b9d9ceb463f","contentType":"Recipe","title":"Pumpkin Dump Cake","isFavorite":false,"linkUrl":"/recipes/pumpkin-dump-cake/93964357-a190-4927-a3ea-8b9d9ceb463f","numberOfRatings":"0","averageRating":"0","averageRatingStars":"0","smallImageUrl":"//mojo.generalmills.com/api/public/content/qmulmiexLES0jzMbbJzFYA_webp_base.webp?v=0d57fc8e\u0026t=67e847e026fb43aa8d6e3f5ef39a4ef7","mediumImageUrl":"//mojo.generalmills.com/api/public/content/qmulmiexLES0jzMbbJzFYA_webp_base.webp?v=0d57fc8e\u0026t=3653fe2f5ecd4a47a5a51c97e429947c"},{"contentId":"7472f05b-5f62-4129-9c42-a9c9a699df28","contentType":"Recipe","title":"Gingerbread Poke Cake","isFavorite":false,"linkUrl":"/recipes/gingerbread-poke-cake/7472f05b-5f62-4129-9c42-a9c9a699df28","numberOfRatings":"0","averageRating":"0","averageRatingStars":"0","smallImageUrl":"//mojo.generalmills.com/api/public/content/FmI5_EFSWEGAO9S6XGHwig_webp_base.webp?v=87cf74b0\u0026t=67e847e026fb43aa8d6e3f5ef39a4ef7","mediumImageUrl":"//mojo.generalmills.com/api/public/content/FmI5_EFSWEGAO9S6XGHwig_webp_base.webp?v=87cf74b0\u0026t=3653fe2f5ecd4a47a5a51c97e429947c"},{"contentId":"03ff625a-be8e-4de7-8364-7f9670ec46e2","contentType":"Recipe","title":"Chocolate Covered Pumpkin Cake Pops","isFavorite":false,"linkUrl":"/recipes/chocolate-covered-pumpkin-cake-pops/03ff625a-be8e-4de7-8364-7f9670ec46e2","numberOfRatings":"0","averageRating":"0","averageRatingStars":"0","smallImageUrl":"//mojo.generalmills.com/api/public/content/EDkPQja2QEeF_vzHvhA5lw_webp_base.webp?v=13f4b921\u0026t=67e847e026fb43aa8d6e3f5ef39a4ef7","mediumImageUrl":"//mojo.generalmills.com/api/public/content/EDkPQja2QEeF_vzHvhA5lw_webp_base.webp?v=13f4b921\u0026t=3653fe2f5ecd4a47a5a51c97e429947c"}]}};
var moduleName = 'relatedContent';
var isVueModule = true;
GeneralMills.PandoSites.RegisterControlInstance(moduleName, configuration, componentMetadata, isVueModule)
});
})();


© 2026 ®/TM General Mills All Rights Reserved